L2TP
CLI reference:/interface/l2tp-client/interface/l2tp-server/interface/l2tp-server/server/interface/l2tp-ether
This section covers L2TP examples. Use it to configure LAC and LNS scenarios and related L2TP interoperability cases.
Layer Two Tunneling Protocol "L2TP" extends the PPP model by allowing the L2 and PPP endpoints to reside on different devices interconnected by a packet-switched network. L2TP includes PPP authentication and accounting for each L2TP connection. Full authentication and accounting of each connection may be done through a RADIUS client or locally. L2TP traffic uses the UDP protocol for both control and data packets. UDP port 1701 is used only for link establishment, further traffic uses any available UDP port (which can be different from 1701). This means that L2TP can be used with most firewalls and routers (even with NAT) by allowing UDP traffic through the firewall or router. The L2TP standard is defined in RFC 2661. L2TPv3 support was added in version 7.1. It supports IPv4 and IPv6.
Introduction
L2TP can be used as any other tunneling protocol with or without encryption. The L2TP standard says that the most secure way to encrypt data is with L2TP over IPsec (this is the default mode for the Microsoft L2TP client), as all L2TP control and data packets for a particular tunnel appear as homogeneous UDP/IP data packets to the IPsec system.
Multilink PPP (MP) is supported to provide MRRU (the ability to transmit full-sized 1500 and larger packets) and bridging over PPP links with Bridge Control Protocol (BCP), which allows sending raw Ethernet frames over PPP links. This allows setting up bridging without EoIP. The bridge should either have an administratively set MAC address or an Ethernet-like interface in it, as PPP links do not have MAC addresses.
L2TP does not provide encryption mechanisms for tunneled traffic. IPsec can be used for additional security layers.
Quick Example
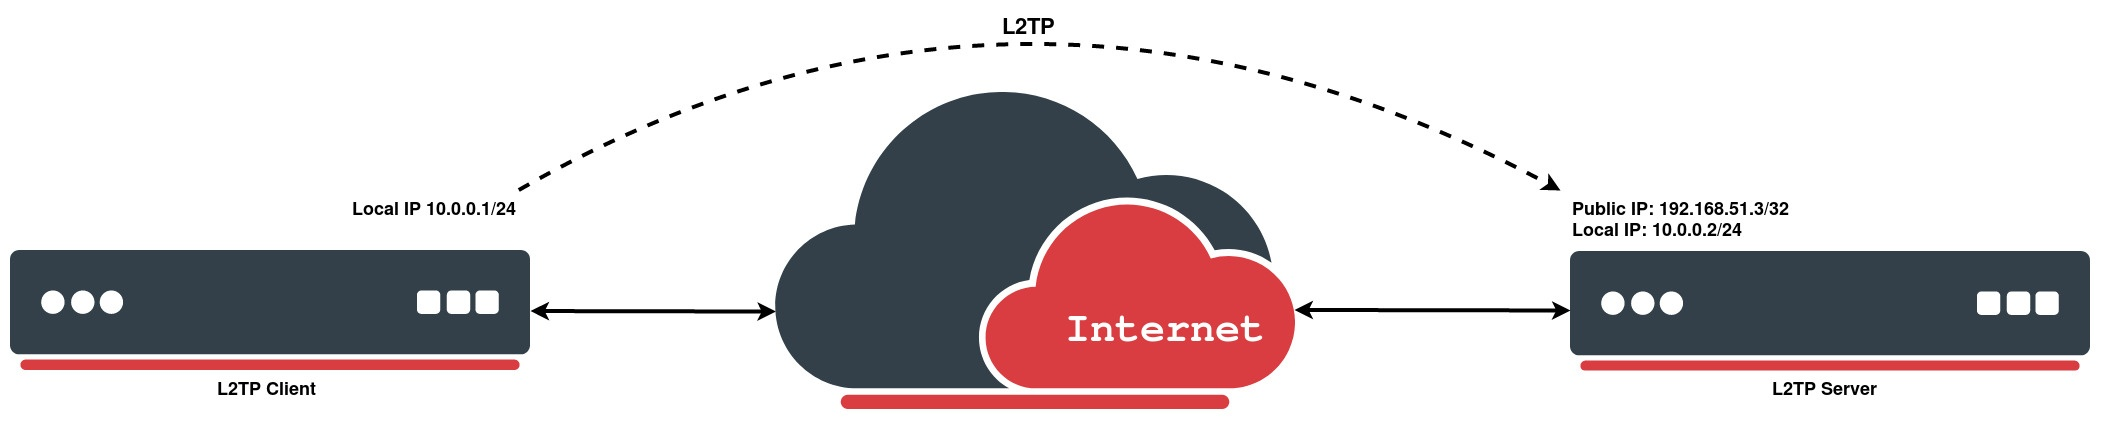
L2TP Server
On the server side, enable L2TP-server and create a PPP profile for a particular user:
[admin@MikroTik] > /interface/l2tp-server/server/set enabled=yes
[admin@MikroTik] > /ppp/secret/add local-address=10.0.0.2 name=MT-User password=StrongPass profile=default-encryption remote-address=10.0.0.1 service=l2tp
L2TP Client
This example configures an L2TP client with username "MT-User", password "StrongPass" and server 192.168.51.3:
[admin@MikroTik] > /interface/l2tp-client \
add connect-to=192.168.51.3 disabled=no name=MT-User password=StrongPass user=MT-User
[admin@MikroTik] > /interface/l2tp-client/print
Flags: X - disabled, R - running
0 R name="MT-User" max-mtu=1450 max-mru=1450 mrru=disabled connect-to=192.168.51.3 user="MT-User"
password="StrongPass" profile=default-encryption keepalive-timeout=60 use-ipsec=no ipsec-secret=""
allow-fast-path=no add-default-route=no dial-on-demand=no allow=pap,chap,mschap1,mschap2
L2TP Ether
Overview
Layer 2 Tunnel Protocol Version 3 (L2TPv3) is defined by RFC 3931 from the Internet Engineering Task Force (IETF). It introduces various improvements to the original L2TP, allowing the encapsulation of Layer 2 (L2) payloads within L2TP for use in L2 virtual private networks (VPNs). An L2TP Ether tunnel transports raw Ethernet frames (an Ethernet pseudowire, Pseudowire-Type 5) between two endpoints.
To establish an L2TP Ether tunnel, the L2TP Ether interface must be created on the client side, while the L2TP server must be enabled on the remote (server) side. Once both sides are configured correctly, a dynamic interface is automatically created between them, forming a transparent Layer 2 connection across the IP network.
L2TP Ether can encapsulate over UDP (l2tp-proto-version=l2tpv3-udp, the default) or directly over IP (l2tp-proto-version=l2tpv3-ip). Both IPv4 and IPv6 overlay networks are supported; connect-to accepts either an IPv4 or an IPv6 address.
Topology and roles
An L2TP Ether tunnel has two distinct roles:
- Active (client) side — you create an
/interface/l2tp-etherentry withconnect-to=pointing at the server. This side initiates the L2TPv3 control connection and the Ethernet session. - Passive (server) side — you only enable the L2TP server (
/interface/l2tp-server/server). When the active side connects, RouterOS automatically creates a dynamicl2tp-etherinterface (flagD) on the server; you do not configure one by hand there.
Typically you add both interfaces to a bridge so the two sites share a Layer 2 domain.
Configuration Example
This example establishes an L2TP Ether tunnel between two routers.
Server Side (L2TP Server)
/interface/l2tp-server/server/set enabled=yes
Client Side (L2TP Ether Interface)
/interface/l2tp-ether/add connect-to=1.1.1.1 disabled=no
Verify the session on the active side (example output):
[admin@MikroTik] > /interface/l2tp-ether/print
Flags: X - disabled, R - running, D - dynamic, u - unmanaged
 0 R name="l2tp-ether1" mac-address=02:3D:2B:00:00:00 connect-to=1.1.1.1 ...
On the passive side, a dynamic interface (flag D) appears automatically once the tunnel is up (example output):
[admin@MikroTik] > /interface/l2tp-ether/print
Flags: X - disabled, R - running, D - dynamic, u - unmanaged
 0 DR name="l2tp-ether1" mac-address=02:3D:2B:00:00:01 connect-to=0.0.0.0 ...
Server-side session acceptance
Whether the server accepts an incoming Ethernet session is controlled by the L2TP server settings in /interface/l2tp-server/server. See the CLI reference for the full property list.
| Setting | What it controls |
|---|---|
max-sessions | Maximum number of concurrent L2TP sessions on the server. Once the limit is reached, the server rejects new sessions. |
accept-proto-version | Which L2TP protocol versions to accept (all, l2tpv2, l2tpv3). |
accept-pseudowire-type | Which pseudowire types to accept (all, ether, ppp). This must allow ether for an L2TP Ether tunnel. |
l2tpv3-ether-interface-list | The interface list the dynamic Ethernet pseudowire endpoints are attached to. |
l2tpv3-circuit-id | The L2TPv3 circuit identifier the server uses for incoming sessions. |
l2tpv3-cookie-length | The L2TPv3 cookie length the server advertises. |
l2tpv3-digest-hash | The L2TPv3 digest hash algorithm the server uses. |
Matching circuit-id and cookies
When the server sets l2tpv3-circuit-id, l2tpv3-cookie-length or l2tpv3-digest-hash, corresponding values are expected on the client-side l2tp-ether entry (circuit-id, cookie-length, digest-hash). If these do not align, the session may fail even though the control connection comes up — check that both ends agree. See the L2TP Ether CLI reference for the client-side properties.
Verify and troubleshoot
If the L2TP control connection comes up but the Ethernet session is immediately torn down, the tunnel will not work even though the transport appears healthy.
| Symptom | Likely cause | Check |
|---|---|---|
Log shows maximum session count reached, then CDN (Result-Code=4) and the tunnel disconnects | Session rejected when the server session limit is reached — a common cause to check, not a guaranteed diagnosis | Confirm max-sessions on /interface/l2tp-server/server is not limiting new sessions |
| Session rejected, no dynamic interface on the server | Pseudowire or protocol type not accepted | accept-pseudowire-type should allow ether; accept-proto-version should allow l2tpv3 |
| No dynamic interface on the passive side | The interface list does not cover the tunnel endpoint | Review l2tpv3-ether-interface-list |
| Session establishes but no traffic passes | circuit-id / cookie-length / digest-hash not aligned between client and server | Compare the l2tp-ether and l2tp-server settings |
Inspect a live session at any time with the monitor command:
/interface/l2tp-ether/monitor l2tp-ether1