RAID
This feature requires the Storage package.
RAID (Redundant Array of Independent Disks) technology allows storing data on multiple drives - improving data transfer performance, data protection or both by combining them into logical units.
In the case of a RAID disk failure, a rebuild begins automatically once the failed drive is replaced.
RouterOS supports software RAID levels 0, 1, 4, 5, 6, linear, and nested RAID.
Setting a hot spare disk
This page explains how to configure a hot spare disk for a RAID array in RouterOS, enabling automatic rebuild on disk failure by assigning a spare disk to the RAID setup.
Moving your RAID array to a different device
This page explains how to move a RAID 5 array from an old device to a new one by creating the RAID on the new device, assigning member slots, ejecting disks from the old device, and finally transferring them to the new device where RouterOS automatically mounts the RAID.
Properties
| Property | Description |
|---|---|
| raid-type | RAID type used (levels 0,1,4,5,6,linear and nested RAID.) |
| raid-chunk-size | The size of the chunks or stripes used in the RAID array. |
| raid-device-count | The number of devices (disks) included in the RAID array. |
| raid-master | Created RAID master block device that the disks are added to. |
| raid-max-component-size | The maximum size of an individual component or disk in the RAID array. |
| raid-member-failed | Sets the drive in a failed state in the RAID array. Used if there is a need to change a non-failed drive |
| raid-role | Defines the role of each device within the RAID array. |
| raid-scrub | Verifies and repairs data integrity across the RAID array. |
Configuration example (RAID6)
This is an example on how to configure RAID. It will be the same procedure for most RAID types
Create the RAID block device (in this example, RAID 6)
add raid-device-count=20 raid-type=6 slot=raid1 type=raid
Add drives to this raid
set nvme1 raid-master=raid1 raid-role=0
set nvme2 raid-master=raid1 raid-role=1
set nvme3 raid-master=raid1 raid-role=2
set nvme4 raid-master=raid1 raid-role=3
set nvme5 raid-master=raid1 raid-role=4
set nvme6 raid-master=raid1 raid-role=5
set nvme7 raid-master=raid1 raid-role=6
set nvme8 raid-master=raid1 raid-role=7
set nvme9 raid-master=raid1 raid-role=8
set nvme10 raid-master=raid1 raid-role=9
set nvme11 raid-master=raid1 raid-role=10
set nvme12 raid-master=raid1 raid-role=11
set nvme13 raid-master=raid1 raid-role=12
set nvme14 raid-master=raid1 raid-role=13
set nvme15 raid-master=raid1 raid-role=14
set nvme16 raid-master=raid1 raid-role=15
set nvme17 raid-master=raid1 raid-role=16
set nvme18 raid-master=raid1 raid-role=17
set nvme19 raid-master=raid1 raid-role=18
set nvme20 raid-master=raid1 raid-role=19
Format the RAID block device
/disk> format raid1 file-system=ext4
And the result should look similar to this
21 BM        type=raid slot="raid1" slot-default="" parent=none uuid="f457bc79-7408-489b-8850-85923e900452" fs=ext4 model="RAID6 2-parity-disks"
             size=17 283 541 893 120 free=17 283 538 190 336 raid-type=6 raid-device-count=20 raid-max-component-size=none raid-chunk-size=1M raid-master=none
             raid-state="clean" nvme-tcp-export=no iscsi-export=no nfs-sharing=no smb-sharing=no media-sharing=no media-interface=none
Avoid using multiple partitions on a single physical disk in multiple RAID arrays. Using the same physical disk in multiple RAID arrays can result in low performance.
Example: RAID check
It is extremely important to monitor your RAID array for failures. There are multiple ways to do it, but the simplest way is to create a script that sends an e-mail whenever a RAID member has failed. You can use the following script as a working example:
/system/scheduler
add interval=30s name=MRaidHealthCheckCall on-event=MraidHealthCheck policy=ftp,read,write,,test,sniff start-time=startup
/system/script
add dont-require-permissions=no name=MraidHealthCheck owner=admin policy=ftp,read,write,,test,sniff source=":global CheckRAID;\
\n:local sysadmin; \
\n\
\n:set \$sysadmin \"<servername@domain.tld>\";\
\n\
\n:local temp [/disk/print count-only where raid-member-failed];\
\n:if ( \$temp > 0 ) do={\
\n :if ( \$CheckRAID < 1 ) do={\
\n /log/info message=\"ERROR: RAID has failed!\";\
\n /tool/e-mail/send to= \$sysadmin subject=([/system/identity/get name].\" RAID failed\") body=(\"Go check it! Value: \".\$temp);\
\n :set \$CheckRAID 7;\
\n :delay 5s;\
\n }\
\n } \
\n :if ( \$CheckRAID > 0 ) do={\
\n :set \$CheckRAID ( \$CheckRAID -1 );\
\n }\
\n"
You will also need to configure your RouterOS device's e-mail server settings:
/tool/e-mail
set from=<raidcheck@domain.tld> port=587 server=smtp.domain.com tls=starttls
Make sure you configure your e-mail server's settings under /tool/e-mail and change the e-mail address in the script above with the values that match your e-mail server's settings.
RAID types
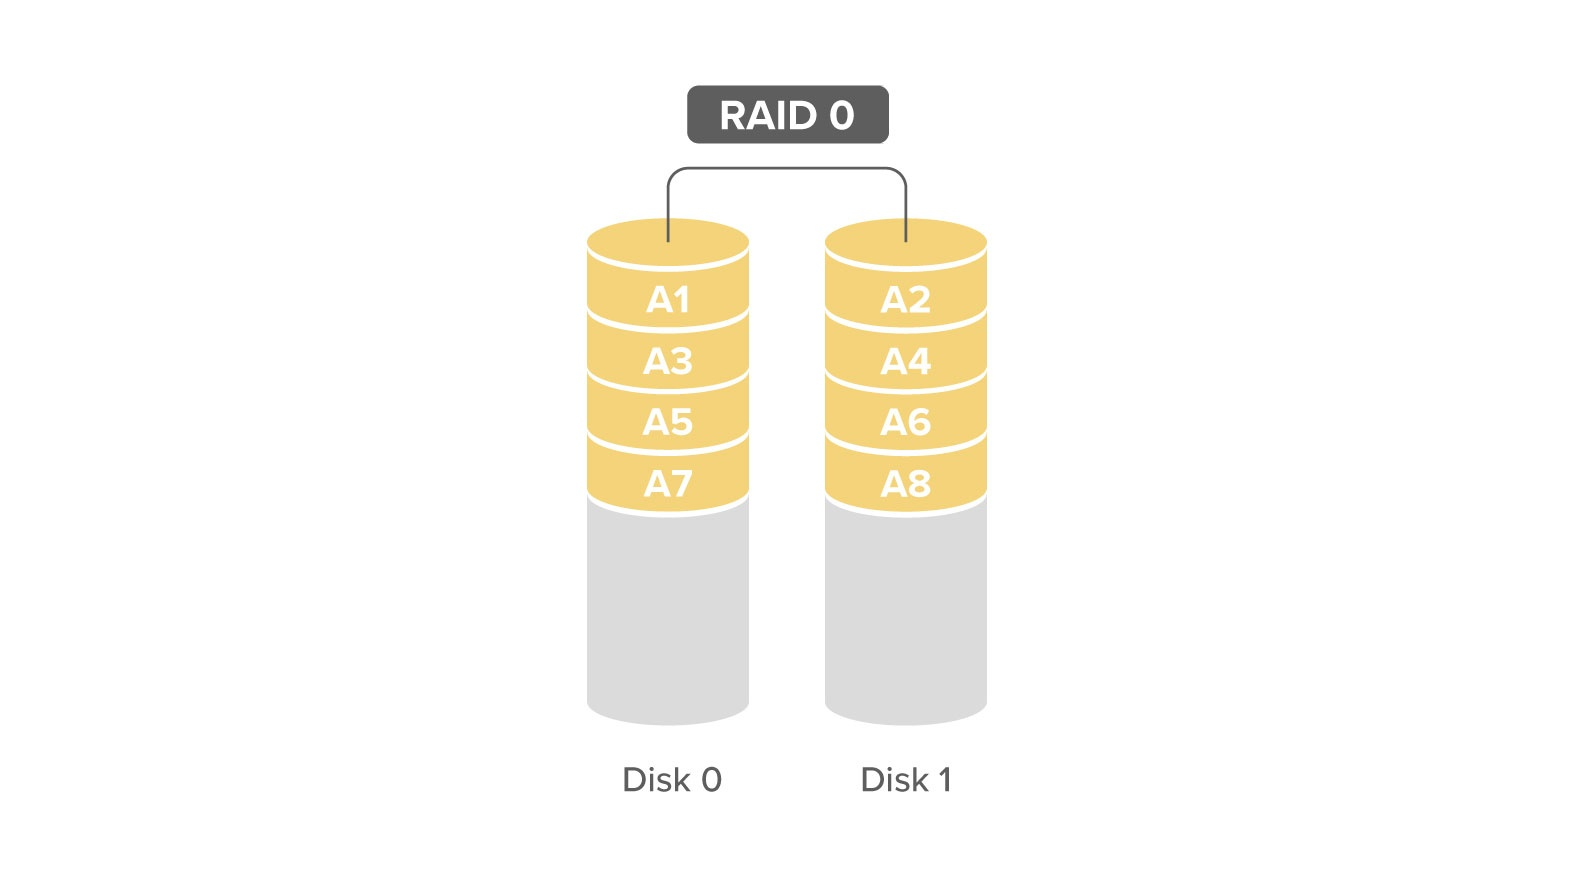
RAID 0
All data is written evenly over all disks in this RAID, this configuration does not provide any fault tolerance but provides best performance.
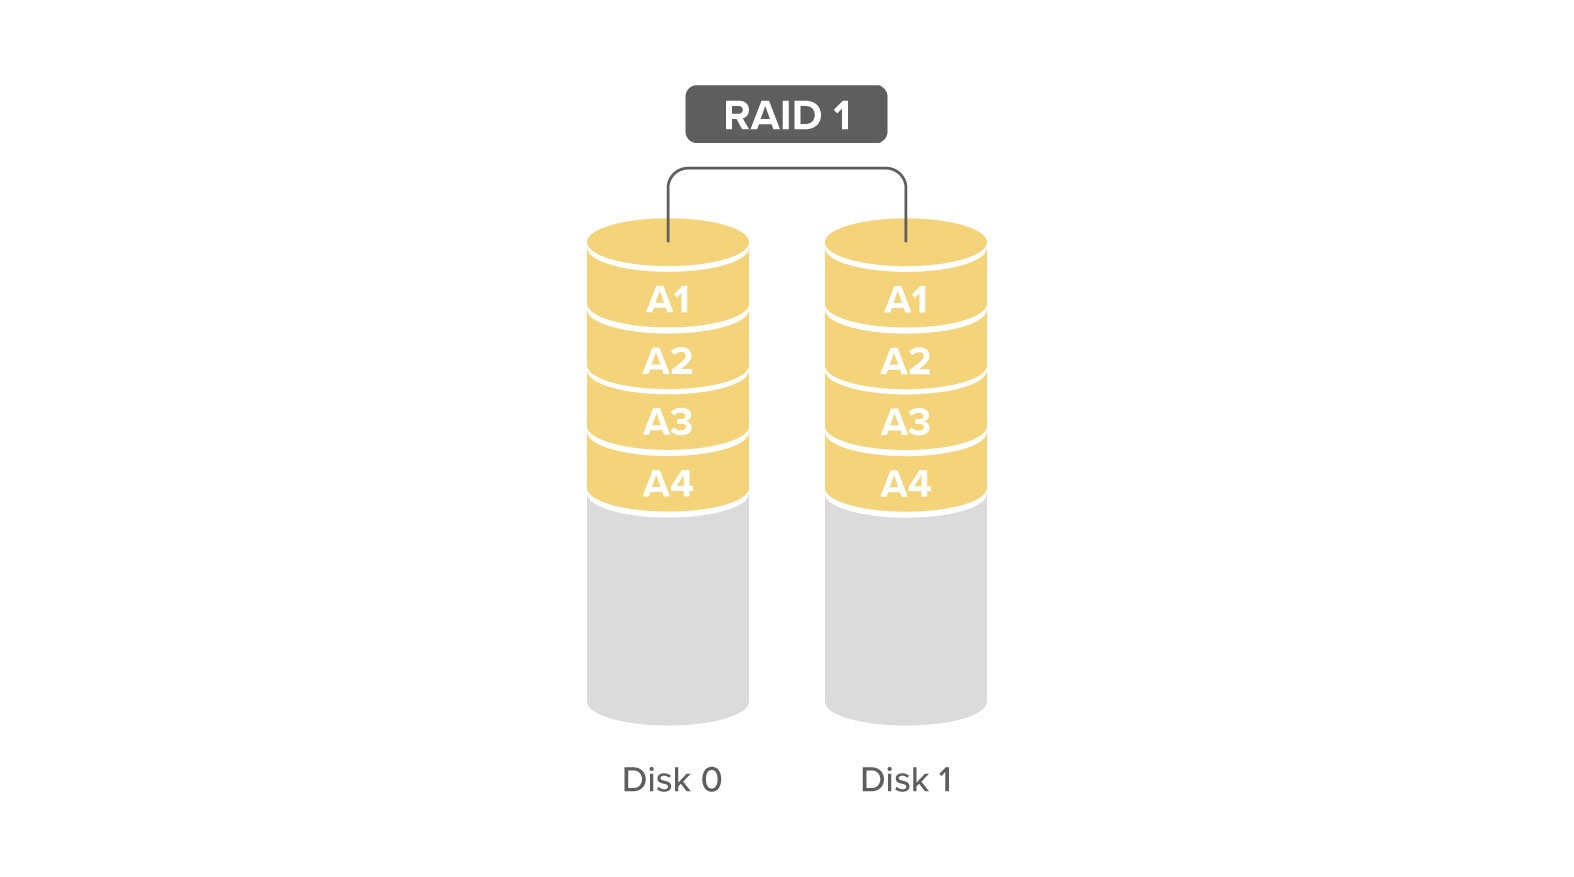
RAID 1
The same data is written to all drives (data is mirrored), this configuration provides best fault tolerance, but performance-wise write speeds will be equal to the slowest disk used in the array.
RAID 4
Block-level data is striped across data disks, with parity bits stored on a dedicated disk. Performance will be limited to the parity writing speed.

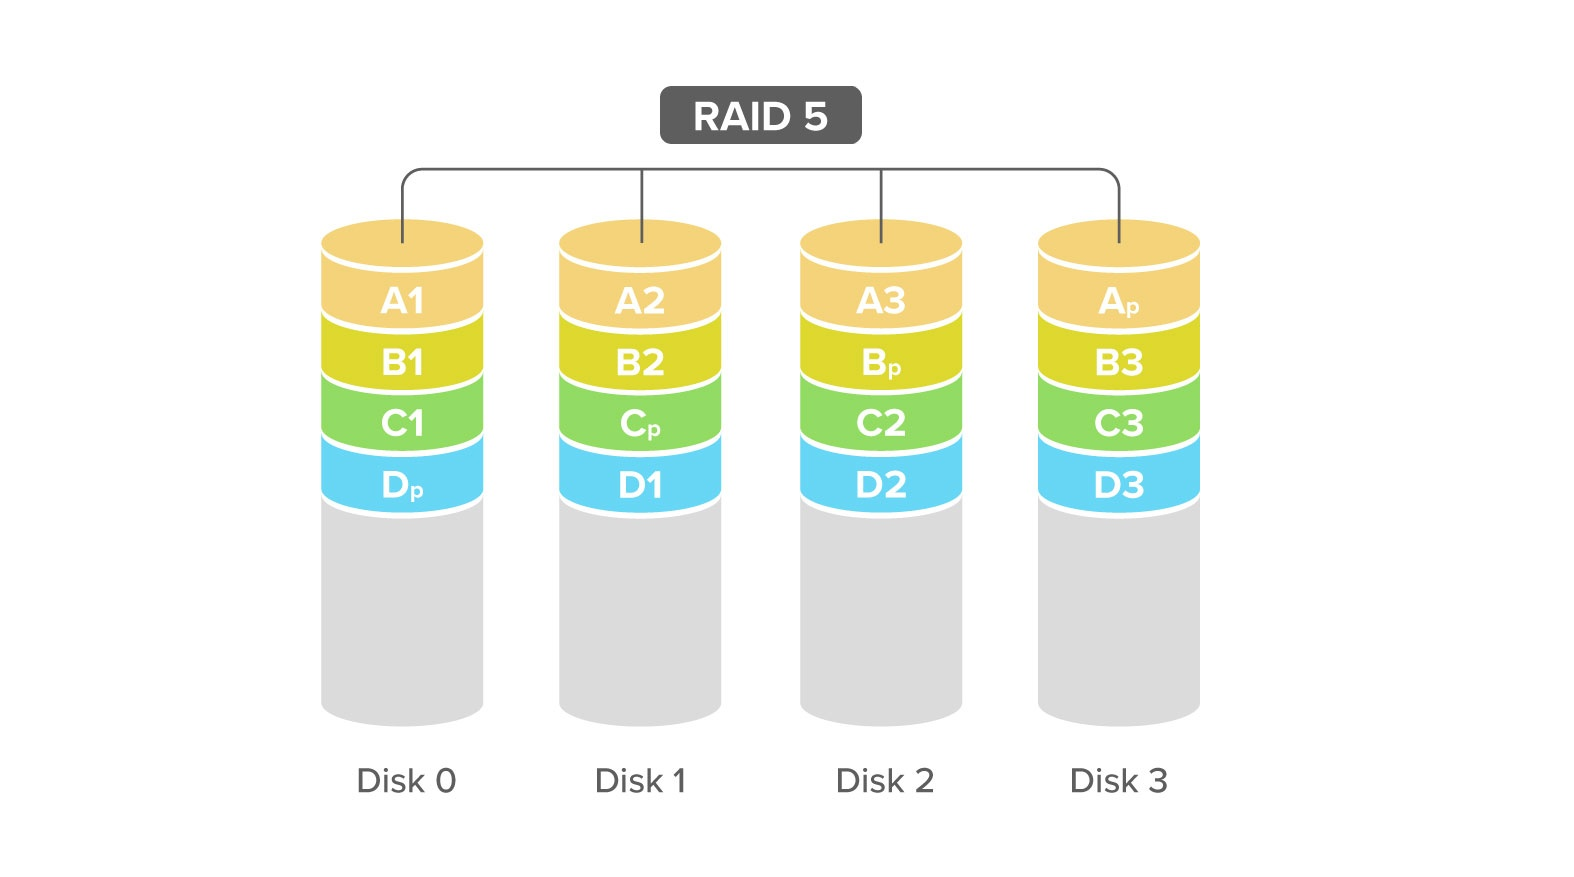
RAID 5
Block-level data is striped evenly over the available disks. It can be recovered from 1 disk failure.
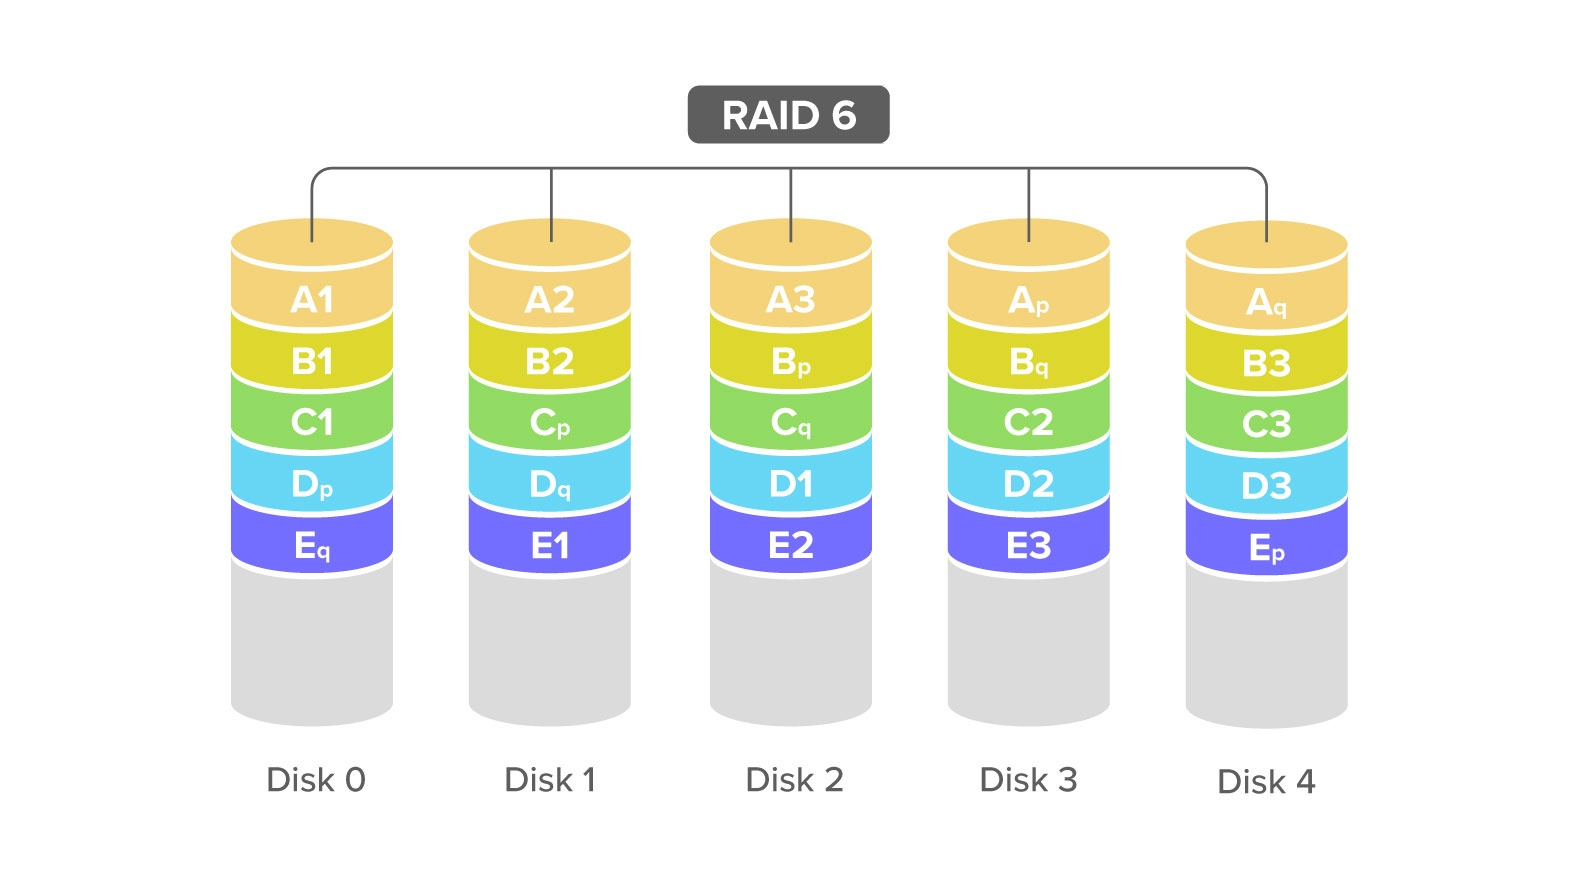
RAID 6
Block-level data is striped evenly over the available disks. It can be recovered from 2 disk failures.
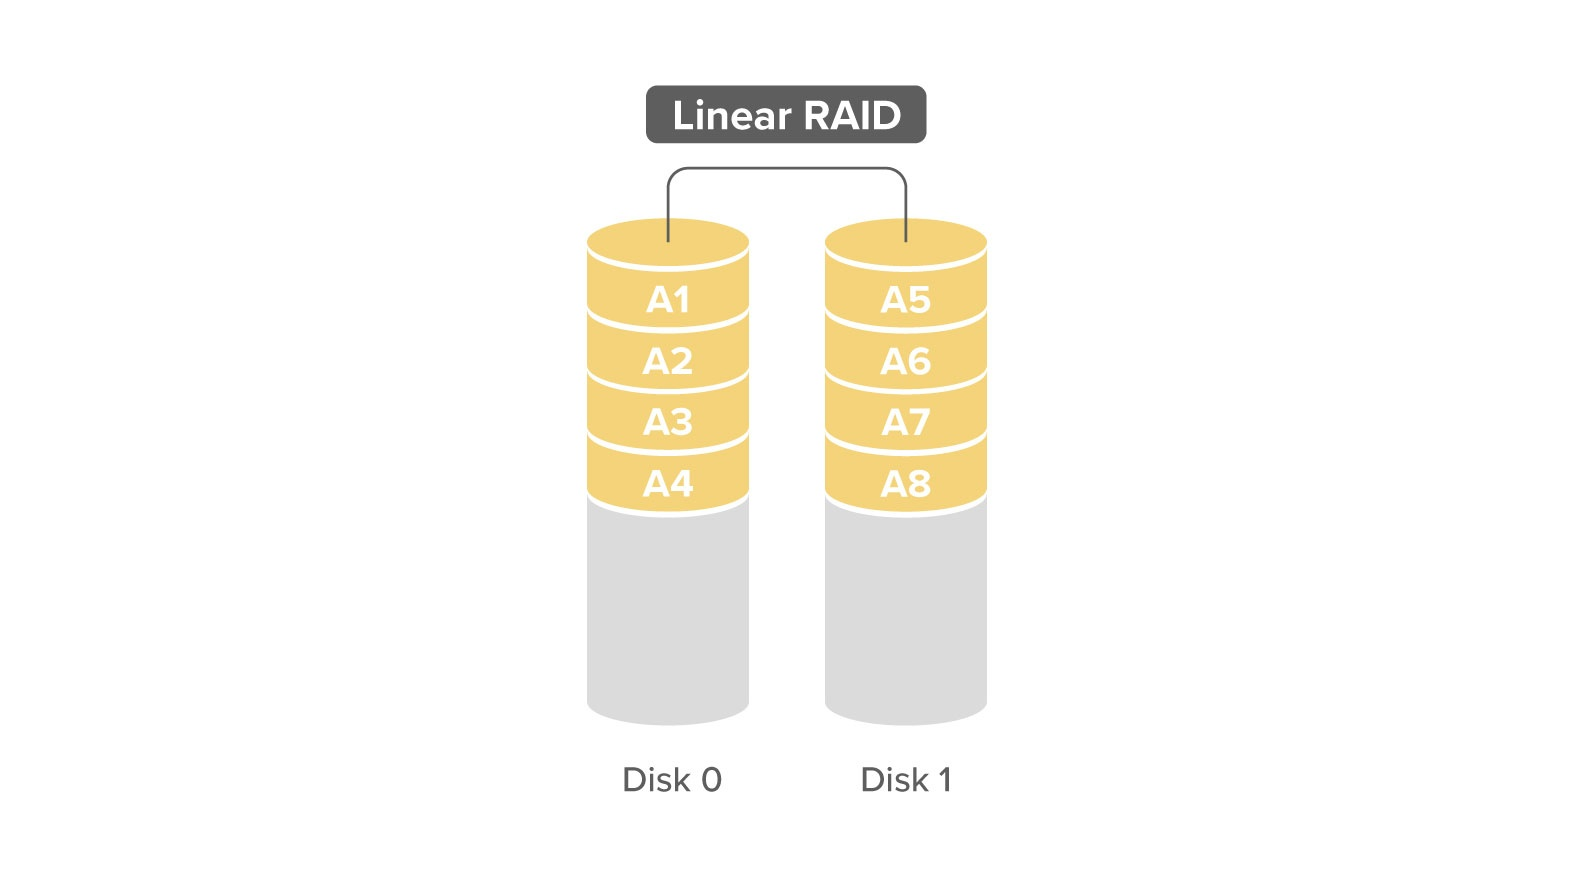
RAID Linear
Data is appended over multiple disks combining them into a single large disk. Provides no redundancy and is limited to the single disk read/write speed.
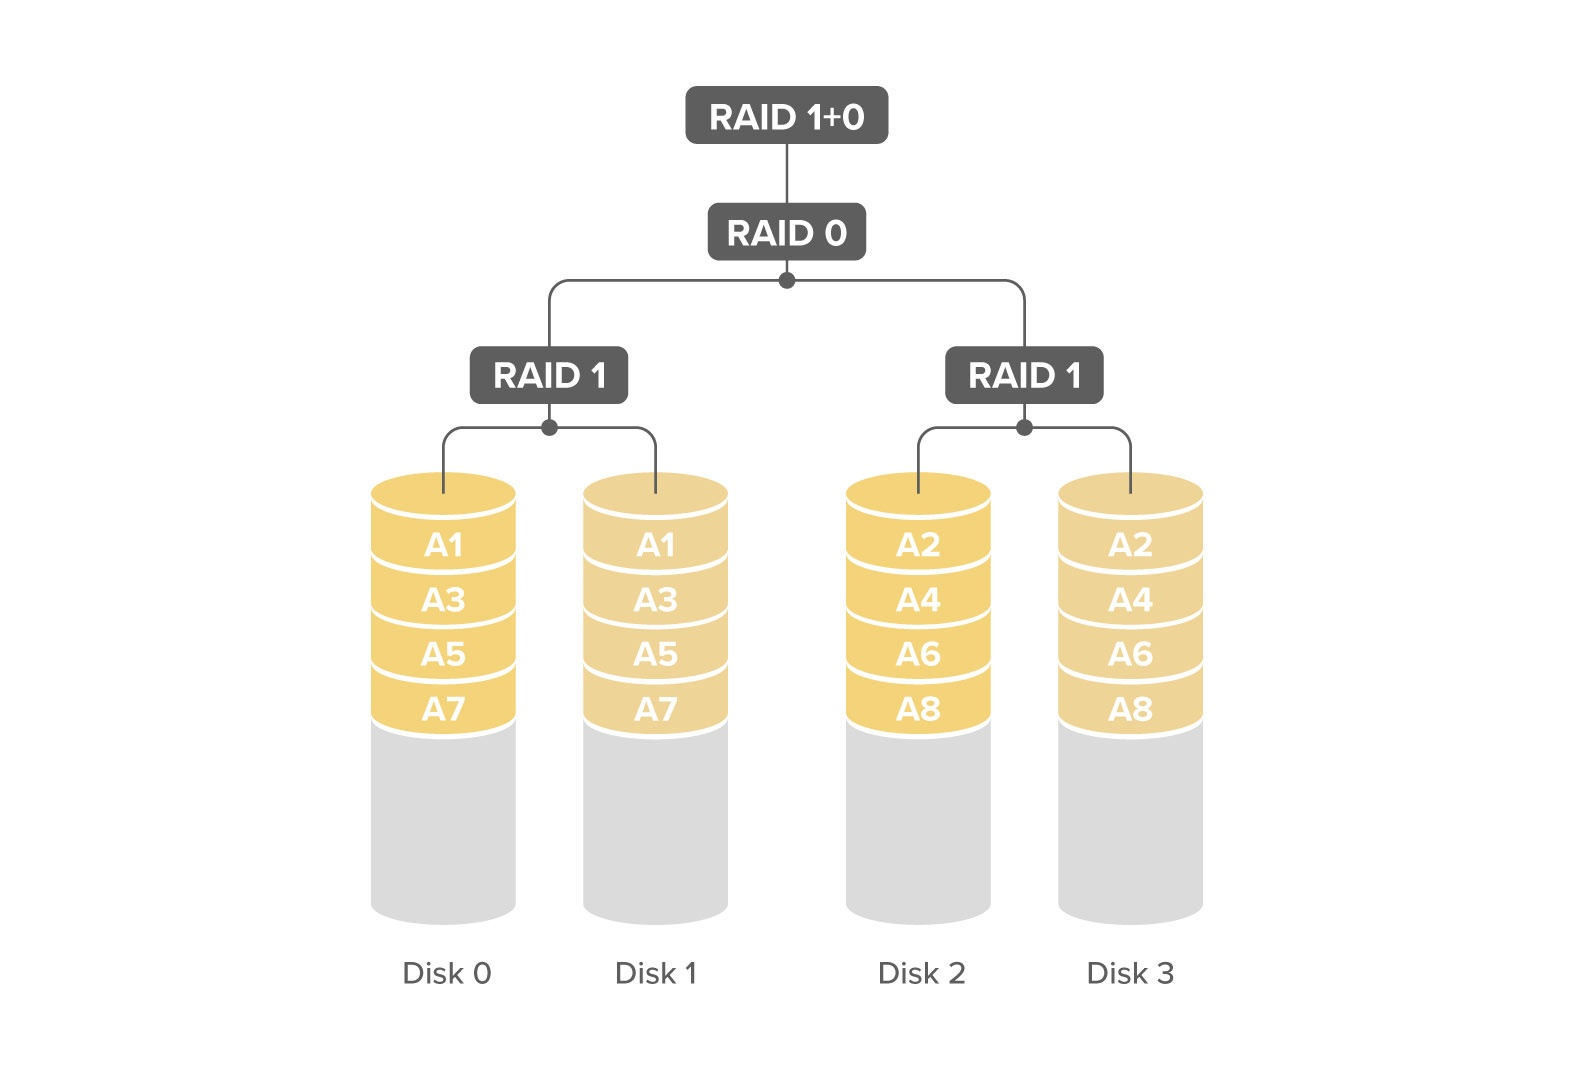
Nested RAID
Combination of multiple RAID configurations into another RAID. For example RAID 10 (RAID 1+0) combines disk mirroring (RAID 1) and disk striping (RAID 0)
Configuration example
In this example I'm using 10 SSD drives and configuring in RAID (RAID 1+0)
Create a RAID 0 block
add raid-device-count=5 raid-type=0 slot=raid10 type=raid
Create five RAID 1 blocks, each containing 2 devices and add them to set the master-raid to the previously created RAID 0 block (name=raid10)
add raid-device-count=2 raid-master=raid10 raid-role=0 raid-type=1 slot=raid0 type=raid
add raid-device-count=2 raid-master=raid10 raid-role=1 raid-type=1 slot=raid1 type=raid
add raid-device-count=2 raid-master=raid10 raid-role=2 raid-type=1 slot=raid2 type=raid
add raid-device-count=2 raid-master=raid10 raid-role=3 raid-type=1 slot=raid3 type=raid
add raid-device-count=2 raid-master=raid10 raid-role=4 raid-type=1 slot=raid4 type=raid
Add drives to each RAID block
set nvme1 raid-master=raid0 raid-role=0
set nvme3 raid-master=raid1 raid-role=0
set nvme5 raid-master=raid2 raid-role=0
set nvme7 raid-master=raid3 raid-role=0
set nvme9 raid-master=raid4 raid-role=0

set nvme2 raid-master=raid0 raid-role=1
set nvme4 raid-master=raid1 raid-role=1
set nvme6 raid-master=raid2 raid-role=1
set nvme8 raid-master=raid3 raid-role=1
set nvme10 raid-master=raid4 raid-role=1
After this format, the raid10 block
format raid10 file-system=ext4
After formatting you should see the free space and use the block
23 BM        type=raid slot="raid10" slot-default="" parent=none uuid="ec3344f4-1662-49ab-b899-db1aaa217b0f" fs=ext4 model="RAID0 striped" size=9 601 967 652 864
             free=9 597 901 369 344 raid-type=0 raid-device-count=5 raid-max-component-size=none raid-master=none raid-state="clean" nvme-tcp-export=no
             iscsi-export=no nfs-sharing=no smb-sharing=no media-sharing=no media-interface=none
Based on this configuration you can modify the RAID 10 configuration to fit as many storage devices as you require.
Similarly it is possible to create other nested RAID configurations, keeping the same principle as showcased in the example.