CMR
CLI reference:/cmr
CMR is a centralized monitoring platform for fleets of RouterOS devices, allowing updates, monitoring, and alert management across the whole fleet.
The cmr package is supported only on devices with the arm, arm64, and x86 architectures.
Overview
CMR manages a fleet of RouterOS devices from one of them. One device runs the CMR server, and the other devices connect to it as CMR clients. From the server you see the state of the whole fleet, upgrade it, receive alerts, run commands on many devices at once, draw network maps, and provision WiFi networks and VLAN ports.
What CMR does
- Device inventory - lists every client with its identity, board, RouterOS version, installed packages, connection state, and labels.
- Fleet upgrades - upgrades groups of devices by rules: a channel or a pinned version, a schedule, an order of device groups, and a failure policy. Packages come from the MikroTik update servers or from a directory on the server.
- Alerts - watches resource usage, health sensors, availability, upgrades, interfaces, and log lines, and writes a log message, runs a script, or calls a webhook when a condition is met.
- Commands on many devices - runs a script on the selected devices and shows the output of each, and reboots, upgrades, or pairs devices.
- Dashboard - shows a live summary of the selected devices: connection state, resource usage, interfaces, traffic, and WiFi clients.
- Network topology - draws maps of the network, with links between devices built from neighbor and port data. The map is shown in the GUI.
- Application traffic - collects statistics of the applications that pass through the selected routers, usually the gateway.
- WiFi provisioning - defines WiFi networks and radio settings once and applies them to the selected access points, also per band.
- VLAN provisioning - puts selected ports of the clients into VLANs as access or trunk ports.
What CMR does not do
- CMR does not configure IP addresses, DHCP, routing, firewall, users, or other device settings. Configure them on the device with WinBox, WebFig, or the CLI. For a one-off change on many devices, use
run-script. - CMR does not edit or adopt the existing configuration of a device. It creates its own configuration objects next to it, and they take over where they overlap, for example a WiFi radio or a bridge port.
- CMR WiFi writes the configuration to each access point. It does not coordinate roaming between access points or act as a central authentication server.
How it works
- The server runs on a device with the
cmrpackage. The client is part of RouterOS, so every device can be a client, except devices with the smips and powerpc architecture. - A client finds the server through neighbor discovery or DHCP, or connects to the addresses set in
controller-addresses. The server does not need to be the gateway, and clients can connect across routed networks, including through NAT or a VPN. - Both devices must agree before a client is managed. This is called pairing. After pairing, the server collects status data from the client and sends it configuration, for example WiFi networks.
- The configuration that CMR sends is stored on the client as managed objects, marked with the Y flag. They cannot be changed on the client, and they stay in effect when the server is unreachable. Disabling the client removes them.
- Use WinBox 4 or WebFig for the CMR menus. WinBox 3 does not support them.
CMR works best with devices that run their default configuration, or a configuration close to it, for example devices taken out of the box. CMR does not adapt its objects to custom bridge, VLAN, or WiFi setups, so devices with extensive non-standard configuration can need manual adjustments before CMR provisioning works as expected.
Getting started
- Install the
cmrpackage on the device that will be the server, and enable the server with/cmr set enabled=yes. - On each device to manage, enable the client with
/cmr/client set enabled=yes. Addcontroller-addressesif the client cannot discover the server by itself. - Approve the pairing. In the default configuration the server waits for approval: the new devices are listed in
/cmr/devicewith the P flag until you runpairfor them. The Pairing section describes the options. - Assign labels to the devices, for example by site and by role, so that rules can select groups of devices.
- Create upgrade rules and alert rules for the labels.
The CMR CLI Reference provides detailed descriptions for every parameter and command in the /cmr menu on the server. The CMR-Client guide describes the client side, and the CMR-Client CLI Reference provides detailed descriptions for every parameter and command in the /cmr/client menu on the managed devices.
The CMR server is configured from the /cmr menu.
Enable the CMR server
Enable the server:
[admin@MikroTik] > /cmr set enabled=yes
After you enable the server, the router is the management controller for the connected CMR clients. The device list, including the server itself, is shown in the /cmr/device menu.
Server settings
The /cmr menu also controls how the clients find the server and what the server collects from them:
controller-addresses- server IP addresses sent to the devices when they cannot discover the server automatically through neighbor discovery (MNDP) or DHCP.track-topology- fetches routes, the WiFi registration table, the ARP table, neighbors, DHCP state, and interface states from the clients. The automatic links of network topology layouts depend on this data. Default:yes.fetch-comments- fetches the comments of interfaces, ports, and WiFi registration table entries from the clients. Default:yes.auto-labels- selects which automatic labels the server fetches from the clients: any ofversion,architecture,model,board-name,identity, andaddress, orallornone. Default:all.apptraffic-devices- selects, by labels, the devices to collect application traffic statistics from.upgrade-check-interval- how often the server checks the update servers for new versions. The minimum is 1 minute.packages-directory,packages-cache-type, andpackages-cache-limit- where the server takes and stores upgrade packages. The Upgrade sources section describes them.
For now, /cmr/get returns an empty value for settings that are not set, instead of their default.
Pairing
Pairing is established only when both devices agree to it. Each device has its own pairing-requirement setting, which defines what the remote device must do before this device accepts the pairing. Because each side has its own requirement, pairing succeeds only after the requirements of both devices have been satisfied.
Running the pair command locally always approves the pairing from this device, regardless of its configured requirement. pairing-requirement can be set to:
- none - no additional approval is required. This device accepts pairing automatically.
- password - the remote device can approve pairing by giving the username and password of a RouterOS user on this device, with the
usernameandpasswordarguments of thepaircommand. CMR has no separate pairing password. Pairing can also be approved locally with thepaircommand. - confirm - pairing must be approved locally by running the
paircommand on this device; approval from the remote side is not possible.
Think of pairing-requirement as what must happen before this device agrees to the pairing. Pairing completes only after both devices have agreed.
Typical pairing scenarios
- none suits trusted environments where devices should pair automatically as soon as they discover each other. For example, a CMR server and a client on the same managed LAN can both use none, allowing pairing to complete without user interaction.
- confirm forces explicit local approval on the server: discovering a new client is not enough by itself; an administrator must run the
paircommand on the server before it accepts that client. - password suits when remote approval is needed but physical or administrative access to both devices is inconvenient. For example, a client can use password, allowing the CMR server to satisfy the client's requirement remotely with the credentials of a user on the client.
The requirements on the two devices are independent. The client accepts pairing automatically (none), when the server gives the credentials of a user on the client (password), or only after the pair command is run on the client (confirm). Changing the requirement of an already paired client to confirm puts the pairing back into waiting-for-pairing until pair is run on the client. For example:
- CMR server: none, client: none - both devices accept automatically.
- CMR server: none, client: password - the client accepts when the server gives the credentials of a user on the client.
- CMR server: password, client: none - the server accepts when the client gives the credentials of a user on the server.
- CMR server: password, client: password - each device must satisfy the other device's password requirement, unless pairing is approved locally with the
paircommand. - CMR server: confirm, client: none - the client accepts automatically, but the
paircommand must be run on the server. - CMR server: confirm, client: password - the client accepts when the server gives the credentials of a user on the client, but the
paircommand must also be run on the server.
To start the pairing, run the pair command on one of the devices: /cmr/device/pair on the CMR server or /cmr/client/pair on the client. Pairing can also be performed by using the physical reset button: /cmr/push-button on the server or /cmr/client/push-button on the client.
Managing devices
The /cmr/device menu lists the devices managed by the server. A device appears in the list as soon as it connects to the server; until the pairing is approved it is marked with the P (pending) flag. The server itself is shown as the device with the L flag. Each entry shows the device identity, board, RouterOS version, labels, and uptime. For the devices currently connected, the print output also includes the connection address when you filter the list with where:
[admin@MikroTik] > /cmr/device/print where labels=Group2
Flags: C - CONNECTED; U - UPGRADE-AVAILABLE
Columns: IDENTITY, BOARD, VERSION, LABELS, UPTIME, ADDRESS
 #    IDENTITY  BOARD       VERSION  LABELS  UPTIME   ADDRESS
 2 CU MikroTik  RB4011iGS+  7.x      Group2  1h5m53s  192.168.1.98
 3 CU MikroTik  RB4011iGS+  7.x      Group2  1h3m8s   192.168.1.99
 9 CU MikroTik  RB4011iGS+  7.x      Group2  1h9m37s  192.168.1.100
The address of a device is the source address of its connection to the server. For a client behind NAT, it is the translated address, so several clients can show the same address.
The flags mark the device state: L the server itself, P pairing pending, C connected, S stale (no connection), and U a different version available on the device's upgrade channel. The U version can also be earlier than the installed version, for example when the device runs a testing build and its upgrade rule uses the stable channel. The /cmr/device CLI reference lists every flag and every read-only value, such as the board, serial, installed packages, alert counts, and the upgrade rule that covers the device.
Set device properties
You can change the following properties of a managed device from the server:
identity- rename the device. The new identity is applied to the device itself.labels- assign labels to group devices. Labels are the common selection mechanism across CMR: upgrade rules, alert rules,run-script, and the other device commands select devices by label.port-labels- assign labels per port. Quote the label, for exampleport-labels=ether1:"uplink". Theport-labelsof a/cmr/vlanrule select ports by these labels or by interface name.pairing-requirement- override the server's pairing requirement for a single device.
Filter the list with where on any of these properties, for example /cmr/device/print where connected or /cmr/device/print where labels=office. To remove all labels from a device, set labels to an empty value.
Labels and device selection
Labels group devices. Upgrade rules, alert rules, WiFi and VLAN provisioning, layouts, the apptraffic-devices setting, and the device commands select devices by labels.
Besides the labels you assign, each device has automatic labels, shown in the read-only auto-labels value: for example its address, architecture, model, board name, and identity. Automatic labels select devices the same way as your own labels, so labels=arm selects all devices with the arm architecture, and labels=Office-AP1 selects the device with that identity.
A labels value is a comma-separated list. Plain labels are combined with OR. A label that starts with + must also match (AND), and a label that starts with - excludes devices (AND NOT). all selects every device, including the CMR server.
| Selector | Selected devices |
|---|---|
labels=office,lab | Devices with the office label or the lab label. |
labels=office,+ap | Devices with both the office and ap labels. |
labels=office,-ap | Devices with the office label, except devices with the ap label. |
labels=office,lab,-ap | Devices with the office or lab label, except devices with the ap label. |
labels=all,-core or labels=-core | All devices except devices with the core label. |
The + and - signs must start a list element. Without the comma, labels=office+ap is a single label name. Labels that no device has are accepted without a warning, so check a selection before you rely on it, for example with show-devices of an upgrade rule or the devices count of an alert rule.
WiFi items can also select the radios of one band with a band label, and VLAN rules can select ports by port label. The WiFi configuration and VLAN provisioning sections describe them.
Run commands on devices
The device menu provides commands that operate on the selected devices, together with the read-only values they report:
run-script- run a single-line RouterOS script on each selected device and show its output. The script runs with limited permissions: commands that need thepolicypermission, for example adding a user, fail with "not enough permissions (9)".upgrade- start an upgrade job for the selected devices, regardless of the schedule of their upgrade rule.reboot- reboot the selected devices.pair- start pairing with the selected devices.wifi-logs- monitor the WiFi logs of the selected devices. Filter the entries byevent(connected,disconnected, orfailed), by client MAC address (address), bybssid, or by a time range (time-startandtime-end). The events of access points managed by CAPsMAN are logged by the CAPsMAN device and appear under it. For now, the device selection does not limit the output: the entries of all devices that log WiFi events are shown.apptraffic- application traffic monitor for the selected devices.dashboard- a live view of the selected devices.
Each command selects its devices by labels (or numbers) and reports the result per device. For example, run a command on all devices with the Group2 label:
[admin@MikroTik] > /cmr/device/run-script labels=Group2 script="/system/identity/print"
Columns: DEVICE, STATUS
DEVICE                  STATUS
MikroTik@192.168.1.98   running
MikroTik@192.168.1.99   running
MikroTik@192.168.1.100  running

Columns: DEVICE, STATUS, OUTPUT
DEVICE                  STATUS   OUTPUT
MikroTik@192.168.1.98   success   name: MikroTik
MikroTik@192.168.1.99   success   name: MikroTik
MikroTik@192.168.1.100  success   name: MikroTik
The command first lists the selected devices as running, then shows each device's STATUS and OUTPUT when the script finishes. run-script refuses an empty selection: without numbers or labels it fails with "numbers and/or labels required", and with labels that match no device it fails with "no devices selected". Here, labels follows the same label syntax as everywhere in CMR: a comma-separated list where plain labels are combined with OR, a label that starts with + must also match (AND), and a label that starts with - excludes devices (AND NOT). For example, labels=office,+ap selects devices with both labels, and labels=all,-core selects all devices except those with the core label. Without the comma, office+ap is read as a single label name.
Dashboard
The /cmr/device/dashboard command opens a live view of the selected devices: how many are connected, the CPU, memory, and disk usage, the interface state, and the traffic throughput. The view repeats every few seconds until you stop it. Press m, l, a, p, w, or s to switch between the main, alerts, devices, ports, WiFi, and resources views, D to dump the current view, and Q to quit:
[admin@MikroTik] > /cmr/device/dashboard numbers=[find where [:find $labels "Group2"]>=0]
DEVICES          TOTAL  PAIRED  ONLINE
                 3      3       3
RESOURCES                MIN  AVG  MAX
CPU        ------------  0    0    0
Memory     ===---------  33   33   34
HDD        ===========-  96   96   97
3      Ethernet
3      Enabled   =====================
3      Running   =====================
3      Wifi
3      Enabled   =====================
                              TX  RX
Total                         0   480
Uplink                        0   480
Ethernet                      0   480
Wifi                          0   0
For now, dashboard and wifi-logs return no such item when devices are selected with labels. Select the devices with numbers instead, as in the example: [find where [:find $labels "Group2"]>=0] selects the devices that have the Group2 label, and [find where identity~"Office"] selects devices by identity. The /cmr/device/dashboard CLI reference lists all its arguments.
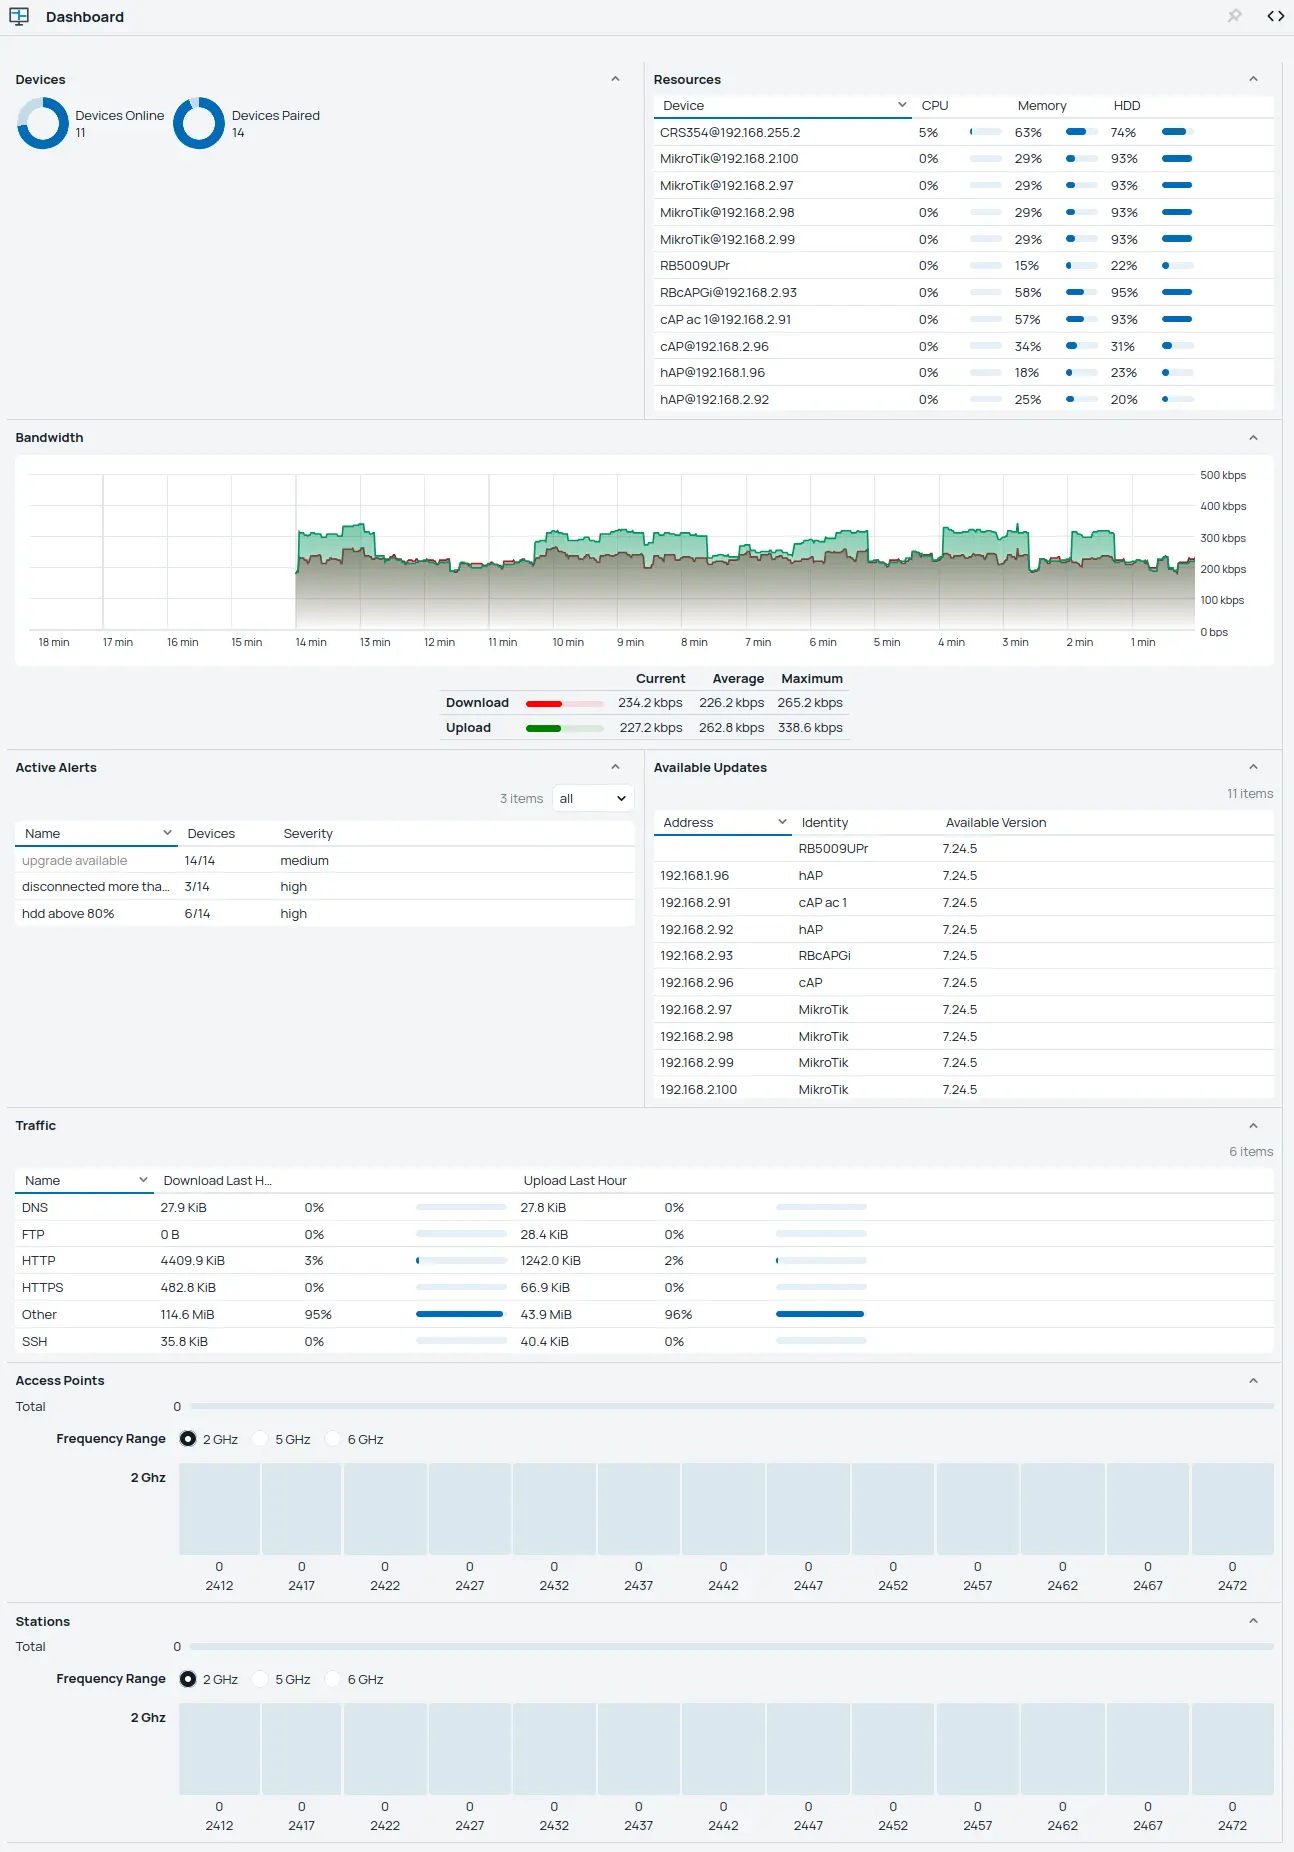
The same live view is shown in the WebFig GUI:
Dashboard sections
The dashboard is split into eight sections:
- Devices - the counts of paired and online devices. Only paired devices that are currently connected count as online, so a paired device that is offline, or a device that is not yet paired, is not shown online.
- Resources - the current CPU, memory, and disk usage of each device.
- Bandwidth - a live graph of the traffic throughput of the devices. The green area is the upload bandwidth and the red/brown area is the download bandwidth, plotted over the last few minutes. The summary shows the current, average, and maximum download and upload rates.
- Active Alerts - the alert rules that are currently fired, with the number of devices each alert is active on.
- Available Updates - the devices that have a different RouterOS version available on their upgrade channel, as offered by their upgrade rules.
- Traffic - a table of the application traffic of the devices from the application traffic classifier, for the last hour. Each row is one application with its name, the downloaded amount with the share of the total (shown as a progress bar), and the uploaded amount with its share.
- Access Points - the number of access points running on the devices. A WiFi band selector (2.4, 5, or 6 GHz) filters the view, and a bar chart shows how many access points run on each channel.
- Stations - the number of client stations connected to those access points. A WiFi band selector filters the view as for access points, and a bar chart shows how many stations are connected on each channel.
Fleet upgrades
CMR manages software upgrades for the whole fleet with upgrade rules in the /cmr/upgrade menu. An upgrade rule selects the devices it covers by labels, schedules when the upgrade runs, and defines which channel or version to install.
Upgrade rules
A rule selects the devices it covers by labels, the same labels used across CMR. If labels is omitted, the rule covers all connected devices (labels=all). A plain list combines labels with OR, and list elements that start with + or - combine them with AND and AND NOT, for example labels=all,-core.
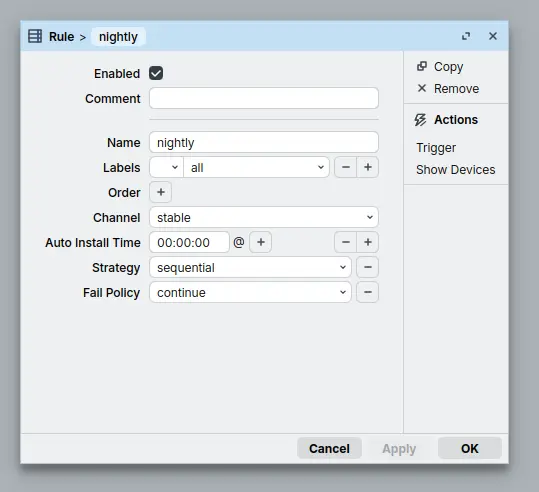
For example, this rule creates a nightly upgrade of all connected devices to the newest stable release:
[admin@MikroTik] > /cmr/upgrade/add name=nightly labels=all channel=stable schedule-time="00:00:00" strategy=sequential fail-policy=continue
Each argument sets one property of the rule:
name=nightlynames the rule. The name appears in the rule list and is used to select the rule for an immediate run.labels=allselects every connected device. Givingallexplicitly is the same as omittinglabels.channel=stableselects the upgrade channel:long-term,stable,testing, ordevelopment. To pin a specific version, set the version directly as the channel value, for examplechannel=7.24.4.strategy=sequentialupgrades the devices one after another and waits for each to finish. The alternative isparallel, which upgrades all covered devices at the same time.fail-policy=continueskips a failed device and continues with the rest.fail-policydefaults tocontinuewhen unset. The other fail policies arestopandcontinue-order.schedule-time="00:00:00"triggers this rule every day at midnight.schedule-timeis a time with an optional weekday, for example14:00:00(every day at 14:00) or00:00:00@sat(every Saturday at midnight). Multiple times are comma-separated, for example00:00:00@sat,00:00:00@sun. Separate the weekday with@: with a space, for example"14:00 sat", the weekday is dropped and the rule runs every day.
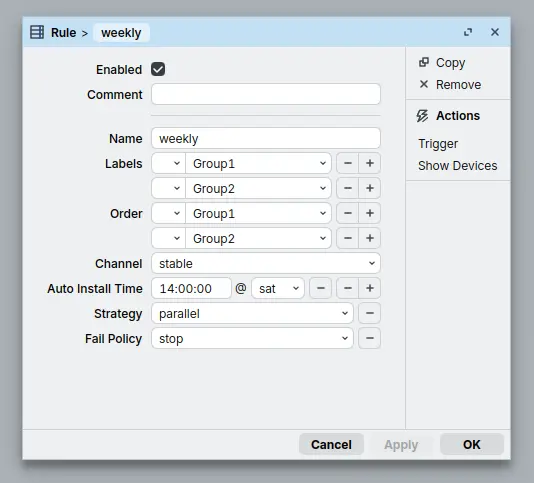
A weekly rule is created the same way. For example, this rule upgrades two label groups every Saturday at 14:00 and stops on the first failure:
[admin@MikroTik] > /cmr/upgrade/add name=weekly labels=Group1,Group2 channel=stable schedule-time="14:00:00@sat" strategy=parallel fail-policy=stop order=Group1,Group2
schedule-time="14:00:00@sat"starts the upgrade every Saturday at 14:00. The weekday comes after@and can besun,mon,tue,wed,thu,fri, orsat.order=Group1,Group2sets the label groups and the order in which they are processed.fail-policy=stopcombined withstrategy=parallelrequiresorder.fail-policy=stopstops the whole upgrade when a device fails. In this example, a failed device inGroup1stops the upgrade, andGroup2is not upgraded.
The order of the rules defines precedence. When several rules select overlapping devices (for example a labels=all rule and rules with specific labels), the first rule in the list matching a device claims the device. A labels=all rule placed first therefore covers every device, and the later rules show no devices in /cmr/upgrade/show-devices. List the specific-label rules before the labels=all rule when each label group needs its own rule, and verify the per-device assignment with show-devices.
After you enable the server, the rule list contains a dynamic rule named default (flag D, labels=all, channel=stable). It is listed after your own rules and covers the devices that no other rule claims. The rule has no schedule: it sets the channel that these devices are checked against for the U flag and available-version. If your devices run testing or development builds, create rules that cover them, so that stable is not offered to them as an upgrade.
To change the position of a rule, use move, for example /cmr/upgrade/move [find name=weekly] 0. For now, the place-before argument of add adds the new rule at the end of the list.
Running an upgrade
After you create a rule, a job is scheduled according to its schedule-time. You can start an upgrade without waiting for the schedule:
/cmr/upgrade/trigger- start the job of a chosen rule right away and upgrade its covered devices early, without waiting for the schedule-time./cmr/upgrade/job/run-next- run a scheduled job right away. The scheduled job remains scheduled and the run is added as a new job./cmr/device/upgrade- upgrade selected devices immediately, by their label, regardless of the schedule of their rule.
Only one upgrade job runs at a time. Triggering a second job while another one is in progress places the new job in the queued state until the running job finishes. Use /cmr/upgrade/version-check to see the newest version available for the channels configured in your upgrade rules.
Upgrade sources
The server checks the MikroTik update servers for the newest version of each channel used by an upgrade rule. /cmr/upgrade/version-check shows the result, and a connected device shows the newest available version in the read-only available-version parameter of the /cmr/device menu. The upgrade-check-interval setting in the /cmr menu controls how often the check runs.
The server downloads the package files when an upgrade runs and the needed version is not already available locally, stores them, and sends them to the devices; the periodic version check only looks up which versions are available. The /cmr menu has the cache settings: packages-cache-type selects whether downloaded packages are stored on the server's storage (directory, in a cmrcache subdirectory of packages-directory) or in RAM (memory), and packages-cache-limit sets the maximum cache size in megabytes. When the cache is full, the server evicts older entries to make room for a newly downloaded package.
To let the server serve packages of your own, place the .npk files in a directory on the server's file system and set packages-directory to that directory. Packages are resolved individually: a package already in the directory for the required version is served from there without redownloading, and only the missing packages are downloaded into the cache.
Use a package directory to install versions that the update servers do not offer. Place the packages of every architecture and every installed package of the covered devices in the directory, select it as packages-directory, and set the version as the channel. For example, for devices with the arm architecture and the wifi-qcom package:
[admin@MikroTik] > /file add name=cmr-packages type=directory
Upload routeros-<version>-arm.npk and wifi-qcom-<version>-arm.npk into cmr-packages, for example with SFTP, then select the directory and upgrade the devices:
[admin@MikroTik] > /cmr set packages-directory=cmr-packages/
[admin@MikroTik] > /cmr/device/upgrade labels=testgroup channel=7.24.4
The packages-directory value is selected from the existing directories and ends with /. For now, changing packages-directory restarts CMR on the server and all clients reconnect, so start upgrade jobs after the clients show as connected again in /cmr/device.
A version set as the channel is installed even when it is earlier than the installed version, so a pinned channel can downgrade devices.
Job states and results
Jobs are listed in the /cmr/upgrade/job menu and represent a single upgrade run. A job goes through the states scheduled, queued, waiting devices, version check, processing, and finally done or cancelled. The success counter is upgraded/total, for example 6/7.
The success counter counts only the devices the job actually upgraded. The job does not upgrade when a device covered by the rule is already on the target version (left pending with the note no upgrade available) or is disabled. For now, a device is also left pending with the error no upgrade available when the packages for a pinned version are neither in packages-directory nor on the update servers.
A job can be removed to cancel it. Remove a job with /cmr/upgrade/job/remove. Removing a queued job marks it cancelled. Removing a processing job stops the run and marks the remaining devices cancelled. An interrupted install is still able to finish when the device reboots.
Strategy and failure handling
strategy controls how the covered devices are upgraded. The optional order splits the covered devices into label groups and defines the sequence in which the groups are processed.
- Parallel - upgrades all covered devices at the same time. Combined with
order, the devices within one label group upgrade together, and the groups are processed one after another in the order given byorder. - Sequential - upgrades the devices one after another and waits for each to finish. Combined with
order, the groups inorderare processed one after another, and within a group the devices upgrade one at a time.
The fail-policy controls what happens when a device fails:
continue- skip the failed device and continue with the rest.stop- stop the whole upgrade on the first failure. The job does not continue with the remaining devices or with the next label group inorder. Withstrategy=parallelit requiresorder.parallelcombined withstopwithoutorderis rejected.continue-order- skip the failed device and continue with the next label group inorder. Requiresorder, which lists the labels to process one group after another.continue-orderis not accepted without it. How the failed device's group is handled depends on thestrategy:- sequential - the rest of the group is skipped (devices not yet started stay
pending) and the job continues with the next group inorder. - parallel - only the failed device is abandoned. Devices already in progress in the same group finish, and the job continues with the next group in
order.
- sequential - the rest of the group is skipped (devices not yet started stay
Notes
- Removing an upgrade rule does not cancel its already-started or queued jobs. Cancel a job explicitly with
/cmr/upgrade/job/remove. - Both
/cmr/upgrade/show-devicesand/cmr/upgrade/job/show-deviceslist the per-device coverage and state of a rule or job. They show per-device notes such as the "upgrade available" and "no upgrade available" states described in the previous sections.
Alert rules
An alert rule applies conditions to the devices selected by labels and runs actions on the CMR server when a condition becomes true. Alert rules are managed in the /cmr/alert menu.
Create an alert rule
A rule needs at least one condition and one action. When a rule has several conditions, all of them must match, so hdd-above=80 hdd-below=95 matches a disk usage between the two values. For an either-or case, create two rules. For example, create a rule that logs a warning when the CPU load of any device rises above 95%:
[admin@MikroTik] > /cmr/alert/add name=cpu-load labels=all cpu-above=95 .log="[device] CPU usage is above 95% ([cpu-usage]%)" .log-topics=cmr,warning severity=high category=performance
[admin@MikroTik] > /cmr/alert/print where name=cpu-load
11 ;;; example
name="cpu-load" labels=all cpu-above=95
.log="[device] CPU usage is above 95% ([cpu-usage]%)"
.log-topics=cmr,warning severity=high category=performance devices=9
devices-on=0 fired=0 action-failures=0
The devices value counts the devices the rule matches. The read-only values devices-on, fired, and action-failures are updated as the rule runs.
Conditions
A rule selects the devices it applies to with labels, the same labels used across CMR. The /cmr/alert CLI reference lists every condition and parameter; the conditions fall into these groups:
- Usage thresholds -
cpu-aboveandcpu-below,mem-aboveandmem-below, andhdd-aboveandhdd-belowcompare CPU, RAM, or disk usage to a percentage. - Health sensors -
health-aboveandhealth-belowcompare a health sensor to a value.health-valuenames the sensor and matches a name from/system/health/print(for examplecpu-temperature). A rule compares a sensor only on devices that report it; devices without that sensor are ignored. A value equal to the threshold of anabovecondition also fires the rule; abelowcondition fires only for values strictly below the threshold. - Availability -
connectedfires when a device connects or disconnects,disconnected-more-thanfires when a device has been disconnected longer than a given time,rebootedfires when a device reboots, andunpaired-device-connectedfires when a device that is not paired connects. - Upgrades -
upgrade-availablefires when a newer version is available for a device,upgrade-donefires when a device upgrade finishes, andupgrade-job-donefires when an upgrade job finishes. - Interfaces -
interface-changefires on an interface state change (running,not-running,added, orremoved) of interfaces of the type selected byinterface-type(ethernet,wifi, orbridge). For now, disabling or enabling a CAPsMAN-managed WiFi interface does not fire aninterface-type=wifirule. - Log lines -
log-topicsandlog-regexfire when a device sends a log line with a matching topic and message; the matched values are available as[message]and[message-topics].
Actions
When a rule fires, it runs every action that is set:
action.logwith the optionalaction.log-prefixandaction.log-topicswrites a message to the CMR log. The default topics arecmr,info. For a log-line condition, the message starts with the device that sent the log line, asidentity|board|address:, so[message]alone is enough as the message text, for exampleaction.log="[message]".action.scriptruns a named system script andaction.script-varsgives it the values for the device that fired. The script must allow itself to run with reduced rights (dont-require-permissions=yes) or the action logs "not enough permissions".action.http-url,action.http-method,action.http-body, andaction.http-headerscall an HTTP or HTTPS webhook. Placeholders in the request body are substituted per device. The call does not set aContent-Typeheader by itself, so add one withaction.http-headerswhen the receiver expects it (for exampleContent-Type: application/jsonfor a JSON body). A failed call is written to thecmrtopic withwarningand counts inaction-failures, for examplealert "name" HTTP action failed: request failed: Connection refused. The webhook works also when the device mode of the server does not allowfetch.
Variables in action text
The placeholders in an action string are replaced with the values for the device that fired, and the same values are available to a script triggered by action.script when their names are listed in action.script-vars (for example action.script-vars="device,version" sets $device and $version in the script). Which variables are available depends on what fired the alert.
Device variables are available for every device alert, from the device that fired:
| Placeholder | Value |
|---|---|
[device] | Device identity and address (identity@address). When the address is not known, the identity is used alone, for example for the controller itself. |
[identity], [address], [board], [version] | Device identity, address, board, and RouterOS version. |
[arch], [serial] | Device architecture and serial number. |
[packages] | Comma-separated list of the installed packages. |
[labels] | Comma-separated list of the user and automatic labels. |
[state] | The device state, for example the pairing or upgrade state. |
[available-version] | The newer RouterOS version available for the device, or unknown. |
[upgrade-state] | The current upgrade progress or result, or unknown. |
[cpu-usage], [mem-usage], [hdd-usage] | CPU, RAM, and disk usage in percent. |
[<sensor>] | Current reading of the health sensor named by the rule, for example [cpu-temperature]. |
Event variables are available when the event condition of the rule matches:
| Placeholder | Value |
|---|---|
[iface-name], [iface-type], [iface-change] | Interface name, type, and change (running, not-running, added, or removed) of an interface-change condition. |
[upgrade-version], [upgrade-error], [upgrade-state] | Version, error, and final state of the upgrade reported by an upgrade-finished condition. |
[message], [message-topics] | Message and topics of a matching log line for a log-line condition. |
[job-device-count], [job-success-count] | Total devices and successfully upgraded devices of an upgrade-job-finished event. |
[job-start-time], [job-end-time], [job-run-time] | Start time, end time, and duration in seconds of the finished job. |
An upgrade-job-finished event is a system event with no device context, so the device variables in the table above are not available for it. The other event conditions fire for a device, and the device variables are available alongside the event variables.
Alert variables are available for every alert, whatever fired it:
| Placeholder | Value |
|---|---|
[alert-name] | The configured rule name, or one generated from the conditions. |
[severity], [category] | Rule severity and comma-separated categories. |
[alert-users] | Number of devices the alert applies to. |
[alert-fired-count] | Number of times the alert has fired. |
[action-fail-count] | Number of failed action executions. |
A placeholder that does not apply to a rule is rendered as unknown. A placeholder whose value is not available is rendered as (empty), for example [address] for the controller itself.
How a rule fires
The controller evaluates the rules periodically, so a rule can take up to a minute to fire after a condition appears. A rule fires when a device starts to match its conditions and fires again only after the device stops matching and then matches again. A newly created rule fires immediately for every device that already matches it. When a device disconnects, the rule keeps its fired state for that device by default; set reset-on-disconnect=yes to clear the state on disconnect, so that the device fires the rule again after it reconnects and still matches. Only paired devices are evaluated.
Every rule has a severity (critical, high, medium, or low, default medium) and a category that the controller assigns according to the rule's conditions (for example performance, availability, or version); the category can be changed. The read-only values describe the state of a rule:
devices- number of devices the rule matches.devices-on- number of devices the rule is fired on.fired- total number of times the rule fired.action-failures- number of times an action failed.
Test and inspect a rule
testruns the actions of a rule immediately and replaces the placeholders with[placeholder]values, which verifies that the actions work. For now, each test run also counts in the rule'sfiredvalue.show-deviceslists the devices a rule covers. Addon-only=yesto show only the devices the rule is fired on.- Messages written by
action.logappear in the router log under the topics set in the rule, so read them with/log/print where topics~"cmr".
The /cmr/alert CLI reference describes every parameter and read-only value in detail.
Network topology
The /cmr/layout menu stores network topologies. A topology is composed of nodes and links: node maps a device or another layout to a position, and link connects two nodes. Links can be generated automatically from port data with rebuild-links, and devices can be added in bulk with add-devices. The topology itself is displayed only in the GUI.
Automatic links are built from the data that track-topology fetches from the clients, so keep track-topology=yes when you use rebuild-links. rebuild-links creates links only between devices that are directly connected. Add other connections, for example through a VPN or a switch that is not a CMR client, as links of your own. An automatic link shows the connected ports on both devices with their traffic counters and PoE state. A node can represent another layout (target-layout), so an overview layout can show and link site or building layouts that each contain their own devices. Node names must be unique across all layouts.
For example, create a layout for one site, add the devices with the office label, and generate the links between them:
[admin@MikroTik] > /cmr/layout/add name=Office
[admin@MikroTik] > /cmr/layout/add-devices [find name=Office] labels=office
[admin@MikroTik] > /cmr/layout/rebuild-links [find name=Office]
The topology in the screenshot below is stored as one layout, with a node for each device and a link between the connected ones:
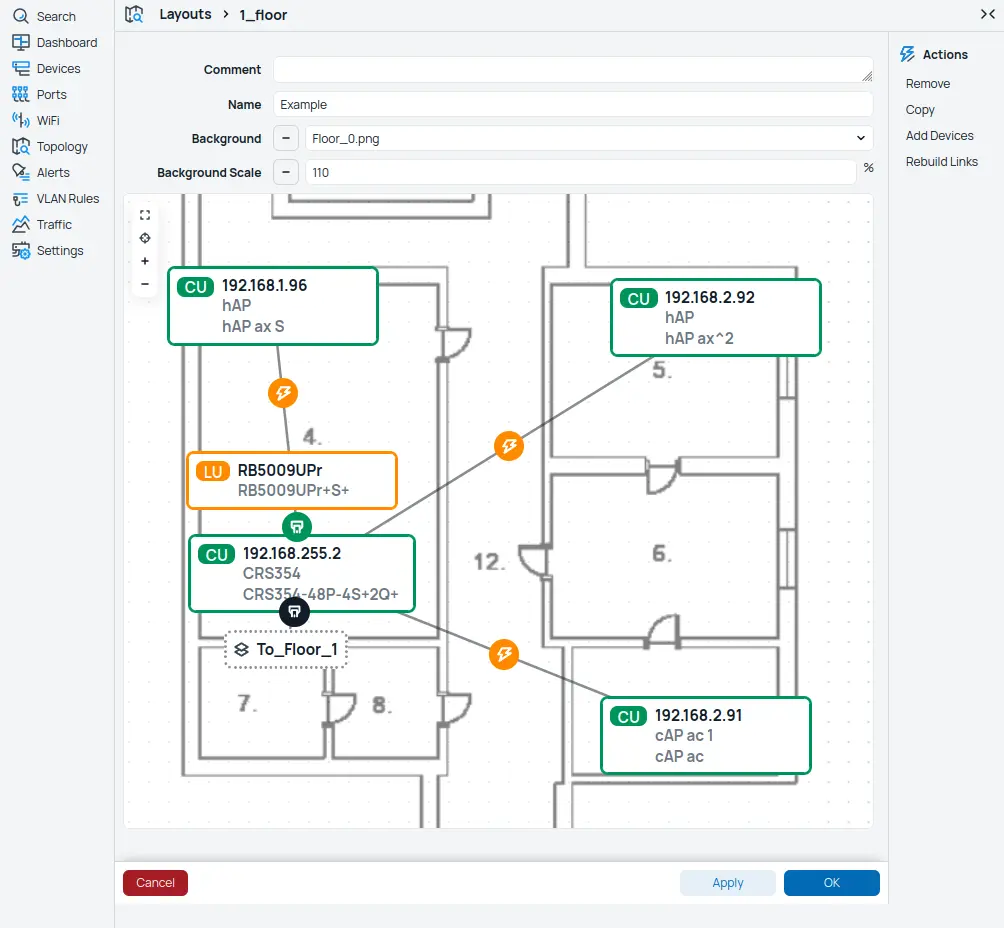
[admin@MikroTik] > /cmr/layout/print detail
 0  name="Example" scale=110 file="Floor_0.png"
 1  name="1_floor" file=""

[admin@MikroTik] > /cmr/layout/node/print detail
 0  name="RB5009UPr" layout=Example device=RB5009UPr x=300 y=25
 1  name="CRS354" layout=Example device=CRS354@192.168.255.2 x=308 y=99
 2  name="hAP" layout=Example device=hAP@192.168.1.96 x=285 y=-113
 3  name="hAP-1" layout=Example device=hAP@192.168.2.92 x=636 y=-104
 4  name="cAP ac 1" layout=Example device=cAP ac 1@192.168.2.91 x=628 y=227
 5  name="To_Floor_1" layout=Example target-layout=1_floor x=295 y=159

[admin@MikroTik] > /cmr/layout/link/print
 #   LAYOUT   NODE1      NODE2
 0   Example  CRS354     RB5009UPr
 1   Example  RB5009UPr  hAP
 2   Example  CRS354     hAP-1
 3   Example  CRS354     cAP ac 1
 4   Example  CRS354     To_Floor_1
A layout stores its name, the scale of the background picture, and the picture itself in file. A node places, in a layout, either a device with device (for example RB5009UPr or cAP ac 1@192.168.2.91) or another layout with target-layout; device and target-layout are mutually exclusive. The To_Floor_1 node above opens the 1_floor layout from the example, so an overview layout can show and link whole site or building layouts.
In the GUI, right-click a free spot in the topology map to create a node:
- a device node, by picking a device, and
- a layout node, by picking another layout.
Right-click an existing node to create a link to another node. The same can be done from the CLI with the add, node, and link commands.
A link connects two nodes of a layout. Links created by rebuild-links also show the connected ports on both devices with their traffic counters and PoE state:
[admin@MikroTik] > /cmr/layout/link/print detail where layout=Example
 0  layout=Example node1=CRS354 node2=RB5009UPr
     links=*ether47(poe=waiting-for-load,tx=520,rx=0)--*ether2(poe=waiting-for-
        load,tx=132.0KiB,rx=160.9KiB),ether49(,tx=913.0KiB,rx=30.8KiB)--
        ether1(poe=waiting-for-load,tx=350.7KiB,rx=67.5KiB)
 1  layout=Example node1=RB5009UPr node2=hAP
     links=*ether6(poe=powered-on,tx=0,rx=0)--*ether1(,tx=0,rx=0)
Here ether2 on CRS354 is linked to ether1 on RB5009UPr, and *ether6 hands PoE power to ether1 on hAP (* marks the port that provides PoE; poe=powered-on and poe=waiting-for-load show the PoE state of each side, and tx/rx show the traffic counters). A link that only connects two layouts, such as the link between CRS354 and To_Floor_1, carries no ports.
Node coordinates are relative to the center of the layout and can be negative. The print output shows the coordinates as signed numbers, for example y=-113.
Application traffic
CMR can collect application traffic statistics from selected devices. Select the devices by labels with the apptraffic-devices setting in the /cmr menu; the server then enables the application traffic classifier (/tool/apptraffic) on the selected devices:
[admin@MikroTik] > /cmr set apptraffic-devices=gateway
The classifier sees the traffic that the device routes. An access point that bridges its clients' traffic in the bridge fast path sees only its own traffic, such as its DNS queries and management sessions. Select the routers that route the network's traffic, for example the gateway, to see the applications of the clients.
The statistics are shown in the GUI under CMR > Traffic, per application or per category, with the traffic in and out for the last minute, hour, day, and week. For now, the CLI views (/cmr/device/apptraffic and /tool/apptraffic/stats) list only the detected applications and categories, without the traffic counters.
The classifier is not available on devices with mmips, mipsel, smips, and powerpc architecture.
WiFi configuration
The /cmr/wifi menu defines the WiFi networks of the fleet, and the /cmr/wifi/radio menu defines the radio configuration. An item is applied to the devices that match its labels, the same label selection used by the upgrade and alert rules. The arguments continue the /interface/wifi configuration: a network item holds the connectivity and security settings, and a radio item holds the configuration and channel settings. Items have no name; the labels select the target devices and the numbers select an item for editing.
Define a WiFi network
Create a network for the devices with the Group2 label that broadcasts the SSID Office, authenticates with WPA2 and the ccmp cipher, and tags the client traffic with VLAN 10:
[admin@MikroTik] > /cmr/wifi/add labels=Group2 ssid=Office vlan-id=10 security.authentication-types=wpa2-psk security.encryption=ccmp security.passphrase="office-passphrase" comment=office-wifi
The network appears in the list. The settings of a group have dotted names. In the print output the group name is written once and the remaining values of that group are written with a leading dot:
[admin@MikroTik] > /cmr/wifi/print
0  ;;; office-wifi
   labels=Group2 ssid="Office" security.encryption=ccmp
   .authentication-types=wpa2-psk vlan-id=10
The arguments of a network mirror the /interface/wifi network:
labels- the devices the network is applied to.ssid- the network name broadcast to clients.mode- the operating mode:ap,station,station-bridge,station-pseudobridge, ormeshpoint.vlan-id- the VLAN that the client traffic is tagged with.security.authentication-types- the authentication methods, for examplewpa2-psk,wpa3-psk, orowe.security.encryption- the allowed ciphers, for exampleccmporgcmp.security.passphrase- the network password for the personal authentication types. The passphrase is a sensitive value and does not appear in the print output.
Disable a network to stop applying it without deleting it. A disabled network is marked with the X flag:
[admin@MikroTik] > /cmr/wifi/set 0 disabled=yes
[admin@MikroTik] > /cmr/wifi/print
Flags: X - DISABLED
 0  X ;;; office-wifi
      labels=Group2 ssid="Office" security.encryption=ccmp
      .authentication-types=wpa2-psk vlan-id=10
Configure the radio
The /cmr/wifi/radio menu sets the radio parameters of the selected devices. A radio item applies to every radio of the devices it selects, so limit channel settings to one band with a band label, for example +5ghz. Without the band label, a 5 GHz frequency is also applied to the 2.4 GHz radio, which then stays inactive with "no available channels". Set the regulatory domain, radio chains, and channel of the 5 GHz radios of the devices with the Group2 label:
[admin@MikroTik] > /cmr/wifi/radio/add labels=Group2,+5ghz configuration.country=Latvia configuration.chains=0,1 channel.band=5ghz-ax channel.frequency=5180 channel.width=20mhz comment=office-radio
[admin@MikroTik] > /cmr/wifi/radio/print
0  ;;; office-radio
   labels=Group2,+5ghz configuration.country=Latvia .chains=0,1
   channel.frequency=5180 .band=5ghz-ax .width=20mhz
The configuration and channel groups mirror the radio parameters of /interface/wifi: configuration.country sets the regulatory domain, configuration.chains the radio chains, and channel.band, channel.frequency, and channel.width the channel selection.
The /cmr/wifi and /cmr/wifi/radio CLI reference lists every argument of both menus.
How the configuration is applied
On each selected device, a WiFi network is written as a managed entry (flag Y) in the device's /interface/wifi/network menu, and a radio item as a managed entry in /interface/wifi/network/radio. The managed entries apply to the radios that the item selects:
- Without a band label, a network or radio item applies to every radio of the selected devices. Add a band label to select the radios of one band:
+2ghz,+5ghz, or+6ghz. For example,labels=Group2,+5ghzselects only the 5 GHz radios of the devices with theGroup2label. - A CMR network takes over the radios it selects and replaces their existing configuration, including radios managed by CAPsMAN and radios with a local configuration. Radios that no CMR network selects keep their configuration, so the 2.4 GHz radio of an access point can stay under CAPsMAN while its 5 GHz radio is configured by CMR.
- A radio item applies only to radios that a CMR network also selects.
- On devices with WiFi 7 radios, the device creates an MLD interface for the CMR network.
- The managed entries cannot be changed on the device. Change them on the CMR server.
For now, removing or disabling a CMR WiFi network, or disabling the CMR client on the device, does not restore the previous configuration of the radios. A radio falls back to the local /interface/wifi/network entries that match it, and stays disabled when there are none. Its previous CAPsMAN or per-interface configuration must be set again on the device, so export the WiFi configuration of an access point before you apply a CMR network to it.
Bridge and VLAN
For now, a CMR WiFi network cannot select a bridge, because /cmr/wifi has no datapath settings. The bridge depends on the vlan-id of the network:
- With
vlan-id, the WiFi interfaces are added to the managedcmr-bridge(the same bridge that VLAN provisioning creates), with VLAN filtering enabled and thevlan-idas their PVID. - Without
vlan-id, the WiFi interfaces are not added to any bridge, and the clients have no network access. For now, set avlan-idfor every CMR WiFi network.
cmr-bridge is not connected to the rest of the network until a port of the device joins it. Add the access point's uplink port to cmr-bridge with a VLAN provisioning rule, so that the uplink carries the network's VLAN. For example, for an office network on VLAN 10 on the access points with the office-ap label, with ether1 as the uplink:
[admin@MikroTik] > /cmr/wifi/add labels=office-ap ssid=Office vlan-id=10 security.authentication-types=wpa2-psk,wpa3-psk security.passphrase="office-passphrase"
[admin@MikroTik] > /cmr/vlan/add labels=office-ap port-labels=ether1 vlan-ids=10 role=trunk comment=ap-uplink
The switch port and the router on the other end of the uplink must carry VLAN 10 tagged. The router provides the IP addressing, DHCP, and firewall rules for the network; CMR does not configure them.
When the uplink of an access point joins cmr-bridge, it leaves the access point's previous bridge, and management access through that bridge stops. A trunk port also accepts only VLAN-tagged frames, so untagged traffic on the uplink is dropped. Plan the management access of the access point before you add its uplink to cmr-bridge.
VLAN provisioning
The /cmr/vlan menu creates bridge and VLAN configuration on the selected CMR clients. A rule selects the devices by labels, selects the ports by port-labels (an interface name of a device, for example ether1, or a port label assigned to the port in /cmr/device, for example uplink), defines the vlan-ids (a comma-separated list or a range, for example 10,20 or 10-20), and assigns each port a role: access (default) or trunk.
On a selected device the rule creates a dedicated cmr-bridge bridge with VLAN filtering enabled and moves the selected ports into it:
- An
accessport belongs to a single VLAN, the first VLAN invlan-ids, which is set as the port's PVID. It carries untagged frames. On the client, the VLAN appears as a dynamic untagged entry in the bridge's VLAN table while the port has link. - A
trunkport carries every VLAN invlan-ids, tagged with 802.1Q headers, and accepts only VLAN-tagged frames.
One rule can select several ports; every selected port is configured the same way. A trunk port accepts only VLAN-tagged frames, also when VLAN 1 is in vlan-ids, so a port cannot carry untagged and tagged VLANs at the same time. For now, when several rules select the same port, the first rule applies and the others are ignored without a warning.
For example, give the devices with the office label one access port on VLAN 10 and one uplink carrying VLANs 10 and 20:
[admin@MikroTik] > /cmr/vlan/add labels=office port-labels=ether5 vlan-ids=10 role= comment=office-
[admin@MikroTik] > /cmr/vlan/add labels=office port-labels=ether6 vlan-ids=10,20 role=trunk comment=office-uplink
[admin@MikroTik] > /cmr/vlan/print
0 ;;; office-
labels=office port-labels=ether5 vlan-ids=10 role=
1 ;;; office-uplink
labels=office port-labels=ether6 vlan-ids=10,20 role=trunk
Removing or disabling a rule reverses its provisioning: the selected ports are returned to their previous bridge and port configuration, and cmr-bridge is removed when the last rule that uses it is removed.
Provisioning moves the selected ports into the managed cmr-bridge, which disconnects the port's current traffic and can cut the device's management access if a management or uplink port is selected. A rule with no labels and no port-labels applies to all connected devices and all of their ports, including the CMR controller itself; applying such a rule disconnects the whole fleet and the controller's own management access. Keep the device and port selectors explicit. Disabling or removing a rule restores the previous configuration, provided the device is still reachable from the controller; a rule that also configures the device's own uplink, for example a rule with no selectors, can cut that link, and cmr-bridge is then kept until the CMR connection to the device is re-established, for example by re-enabling the CMR client.