Netinstall for Windows
This guide explains how to install RouterOS on your MikroTik device using the Netinstall utility on a Windows computer.
Prerequisites
Make sure you have set a static IP address on your computer's interface before running the netinstall tool.
- Download the Netinstall utility (Stable, Testing or Development version) from the downloads page.
- Download the RouterOS System Package, and all extra packages you need or which are mandatory to use on the specific device (e.g. wireless, wifi-qcom, container, etc.) from the downloads page.
Select a RouterOS version marked as LongTerm or Stable. Choose the appropriate architecture (ARM64, ARM, MIPSBE, TILE, etc.). If you are unsure, download the RouterOS package for all architectures — Netinstall will automatically select the correct one for your device.
The tool requires the target device to be booted in BOOTP mode in order to be detected and accessed.
Available Actions and Parameters
| Control/Action | Description |
|---|---|
| Net booting | Enables, disables, and configures IP addressing for Netinstall's built-in BOOTP and TFTP server. This is required for netbooting a MikroTik device using the Netinstall client. |
| Shutdown | Shuts down the selected MikroTik device that is booted in Netinstall mode. |
| Reboot | Reboots the selected MikroTik device that is booted in Netinstall mode. |
| Install | Performs a RouterOS installation on the selected MikroTik device using the specified options. |
| Cancel | Cancels the current in-progress installation. |
| Routers/Drives | Displays devices available for installation. A device appears in this list only after it has been started in Netinstall mode. |
| Packages | Allows selection of the directory containing RouterOS package files and creation of package sets for use in subsequent installations. |
Netinstall Parameters
| Parameter | Description |
|---|---|
| Auto Reboot | Defines the action performed after device installation completes successfully. |
| Software ID | Displays the current device Software ID. |
| Key | Allows specification and installation of a new license key during installation. By default, Netinstall retains the detected license key from the device. |
| Keep Old Configuration | Instructs Netinstall to read and restore the device core configuration (/export; /users) after installation. This option does not retain user files, containers, or similar data. |
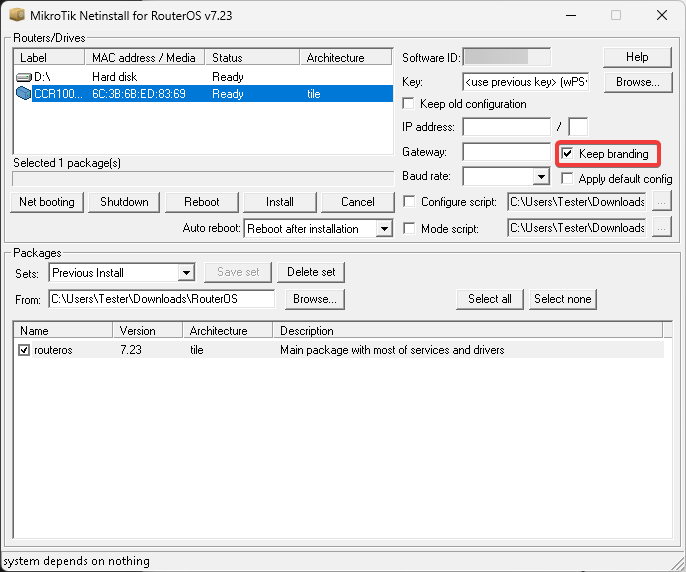
| Keep Branding | Instructs Netinstall to retain the device branding package if present on the device. Factory-installed branding packages cannot be discarded and are always preserved. |
| Apply Default Config | If enabled, the device will apply the default configuration script after installation and reboot. See /system/default-configuration/script/print. |
| Configure Script | Allows installation of a custom default configuration script on the device during installation. This replaces the RouterOS-supplied default configuration script. See /system/default-configuration/custom-script/print. The script is retained during RouterOS updates and used after subsequent configuration resets until the device is reinstalled with a new script or the script is removed. The script can access factory set passwords with read-only variables $defconfPassword and $defconfWifiPassword starting from RouterOS 7.10beta8. |
| Mode Script | Specifies a one-time custom script that runs on the device's first boot after installation. Use this script to configure device‑mode, protected‑routerboot, and other settings during device deployment. The mode script executes before any custom or default configuration scripts. Upon completion, the script is automatically removed from the device. If the script modifies the device-mode, the device reboots immediately after execution. This feature requires RouterOS and Netinstall version 7.22 or newer. |
| IP Address / Gateway / Baudrate | Netinstall auto-creates a Configure script with the specified parameters for initial device configuration using IPv4 connectivity or serial console. This parameter is available only when installing to an empty configuration, meaning no other configuration options are specified. |
Configure and Mode scripts are regular/import files, accept valid MikroTik RouterOS CLI commands.
Prepare Your Computer Network
-
Disable all network interfaces on your computer (WiFi, Ethernet, LTE, or any other connection) except for the Ethernet interface you will use for installation. Netinstall functions only with one active interface.
warningDeactivating all other network interfaces is strongly recommended to ensure Netinstall selects the correct network interface.
-
Configure a static IP address for your Ethernet interface:
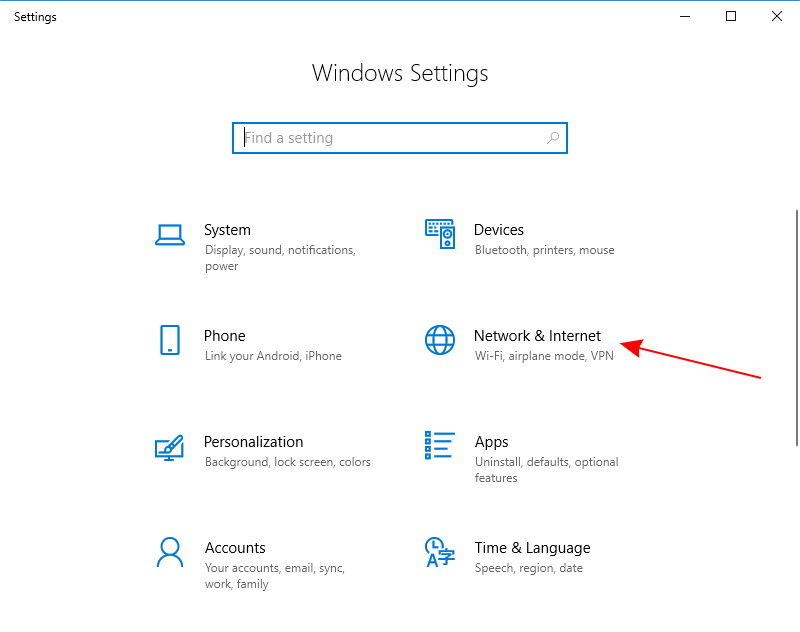
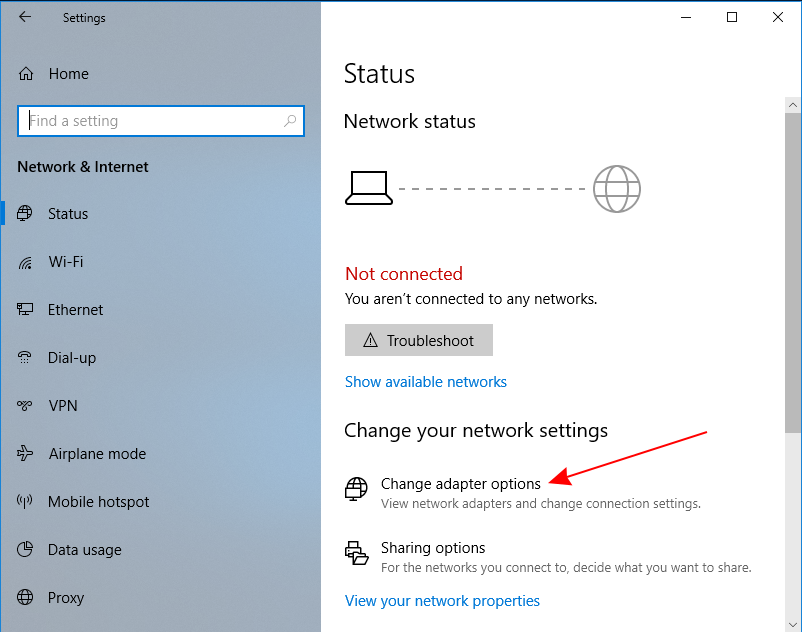
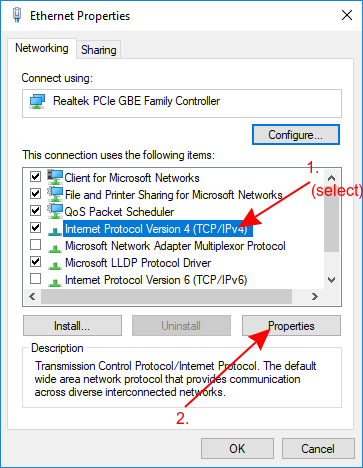
- Open Start and select Settings.
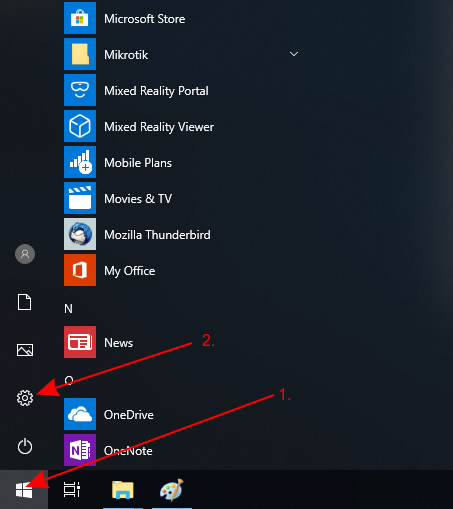
- Go to Network & Internet and select Change adapter options.
- Right-click on your Ethernet interface and select Properties.
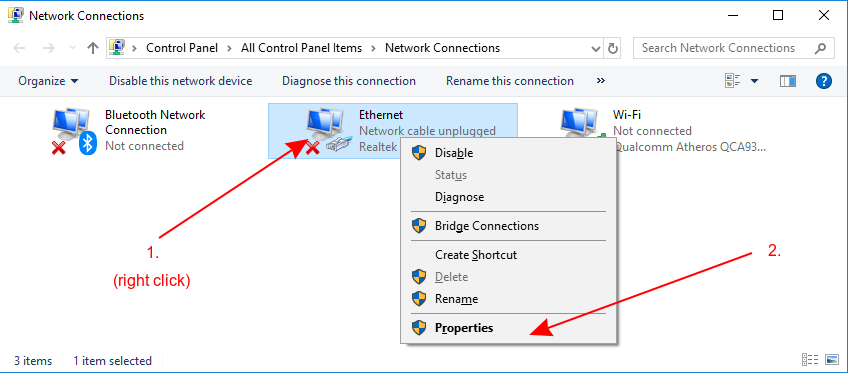
- Select Internet Protocol Version 4 (TCP/IPv4) and click Properties.
- Check Use the following IP address and configure: IP address
192.168.88.1, Subnet mask255.255.255.0.
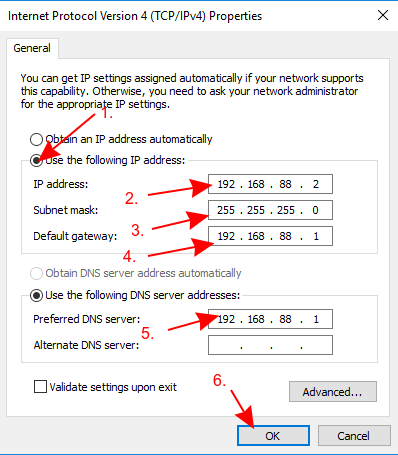
Netinstall can also run on a local network. In such case you could skip setting a static IP address, but it is highly recommended that you set a static IP address if you are not familiar with Netinstall.
Start Netinstall
-
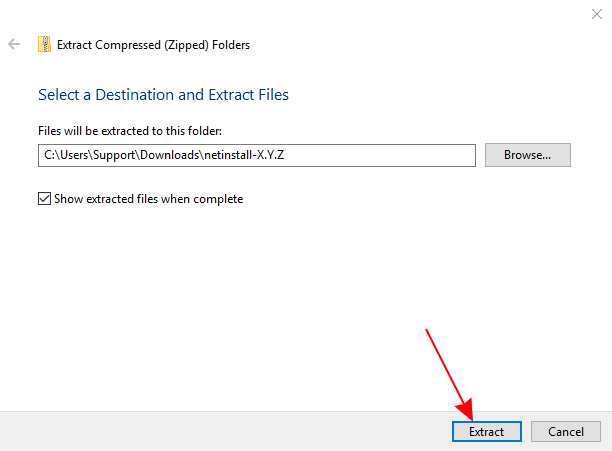
Extract the Netinstall
.zipfile to a convenient location.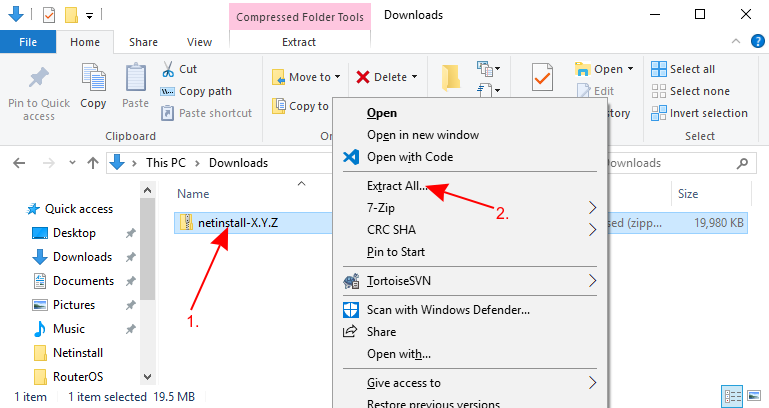
-
Ensure your Ethernet interface is connected and launch
Netinstall.exe.dangerNetinstall requires administrator rights. Accept the permissions prompt for Netinstall to work properly.
Tip: If you followed this guide precisely, your computer should not have an Internet connection. Windows 10 may display a warning about verifying apps — click Run to proceed.
-
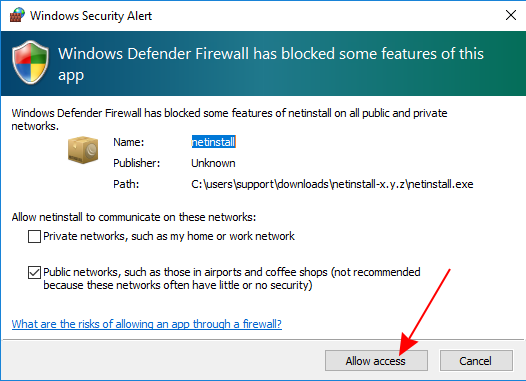
Allow access for Netinstall in the Public network when prompted.
-
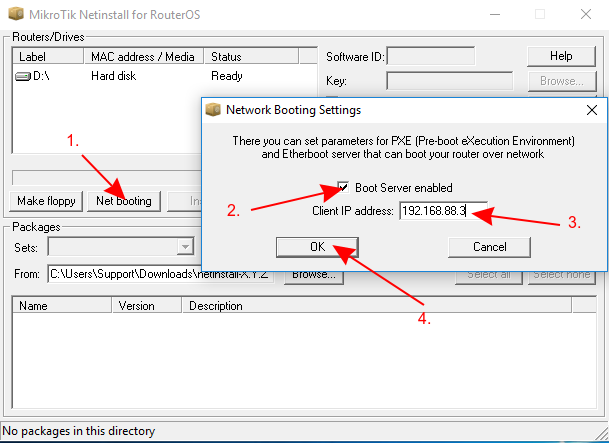
Configure the Net booting settings:
- Set the Client IP address (must be unique and not used by any other device in your network, including your computer).
- Use an IP address from the same subnet as your computer's static IP but different from the computer's address.
Connect the Device
-
Connect your device to your computer using an Ethernet cable directly (without any other devices in between).
-
Plug the Ethernet cable into your device's Ether1 port or the port marked with BOOT.
dangerSome computers (especially USB Ethernet adapters) may create extra link flaps, causing Netinstall to fail to detect a device in Etherboot mode. If this occurs, use a switch between your device and computer, or use a RouterOS-powered router in bridge mode. If using a router in bridge mode, disable any DHCP client on the bridge interface and disable the Detect Internet feature.
Netinstall uses BOOTP packets, which use the same port numbers as DHCP packets. If using a switch, ensure the bridge port is not blocked by other network devices. If you have DHCP snooping enabled, enable "trusted" on the bridge port facing the Netinstall PC.
-
Power up your device and put it into Etherboot mode.
Install RouterOS
-
Wait for the device to appear in Netinstall.
-
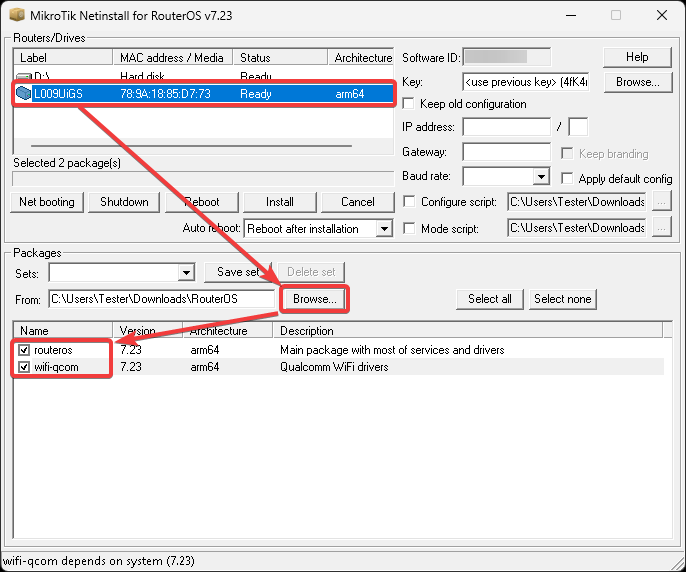
Select the device and click Browse. Navigate to your RouterOS packages location and press OK.
-
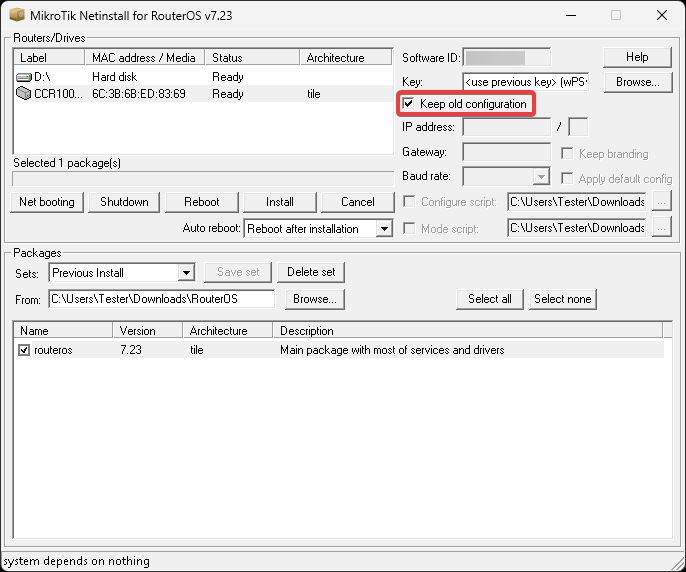
The "Keep old configuration" process downloads the configuration database from the router, reinstalls the router (including disk formatting), and uploads the configuration back. This process applies only to the configuration itself and does not affect files, including databases like User Manager database, Dude database, and others.
-
The "Keep branding" option allows you to retain the device's already installed branding package without reinstalling it using Netinstall.
 tip
tipWhen using the Configure script option, it is recommended to introduce a delay before configuration execution.
-
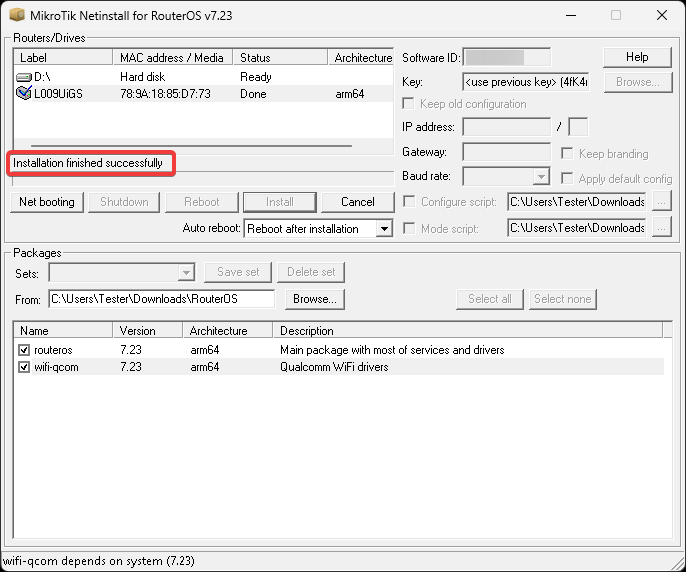
Select your desired RouterOS packages and press Install.

-
Wait for the installation to complete. Depending on the Netinstall version and device, a manual reboot may be required.
 warning
If you downloaded RouterOS packages for multiple architectures, Netinstall will only display the appropriate architecture packages for your device after selecting it. Unsupported packages will not appear in the window.
If the installation does not start (progress bar not moving or no status shown), try closing and reopening Netinstall, or put the device into Etherboot mode again. If the issue persists, try using Netinstall on a different computer.
Post-Installation
After using Netinstall, the device resets to defaults (unless you specified not to apply the default configuration or Keep old configuration). For security reasons, some devices are not accessible through the Ether1 port when using the default configuration. See Default configuration for details.
Complete Setup
Your device is now ready. Configure your device as needed and reconnect it to your network.
Looking for a different installation method? See the Linux or Netinstall Package instructions.