First Time Configuration
CLI reference:/ip/neighbor/system/reset-configuration/interface/bridge/ip/address/ip/dhcp-server/ip/dhcp-client/interface/pppoe-client/ip/route/ip/dns/ip/firewall/nat/user/ip/firewall/filter/interface/list/tool/mac-server/ip/neighbor/discovery-settings/ip/service/tool/bandwidth-server/interface/ip/ssh/ip/proxy/ip/socks/ip/upnp/ip/cloud/interface/wireless/tool/ping
Before You Begin
Prerequisites
Before starting the configuration process, make sure you have the following:
- A MikroTik router
- A computer with an Ethernet port (recommended). Configuration over WiFi is also supported if the router provides a wireless access point
- An Ethernet cable
- An active internet connection from your ISP
- 30–60 minutes of uninterrupted time
Key Concepts
- Default Configuration: Factory-installed settings that may need adjustment depending on your network requirements
- Bridge: A virtual interface that combines multiple physical ports into a single network segment
- DHCP: A protocol that automatically assigns IP addresses to devices on a network
- NAT: Network Address Translation, allowing multiple devices to share a single public IP address
- Firewall: A set of rules that control and filter network traffic for security purposes
Choose Your Configuration Method
This guide explains how to configure RouterOS using either:
Which to choose:
- New users: It is recommended to follow the WinBox instructions
- Advanced users: You may use CLI commands shown in code blocks
After completing each major configuration section, it is recommended to create a backup of your settings.
CLI Method:
/export file=backup-step3
WinBox method:
- Open the Files menu
- Click Backup
- Enter a descriptive name (for example:
after-internet-setup)
If something goes wrong, you can restore your configuration from the Files menu by selecting the backup and clicking Restore.
Accessing the router
Most MikroTik routers ship with a default configuration that allows immediate access. However, some professional devices (such as the CCR series) may ship with a minimal or no default configuration. In that case, set up the network manually first — see Manual Network Setup.
Step 1: Physical Connection
- Connect an Ethernet cable from your computer to any router Ethernet port except ether1.
- Connect the ISP cable to ether1 (typically used as the WAN interface).
- Power on the router and wait approximately one minute for it to fully boot.
Internet ─── [ISP] ─── [ether1] MikroTik Router [ether2-ether5] ─── [Switch / Devices]

                                                 │

                                          [WiFi Clients]
Step 2: Download WinBox
If you don't have WinBox yet:
Download WinBox for your operating system:
Available packages:
- Windows: ZIP archive (contains
WinBox.exe) - Linux: ZIP archive (contains a binary executable)
- macOS: DMG package
- Extract or open the downloaded package.
- Launch WinBox:
- Windows: run
WinBox.exe - Linux: make the binary executable and run it
- macOS: open the
.dmgand start WinBox
- Windows: run
No installation is required. For more details, see the WinBox manual.
Step 3: Find Your Router Using Neighbor Discovery
- Open WinBox.
- In the Select from dropdown, choose Neighbors.
- Your router should appear in the Neighbors list.
- Double-click the router entry to connect:
- Prefer the MAC address if the IP address is not reachable or shows
0.0.0.0.
- Prefer the MAC address if the IP address is not reachable or shows
- When prompted, enter the login credentials:
- Username:
admin - Password: leave empty, or use the password printed on the device label (if applicable)
- Username:
Step 4: Protecting the Router
Once the router is accessible, secure it against unauthorized access and basic attacks. Do these first:
- Set an administrator password. A blank password allows unrestricted access to the router.
- Verify the firewall is enabled. Most MikroTik devices ship with a default firewall configuration that blocks the most common external attacks. Do not disable the existing rules; only add new ones if required.
- Disable direct management access from the internet. This is especially important on devices without a default firewall. If remote access is required, use a secure method such as WireGuard or IPsec instead of exposing management ports directly.
User Password Management
Securing your MikroTik router with a strong password is essential. Use a password that meets the following criteria:
- At least 12 characters long
- Includes uppercase and lowercase letters, numbers, and symbols
- Avoids dictionary words or simple patterns
Set the admin password using CLI:
/user set 0 password="Your_Super_Strong_Password_123!@#$%^&*"
Or change it interactively:
[admin@MikroTik] > /password
old-password: ********
new-password: ****************************
confirm-new-password: ****************************
Remember your password. If it is lost, there is no recovery option. You will need to reset the router or reinstall RouterOS.
You can also manage users in the /user menu:
/user/add name=myname password=mypassword group=full
/user/remove admin
Best practice is to create a new administrator user with a strong password, verify it works, and then disable or remove the default admin account.
Understanding Default Configuration
When you first connect to your MikroTik router, you may see a prompt about the default configuration. Here is what you need to know:
- For beginners: It is recommended to keep the default configuration, as it provides basic security and essential functionality.
- The default setup includes: A basic firewall, a DHCP server, and default wireless security settings (if applicable).
- You can safely customize it while keeping the default structure as a base.
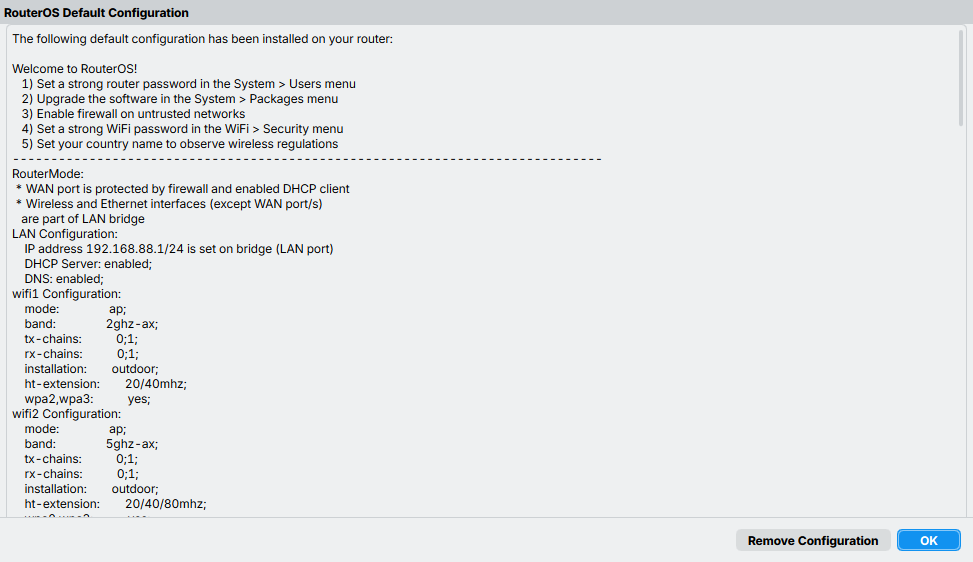
Removing the default configuration removes all built-in security rules and services. This is only recommended for advanced users who plan to configure the router manually.
If your device has no default configuration, or you reset it to a clean state, you must set up the bridge, LAN IP address, and DHCP server manually — see Manual Network Setup before continuing.
Configuring the Internet Connection (WAN)
To give the router internet access, you need to know which connection type your ISP uses. Check with your ISP, or use the descriptions below:
- DHCP / Dynamic IP — most cable modems and some fiber connections. You plug in and get internet automatically.
- Static IP — business connections or some residential fiber. Your ISP gave you a specific IP address, a gateway, and DNS servers.
- PPPoE — DSL connections or some fiber providers. Your ISP gave you a username and password to connect.
Not sure? Start with DHCP — it works for about 80% of home connections.
DHCP / Dynamic IP (most common)
This is the easiest and most common setup for home users. Configure a DHCP client on the public interface to automatically obtain an IP address, DNS server, NTP server, and default route from your ISP.
/ip/dhcp-client/add disabled=no interface=ether1
After adding the client, verify the assigned address and confirm the status shows "bound":
[admin@MikroTik] > print
Columns: INTERFACE, USE-PEER-DNS, ADD-DEFAULT-ROUTE, STATUS, ADDRESS
# INTERFACE USE-PEER-DNS ADD-DEFAULT-ROUTE STATUS ADDRESS
0 ether1 yes yes bound 1.2.3.100/24
Static IP
Use this if your ISP provided specific network settings that never change. Your ISP supplies three parameters:
- IP address:
1.2.3.100/24 - Gateway:
1.2.3.1 - DNS server:
8.8.8.8
Add the IP address to the WAN interface, create a default route using the gateway, and set the DNS server:
/ip/address/add address=1.2.3.100/24 interface=ether1
/ip/route/add gateway=1.2.3.1
/ip/dns/set servers=8.8.8.8
PPPoE
Use this if your ISP gave you login credentials (common with DSL providers). PPPoE provides a dynamic IP address and can automatically configure the DNS servers and default route.
- CLI
- WinBox / WebFig
/interface/pppoe-client
add disabled=no interface=ether1 user=me password=123 \
  add-default-route=yes use-peer-dns=yes
-
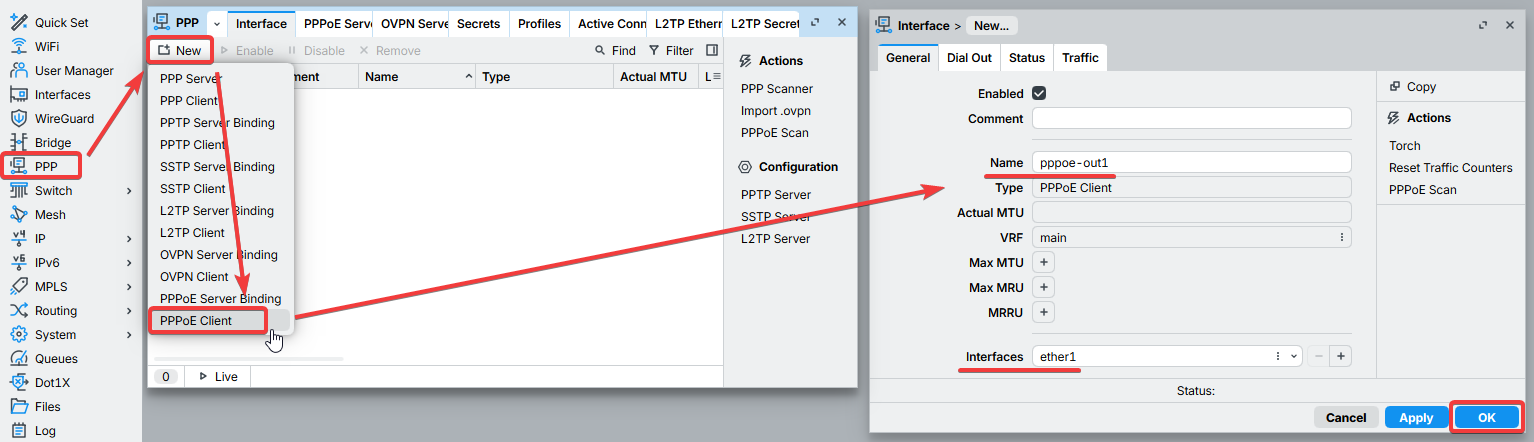
Open the PPP window and navigate to the Interface tab.
-
Click the New or + button to add a new interface.
-
Select PPPoE Client from the dropdown list.
-
Enter a name for the connection and select ether1 as the interface.
-
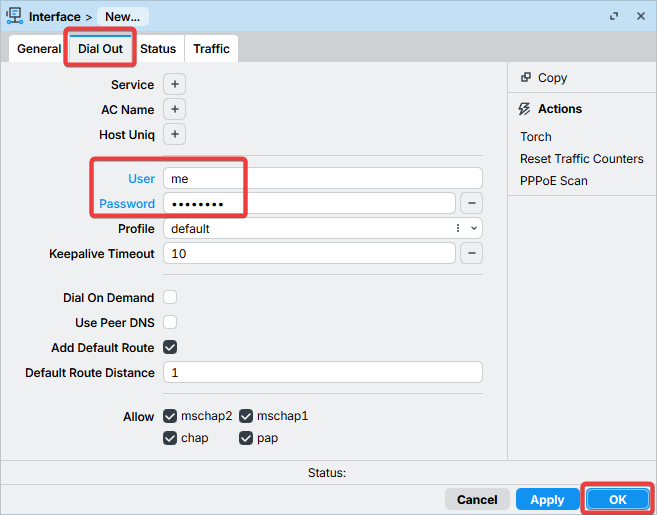
Go to the Dial Out tab and enter your username and password provided by your ISP.
-
Configure any additional parameters as required by your ISP.
-
Click OK to save the settings.
After configuration, the WAN interface becomes pppoe-out1 instead of ether1. Use this interface for all subsequent WAN-related configuration.
Verify Internet Connectivity
After configuring the WAN connection, confirm that the router itself can reach the Internet. First test IP connectivity by pinging a known public IP address — Google's public DNS server at 8.8.8.8:
[admin@MikroTik] > /ping 8.8.8.8
  SEQ HOST                                     SIZE TTL TIME       STATUS
    0 8.8.8.8                                    56  55 14ms399us
    1 8.8.8.8                                    56  55 18ms534us
    2 8.8.8.8                                    56  55 14ms384us
Then verify that DNS resolution works by pinging a domain name:
[admin@MikroTik] > /ping google.com
  SEQ HOST                                     SIZE TTL TIME       STATUS
    0 142.250.74.14                              56  55 14ms475us
    1 142.250.74.14                              56  55 14ms308us
    2 142.250.74.14                              56  55 14ms238us
If the IP ping succeeds but the domain ping fails, the connection is working but DNS is not configured correctly. If both succeed, the router's own internet connection is fully functional. If either fails, see the Troubleshooting section.
Local devices behind the router still need a working NAT rule before they can reach the Internet — see the next section.
NAT Configuration
If you kept the default configuration, a source NAT (masquerade) rule is already set up on the WAN interface, so local devices can already reach the Internet — you can skip this section. The steps below apply only if your router has no default configuration or you are building a custom setup.
For local devices to reach the Internet, the router must translate the private source addresses of their outgoing packets to its own public IP address. Private addresses are not routable over the Internet, so without this translation remote hosts have no way to reply to your local devices. This is done with a source NAT (masquerade) rule on the WAN interface:
/ip/firewall/nat
add chain=srcnat out-interface=ether1 action=masquerade
If the public interface is PPPoE, LTE, or any other type, the 'out-interface' should be set to that interface.
Alternatively, interface lists can be used for more flexible configuration.
First, create an interface list named WAN and add all external interfaces to it:
/interface add name=WAN
/interface member add list=WAN interface=ether1
Then use the interface list in the NAT rule:
/ip/firewall/nat
add chain=srcnat out-interface-list=WAN ipsec-policy=out,none action=masquerade
Another benefit of this setup is that clients behind the router are not directly reachable from the Internet by default, which helps protect them from unsolicited inbound traffic.
Port Forwarding
Some client devices may need direct access from the internet on specific ports. For example, a client device with IP address 192.168.88.254 must be accessible via Remote Desktop Protocol (RDP).
After a quick search, you can find that RDP runs on TCP port 3389. Now you can add a destination NAT rule to redirect RDP traffic to the client's PC.
/ip/firewall/nat/add chain=dstnat action=dst- protocol=tcp dst-port=3389 to-addresses=192.168.88.254 to-ports=3389
If you have set up strict firewall rules, then the RDP protocol must be allowed in the firewall filter forward chain.
Setting up Wireless / WiFi
How you configure wireless depends on your RouterOS generation and driver:
- Modern WiFi (
/interface wifi) — RouterOS v7 devices with the new WiFi stack. - Legacy Wireless (
/interface wireless) — RouterOS v6 and older v7 packages.
This guide shows a basic secured access point (SSID + WPA2/WPA3 password). For advanced topics — Wi-Fi 6/7, MLD / multi-link, multiple radios, CAPsMAN, repeaters, and per-device-family guidance — see the Wireless section.
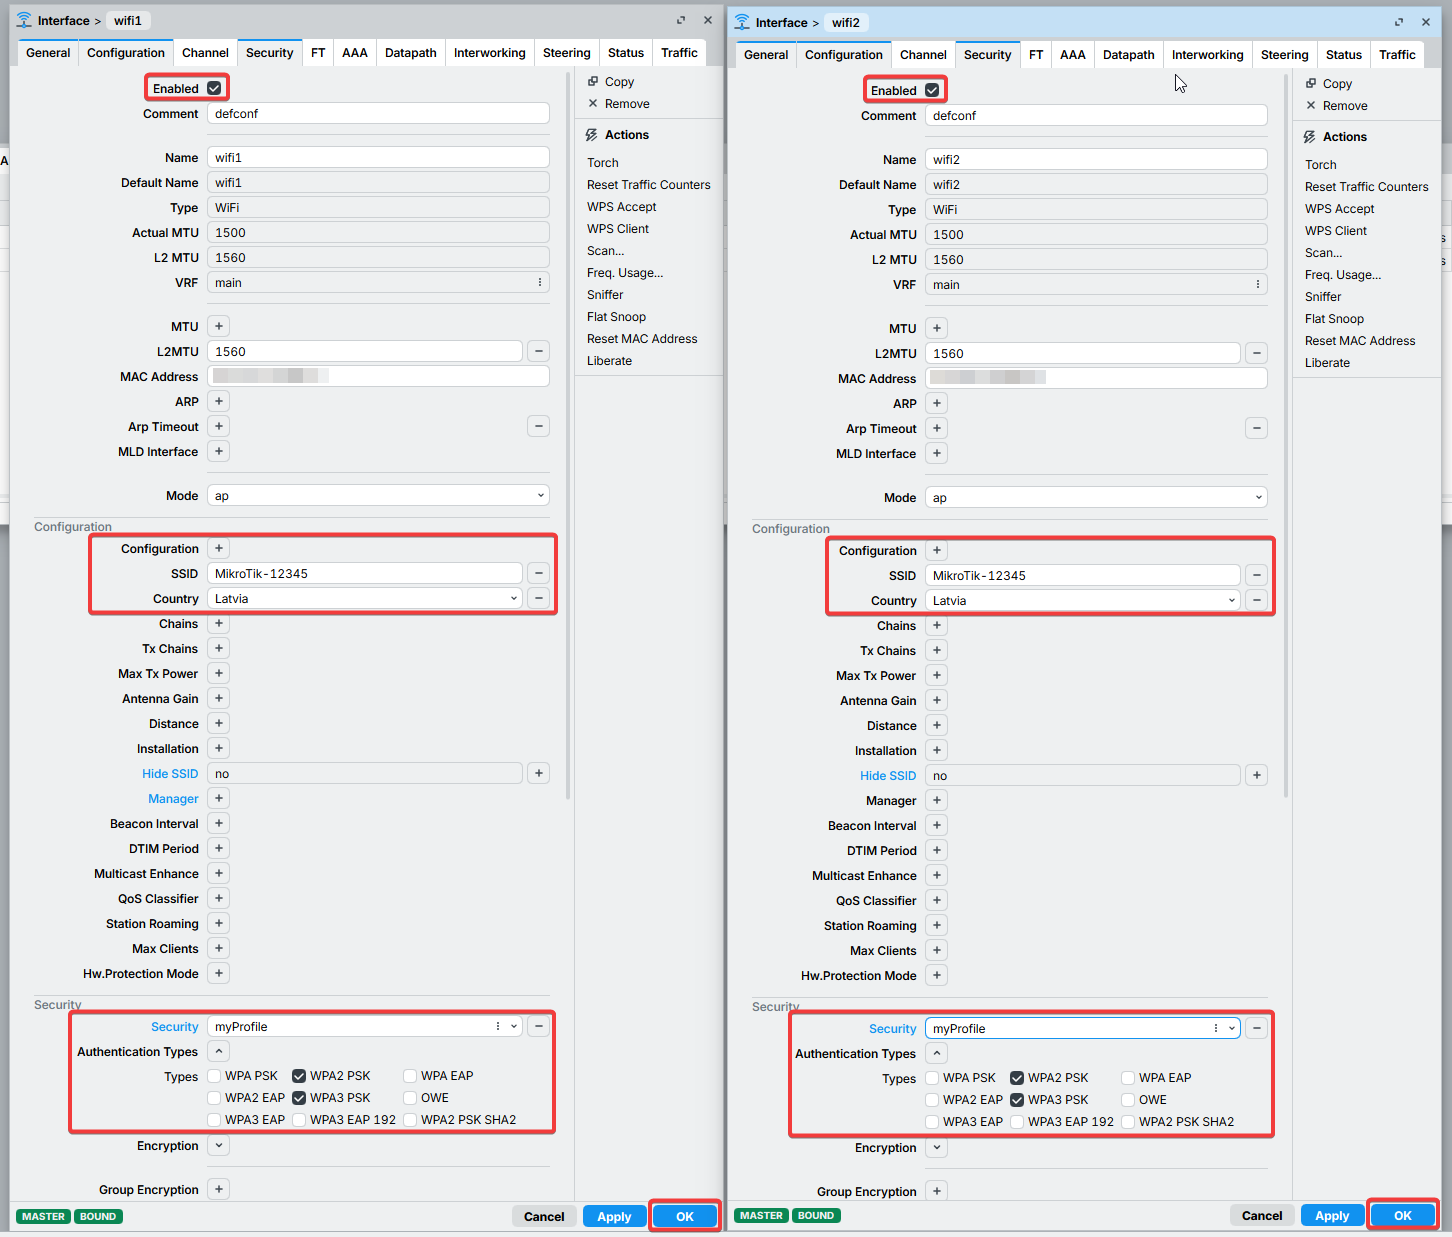
The examples below assume: country = Latvia, SSID = MikroTik-12345, WPA2/WPA3 enabled where supported, WPS disabled.
- Modern WiFi (/interface wifi)
- Legacy Wireless (/interface wireless)
Create a security profile:
/interface wifi security
add name=myProfile authentication-types=wpa2-psk,wpa3-psk \
  passphrase="YOUR_STRONG_PASSWORD"
Configure the radios:
/interface wifi
set [ find default-name=wifi1 ] configuration.country=Latvia \
  .mode=ap .ssid="MikroTik-12345" .hide-ssid=no \
  channel.width=20mhz disabled=no \
  security=myProfile security.wps=disable

set [ find default-name=wifi2 ] configuration.country=Latvia \
  .mode=ap .ssid="MikroTik-12345" .hide-ssid=no \
  channel.width=20mhz disabled=no \
  security=myProfile security.wps=disable
Create a security profile:
/interface/wireless/security-profiles
add name="myProfile" authentication-types=wpa2-psk mode=dynamic-keys \
wpa2-pre-shared-key="YOUR_STRONG_PASSWORD"
Configure the radios:
/interface
set [ find default-name=wlan1 ] band=2ghz-b/g/n channel-width=20/40mhz-Ce distance=indoors \
mode=ap- ssid=MikroTik-12345 wireless-protocol=802.11 \
security-profile=myProfile frequency-mode=regulatory-domain \
country=latvia antenna-gain=3
set [ find default-name=wlan2 ] band=5ghz-a/n/ac channel-width=20/40mhz-Ce distance=indoors \
mode=ap- ssid=MikroTik-12345 wireless-protocol=802.11 \
security-profile=myProfile frequency-mode=regulatory-domain \
country=latvia antenna-gain=3
Add the wireless interface to the bridge
Every wireless interface that should provide LAN access must be added to the bridge. If it is not, wireless clients will not receive DHCP addresses, reach LAN devices, or access the internet — even if the WiFi connection succeeds.
If you kept the default configuration, the wireless interfaces are typically already in the bridge, so you can skip this step. It applies mainly to manual setups, where the bridge was created as bridge1.
/interface
add interface=wifi1 bridge=bridge1
add interface=wifi2 bridge=bridge1
For legacy wireless, use the wlanN interface names instead (for example wlan1, wlan2).
Configuration Complete
At this point the router should:
- Provide Internet access to local devices
- Assign IP addresses automatically using DHCP
- Protect the device from unsolicited access from the Internet
- Provide wireless connectivity (if applicable)
You can now continue with more advanced topics such as VPNs, VLANs, routing, monitoring, and network management.
Next: Secure Your Router
Your router is now online. Before putting it into production, harden it against unauthorized access: set a strong password and a unique username, keep the default firewall rules, restrict management services, and disable any features you do not use.
See Securing your router for the complete hardening checklist, including firewall rules for the public interface, MAC-access and Neighbor Discovery restrictions, service-port hardening, and SSH strong crypto.
Troubleshooting
RouterOS has various built-in troubleshooting tools, like ping, traceroute, torch, packet sniffer, bandwidth test, etc.
We already used the ping tool in this article to verify internet connectivity.
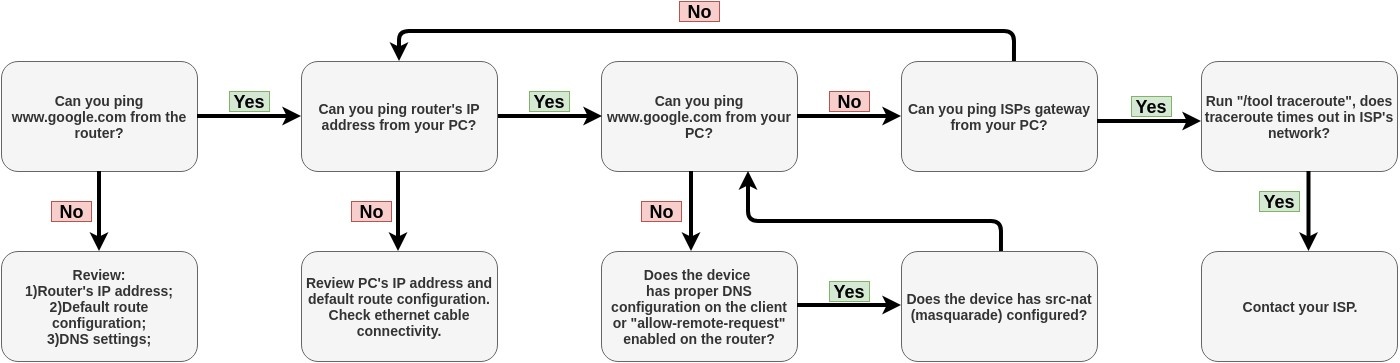
Troubleshoot if ping fails
The problem with the ping tool is that it says only that the destination is unreachable, but no more detailed information is available. Let's review the basic mistakes.
You cannot reach www.google.com from your computer which is connected to a MikroTik device:
If you are not sure how exactly to configure your gateway device, please reach MikroTik's official consultants for configuration support.