WinBox
Summary
A native WinBox beta version for Linux and macOS is now available on the MikroTik downloads page!
WinBox is a small utility that allows the administration of MikroTik RouterOS using a fast and simple GUI. It is a native Win32/Win64 binary but can be run on Linux and macOS (OSX) using Wine. All WinBox interface functions are as close as possible to mirroring the console functions, that is why there are no WinBox sections in the manual. Some advanced and system-critical configurations are not possible from WinBox, like a MAC address change on an interface.
From WinBox v3.14, the following security features are used:
- WinBox.exe is signed with an Extended Validation certificate, issued by SIA Mikrotīkls (MikroTik).
- WinBox uses ECSRP for key exchange and authentication (requires a new WinBox version).
- Both sides verify that the other side knows the password (no man in the middle attack is possible).
- WinBox in RoMON mode requires that the agent is the latest version to be able to connect to the latest version routers.
- WinBox uses AES128-CBC-SHA as an encryption algorithm (requires WinBox version 3.14 or above).
Starting WinBox
WinBox loader can be downloaded from the MikroTik download page. When WinBox.exe is downloaded, double click on it, and the WinBox loader window will pop up. There are two WinBox loader modes: simple, which is enabled by default, and advanced.
Simple mode
When you open the WinBox loader for the first time, the simple mode layout will be used:
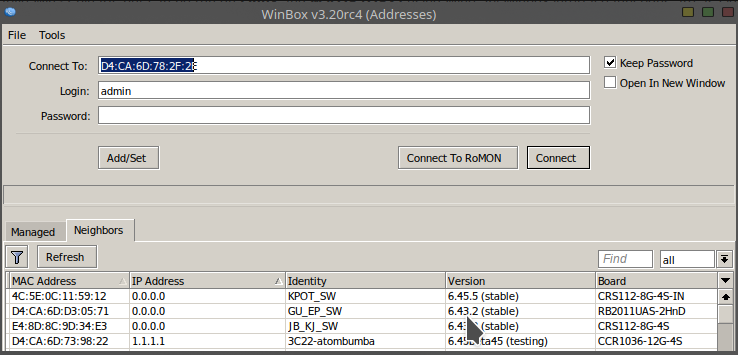
To connect to the router, enter the IP or MAC address of the router, specify the username and password (if any) and click on the Connect button. You can also enter the port number after the IP address, separating them with a colon, like this 192.168.88.1:9999. The port can be changed in the RouterOS services menu.
It is recommended to use an IP address whenever possible. A MAC session uses network broadcasts and is not 100% reliable.
You can also use neighbor discovery to list available routers. Use the Neighbors tab:
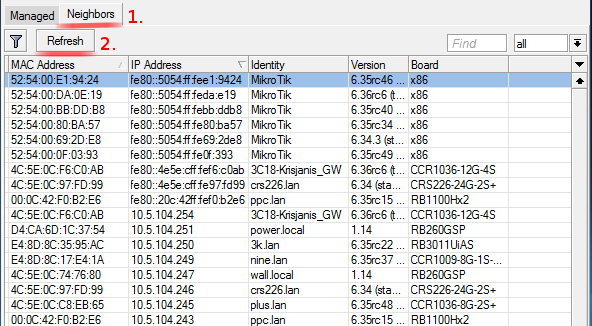
From the list of discovered routers, you can click on the IP or MAC address column to connect to that router. If you click on the IP address then the IP will be used to connect, but if you click on the MAC Address then the MAC address will be used to connect to the router.
Neighbor discovery will show also devices that are not compatible with WinBox, like Cisco routers or any other device that uses CDP (Cisco Discovery Protocol). If you try to connect to a SwOS device, then the connection will be established through a web browser
Buttons/check-boxes and Other Fields
- Connect - Connect to the router.
- Connect To RoMON - Connect to RoMON Agent.
- Add/set - Save/Edit any of the saved router entries in the Managed tab.
- Open In New Window - Leaves the loader open in the background and opens new windows for each device to which connection is made.
- Connect To: - Destination IP or MAC address of the router.
- Login - Username used for authentication.
- Password - Password used for authentication.
- Keep Password - If unchecked, the password is not saved to the list.
Menu Items
-
File
- New - Create a new managed router list in a specified location
- Open - Open managed router list file
- Save As - Save current managed router list to file
- Exit - Exit WinBox loader
-
Tools
- Advanced Mode - Enables/Disables advanced mode view
- Import - Imports saved session file
- Export - Exports saved session file
- Move Session Folder - Changes the path where session files are stored
- Clear cache - Clears WinBox cache
- Check For Updates - Checks for updates for WinBox loader
Advanced mode
Additional WinBox loader parameters are revealed when an advanced mode is enabled with Tools → Advanced Mode:
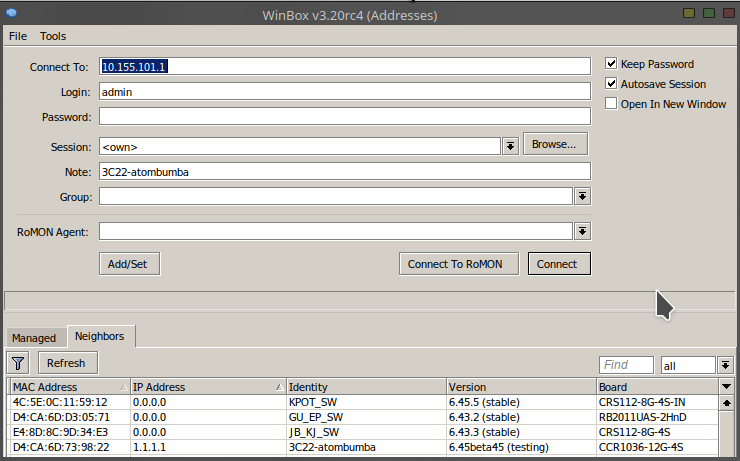
Buttons/check-boxes and Other Fields
Buttons/check-boxes
- Browse - Browse file directory for some specific session.
- Keep Password - If unchecked, the password is not saved to the list.
- Secure mode - If checked, WinBox will use DH-1984 for key exchange and modified and hardened RC4-drop3072 encryption to secure the session.
- Autosave session - Saves sessions automatically for devices to which connections are made.
Fields:
- Session - Saved router session.
- Note - Note that is assigned to saved router entry.
- Group - Group to which saved router entry is assigned.
- RoMON Agent - Select RoMON Agent from the available device list.
The Managed routers list is encrypted, but it can still be loaded with another WinBox, IF the master password is not set for it!
Command Line
It is possible to use the command line to pass connect to, user, password and session ("workspace" for WinBox 4) parameters automatically:
winbox.exe [<connect-to> [<login> [<password>]] <session|workspace>]
For example (with no password):
winbox.exe 10.5.101.1 admin "" "<own>"
This will connect to the router 10.5.101.1 with user "admin" without a password and use session|workspace "<own>".
It is possible to use the command line to pass the connect to, user, and password parameters automatically to connect to the router through RoMON. In this case, RoMON Agent must be saved on the Managed routers list so WinBox will know the user and password for this device:
winbox.exe --romon [<romon-agent> [<connect-to> [<login> [<password>]]] <session|workspace>]
For example (with no password):
winbox.exe --romon 10.5.101.1 D4:CA:6D:E1:B5:7D admin "" "<own>"
Will connect to the router D4:CA:6D:E1:B5:7D, through 10.5.101.1 via RoMON Agent with user "admin" without a password and apply session|workspace called "<own>".
IPv6 connectivity
WinBox supports IPv6 connectivity. To connect to the router's IPv6 address, it must be placed in square brackets the same as in web browsers when connecting to the IPv6 server. Example:
[db8::1]
when connecting to the link-local address, the interface index must be entered after the %:
[0:a00:27ff:fe70::e88c%2]
Port number is set after the square brace when it is necessary to connect WinBox to a port other than the default:
WinBox neighbor discovery is capable of discovering IPv6 enabled routers. There are two entries for each IPv6 enabled router, one entry is with an IPv4 address and another one with an IPv6 link-local address. You can easily choose which one you want to connect to.
Run WinBox on macOS
Starting with macOS 10.15 Catalina, Apple has removed support for 32bit applications, meaning it is no longer possible to use regular Wine and regular WinBox in this OS. Wine has made available a 64bit version for macOS, and MikroTik has released a special WinBox64.exe version as well.
To run WinBox64 the following steps are required:
- Install the latest Wine from the Wine macOS builds page ( wine-devel-7.X-osx64.tar.xz) and make sure you have downloaded the WinBox64.exe executable from the MikroTik download page.
- Launch WinBox64.exe with "open file with" > Wine64.app.
Run WinBox on Linux
It is possible to run WinBox on Linux by using Wine emulation software. Make sure that the Microsoft font pack is installed, otherwise, you may see distortions.
Interface Overview
The WinBox interface has been designed to be intuitive for most of the users. The interface consists of:
- The main toolbar at the top where users can add various info fields, like CPU and memory usage.
- The menu bar on the left - list of all available menus and sub-menus. This list changes depending on what packages are installed. For example, if the IPv6 package is disabled, then the IPv6 menu and all its sub-menus will not be displayed.
- Work area - an area where all menu windows are opened.
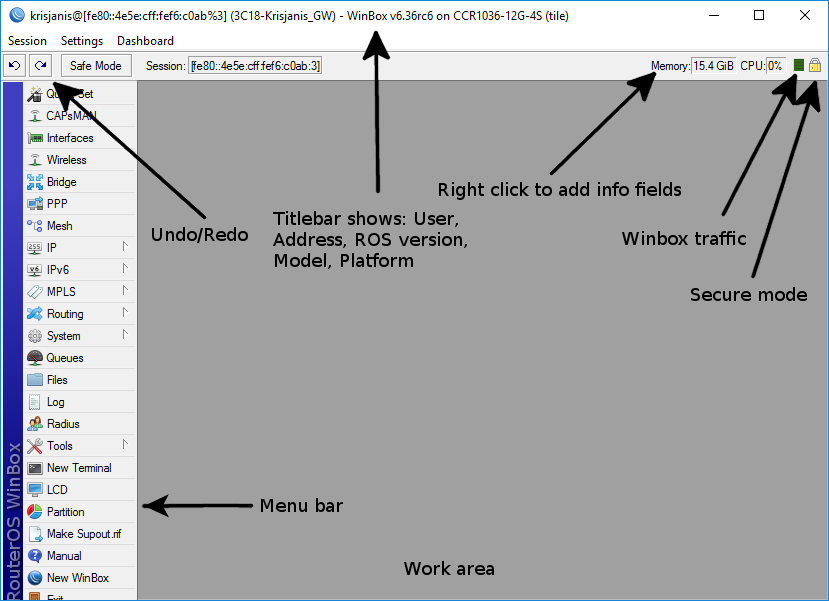
The title bar shows information to identify with which router the WinBox session is opened. Information is displayed in the following format:
[username]@[Router's IP or MAC] ( [RouterID] ) - WinBox [ROS version] on [RB model] ([platform])
From the screenshot above we can see that user krisjanis is logged into the router with IPv4/IPv6 address [fe80::4e5e:cff:fef6:c0ab%3]. Router's ID is 3C18-Krisjanis_GW, currently installed RouterOS version is v6.36rc6, RouterBoard is CCR1036-12G-4S and platform is tile.
On the Main toolbar's left side is located:
- Undo
- Redo
- Safe Mode
- Currently loaded session
More about Safe mode and undoing performed actions can be read in this article.
On the right side is located:
- An indicator that shows whether the WinBox session uses encryption.
- A WinBox traffic indicator displayed as a green bar.
- Custom info fields that can be added by the user by right-clicking on the toolbar and picking available info fields from the list.
Work Area and Child Windows
WinBox has an MDI interface meaning that all menu configuration (child) windows are attached to the main (parent) WinBox window and are shown in the work area.
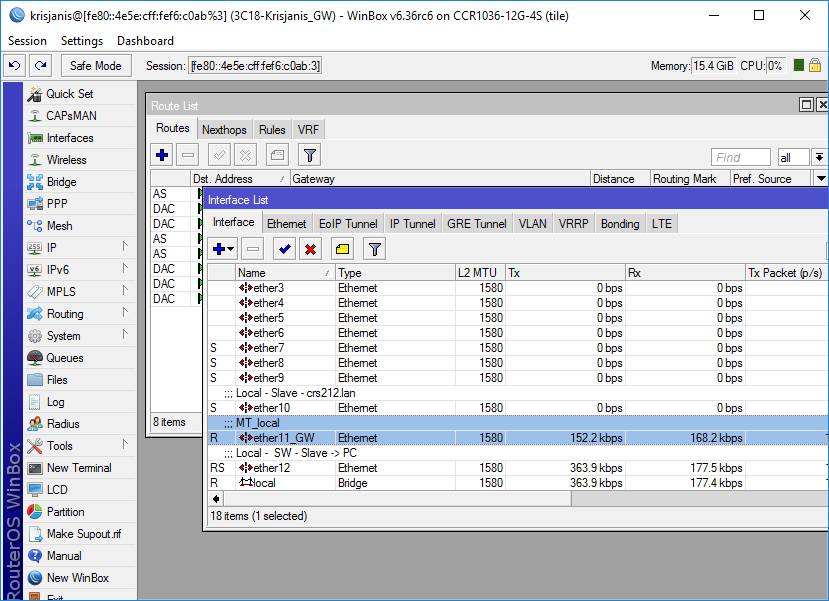
Child windows can not be dragged out of the working area. Notice in the screenshot above that the Interface window is dragged out of the visible working area and a horizontal scroll bar appeared at the bottom. If any window is outside the visible work area boundaries the vertical and/or horizontal scrollbars will appear.
Child window menu bar
Each child window has its own toolbar. Most of the windows have the same set of toolbar buttons:
 Add - add a new item to the list.
 Remove - remove the selected item from the list.
 Enable - enable the selected item (the same as enable command from console).
 Disable - disable the selected item (the same as disable command from console).
 Comment - add or edit a comment.
 Sort - allows you to sort out items depending on various parameters. Sorting out displayed items
Almost all windows have a quick search input field on the right side of the toolbar. Any text entered in this field is searched through all the items and highlighted as illustrated in the screenshot below.
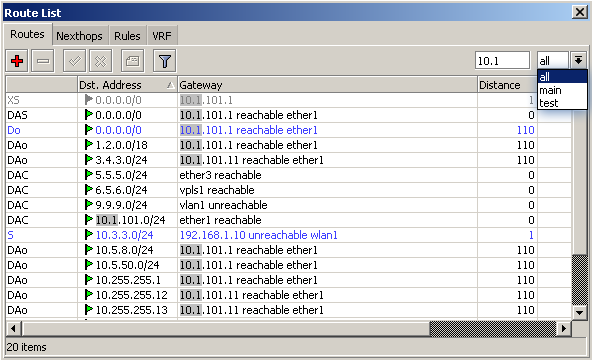
Notice that on the right side next to the quick find input field there is a drop-down box. For the currently opened (IP Route) window, this drop-down box allows to quickly sort out items by routing tables. For example, if the main is selected, then only routes from the main routing table will be listed.
A similar drop-down box is also in all firewall windows to quickly sort out rules by chains.
Sorting out displayed items
Almost every window has a Sort button. When clicking on this button, several options appear as illustrated in the screenshot below.
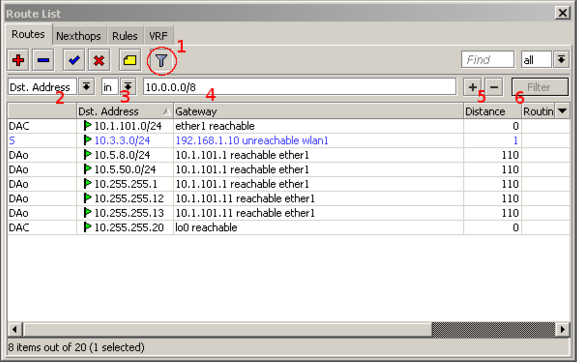
The example shows how to quickly filter out routes that are in the 10.0.0.0/8 range:
- Press the Sort button.
- Choose Dst.Address from the first drop-down box.
- Choose in from the second drop-down box. "in" means that the filter will check if DST address value is in range of the specified network.
- Enter the network against which values will be compared (in our example enter "10.0.0.0/8").
- These buttons are to add or remove another filter to the stack.
- Press the Filter button to apply our filter.
As you can see from the screenshot, WinBox sorted out only routes that are within the 10.0.0.0/8 range.
Comparison operators (Number 3 in the screenshot) may be different for each window. For example, the "IP Route" window has only two: is and in. Other windows may have operators such as "is not", "contains", "contains not".
WinBox allows building a stack of filters. For example, if there is a need to filter by destination address and gateway, then:
- Set the first filter as described in the example above.
- Press the [+] button to add another filter bar in the stack.
- Set up a second filter to filter by the gateway.
- Press the Filter button to apply filters.
You can also remove unnecessary filters from the stack by pressing the [-] button.
Customizing list of displayed columns
By default, WinBox shows the most commonly used parameters. However, sometimes it is needed to see other parameters, for example, "BGP AS Path" or other BGP attributes to monitor if routes are selected properly.
WinBox allows you to customize displayed columns for each individual window. For example, to add the BGP AS path column:
- Click on the little arrow button (1) on the right side of the column titles or right mouse click on the route list.
- From the popped up menu move to Show Columns (2) and from the sub-menu pick the desired column, in our case click on BGP AS Path (3).
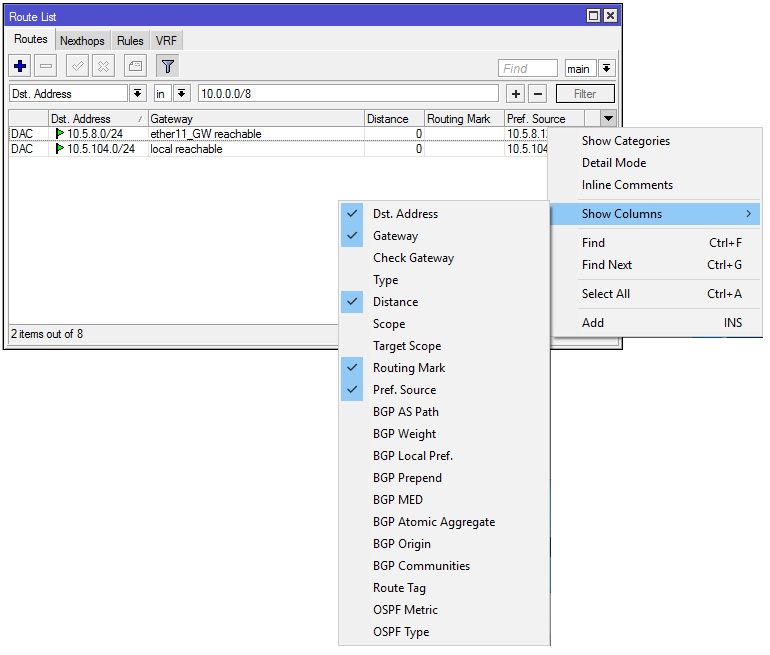
Changes made to the window layout are saved and the next time WinBox is opened the same column order and size are applied.
Detail mode
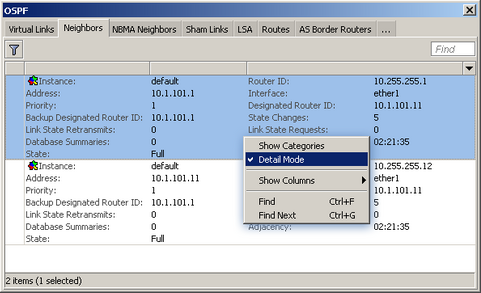
It is also possible to enable Detail mode. In this mode all parameters are displayed in columns, the first column is the parameter name, the second column is the parameter's value.
To enable detail mode, right mouse click on the item list and from the popup menu pick Detail mode
Category view
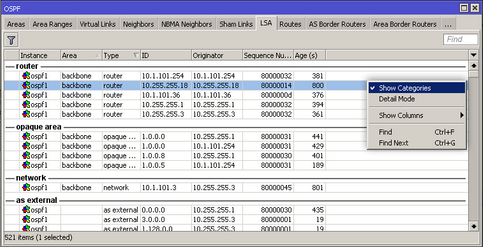
It is possible to list items by categories. In this mode, all items will be grouped alphabetically or by another category. For example, items may be categorized alphabetically if sorted by name, and items can also be categorized by type like in the screenshot below.
To enable Category view, right mouse click on the item list and from the popup menu pick Show Categories.
Drag & Drop
It is possible to upload and download files to/from the router using WinBox drag & drop functionality. You can also download the file by pressing the right mouse button on it and selecting "Download".
Drag & Drop works if WinBox is running on Linux using wine4. Drag and drop between two WinBox windows may fail.
Traffic monitoring
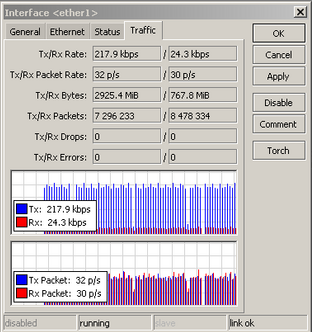
WinBox can be used as a tool to monitor the traffic of every interface, queue, or firewall rule in real-time. The screenshot below shows Ethernet traffic monitoring graphs.
Item copy
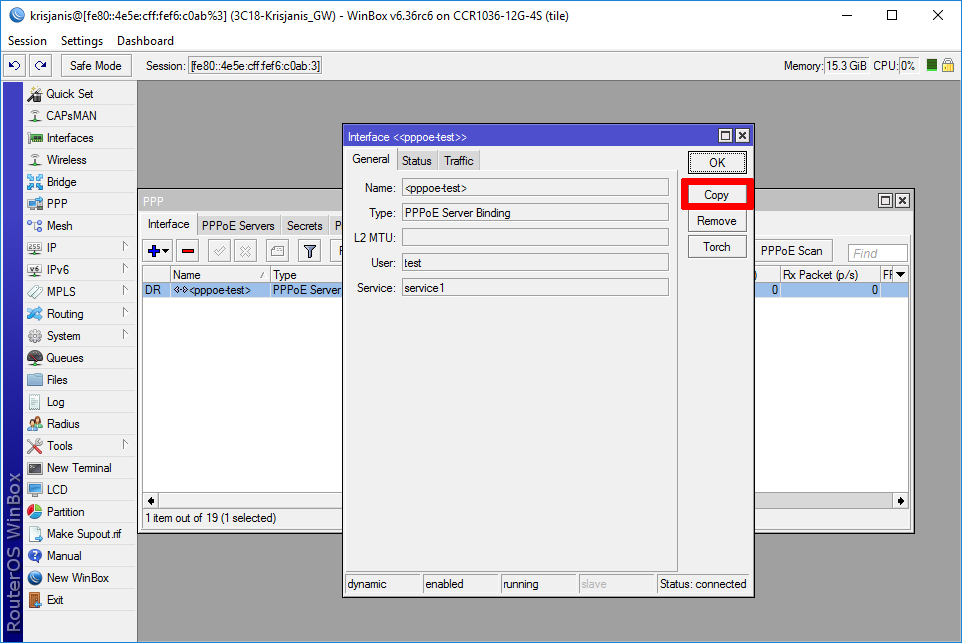
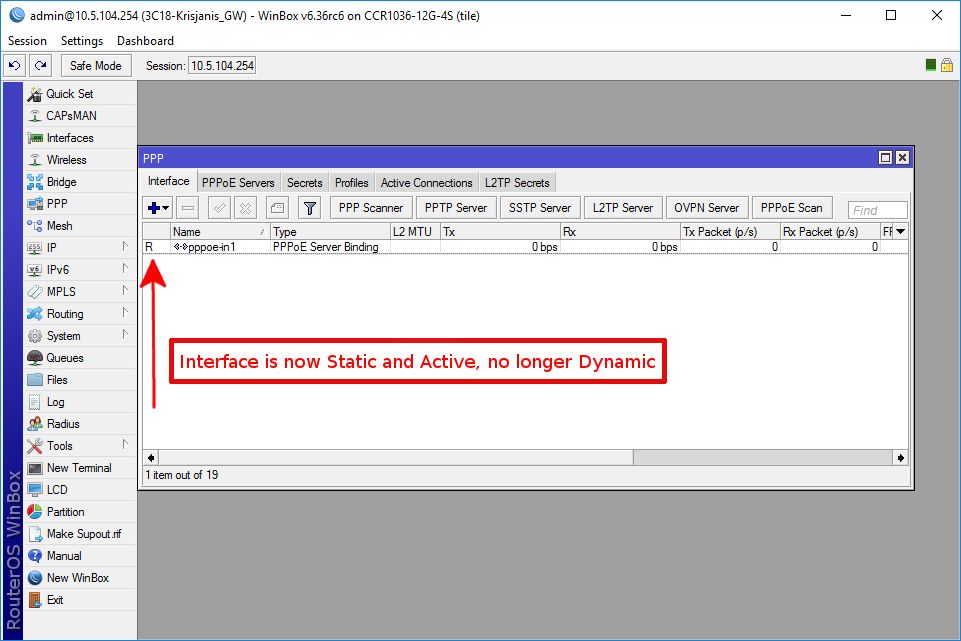
This shows how easy it is to copy an item in WinBox. In this example, we will use the COPY button to make a Dynamic PPPoE server interface into a Static interface.
This image shows us the initial state. As you see, DR indicates "D" which means Dynamic:
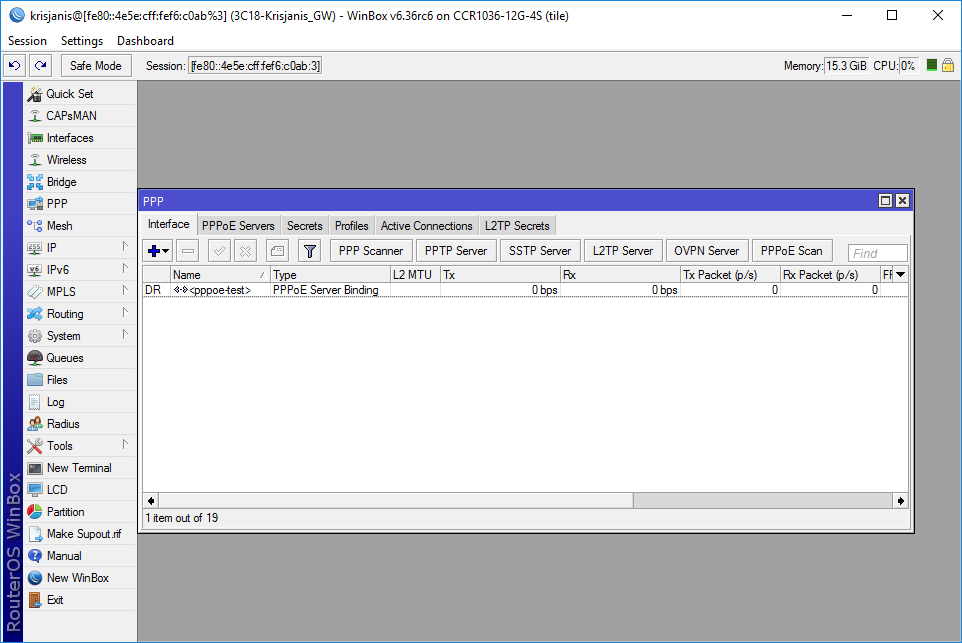
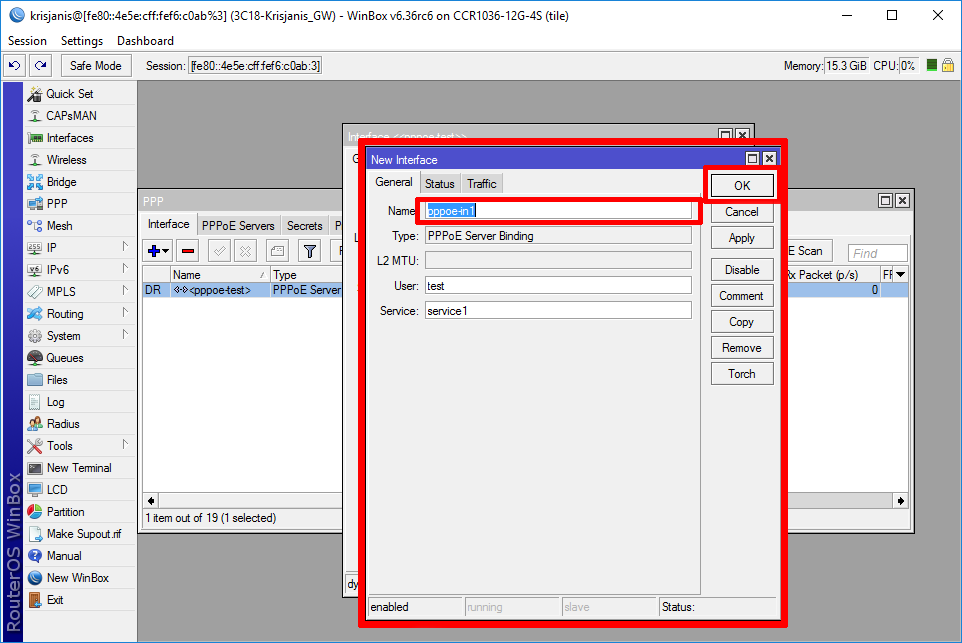
Double-Click on the interface and click on COPY:
A new interface window will appear, and a new name will be created automatically (in this case pppoe-in1).
After this Down/Up event this interface will be Static:
Transferring Settings
-
Managed router transfer - In the File menu, use Save As and Open functions to save the managed router list to a file and open it up again on a new workstation.
-
Router sessions transfer - In the Tools menu, use Export and Import functions to save existing sessions to a file and import them again on a new workstation.
WinBox v3 Keyboard Shortcuts
| Shortcut | Description |
|---|---|
| Ctrl + F | Find |
| Ctrl + G | Find Next |
| F3 | Find / Find next |
| Ctrl + M | Add or edit a comment |
| Ctrl + E or Num+ | Enables a selected setting |
| Ctrl+ D or Num- | Disables a selected setting |
| Ctrl + + | Zoom in WinBox |
| Ctrl+ - | Zoom out WinBox |
| Tab | Choose next control |
| Tab+Shift | Choose previous control |
| Space | Select focused control |
| F4 or Esc | Close window |
| F6 | Focus previous window |
| F6+Shift | Focus next window |
| Insert | Add new entry into list |
| Delete | Delete entry from list |
WinBox v4 Keyboard Shortcuts
| Shortcut | Description |
|---|---|
| Ctrl + E or Num+ | Enables a selected setting |
| Ctrl+ Dor Num- | Disables a selected setting |
| Ctrl/CMD + + | Zoom in WinBox |
| Ctrl/CMD + - | Zoom out WinBox |
| Ctrl/CMD+ 0 | Reset zoom |
| Ctrl + Tab | Choose next tab |
| Ctrl + Shift + Tab | Choose previous tab |
| Tab | Choose next control |
| Shift + Tab | Choose previous control |
| Space | Select focused control |
| Ctrl + F4or Alt/Cmd + W | Close window |
| Alt + A/ Cmd + Shift + S | Focus previous window |
| Alt/Cmd + S | Focus next window |
| Delete | Delete entry from the list |
| Alt/Cmd+ Opt + F | Global menu search |
| Alt/Cmd + T | Open a new Terminal window |
Troubleshooting
WinBox cannot connect to the router's IP address, devices do not show up in the Neighbors list
Make sure that the Windows firewall is set to allow WinBox connections through Private and/or Public network interfaces in the Windows firewall. It can be changed in Control Panel\System and Security\Windows Defender Firewall\Allowed applications. Or disable the Windows firewall.
I get an error '(port 20561) timed out' when connecting to routers mac address
Windows (7/8) does not allow MAC connection if file and print sharing is disabled.
I can't find my device in WinBox IPv4 Neighbors list or MAC connection fails with "ERROR could not connect to XX-XX-XX-XX-XX-XX"
Most of the network drivers will not enable IP stack unless your host device has an IP configuration. Set IPv4 configuration on your host device.
Sometimes the device will be discovered due to caching, but MAC connection will still fail with "ERROR: could not connect to XX:XX:XX:XX:XX:XX".
WinBox MAC-ADDRESS connection requires an MTU value set to 1500, unfragmented. Other values can perform poorly - loss of connectivity can occur.