VRRP Configuration Examples
Basic Setup
This is the basic VRRP configuration example.
Note
It is recommended to use the same version of RouterOS for all devices with the same VRID used to implement VRRP.
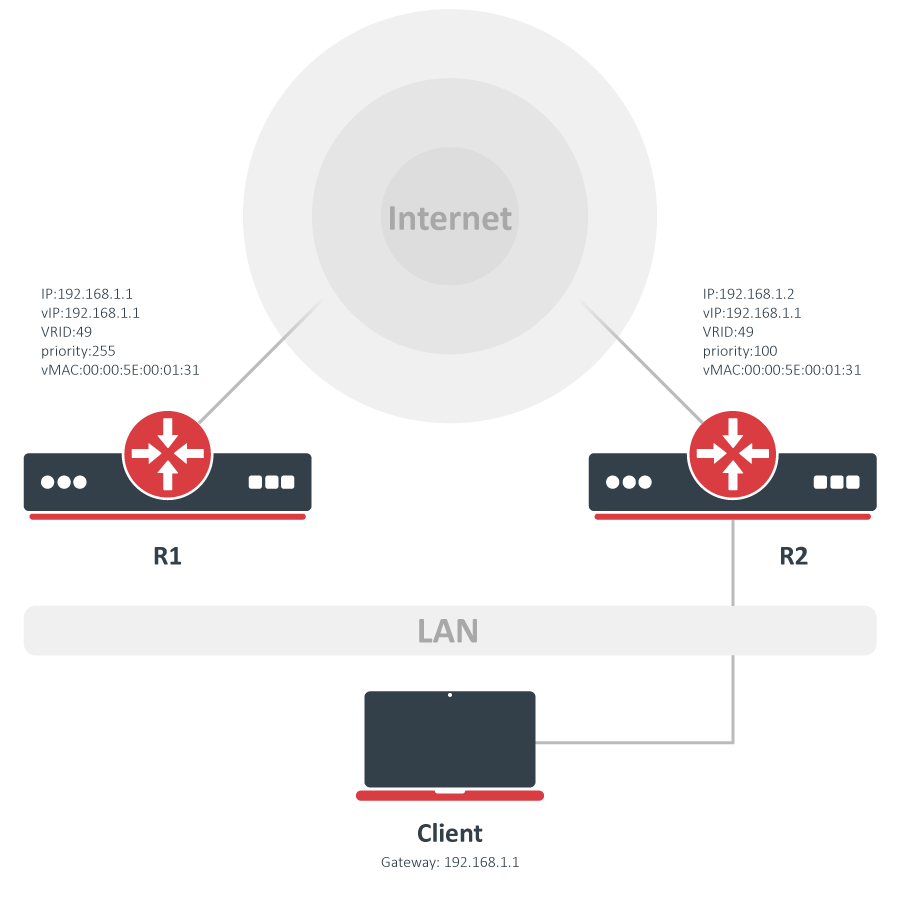
According to this configuration, as long as the master, R1, is functional, all traffic destined for the external network gets directed to R1. But as soon as R1 fails, R2 takes over as the master and starts handling packets forwarded to the interface associated with IP(R1). In this setup router "R2" is completely idle during the Backup period.
Configuration
R1 configuration:
/ip/address/add address=192.168.1.10/24 interface=ether1
/interface/vrrp/add interface=ether1 vrid=49 priority=254
/ip/address/add address=192.168.1.1/32 interface=vrrp1
R2 configuration:
/ip/address/add address=192.168.1.20/24 interface=ether1
/interface/vrrp/add interface=ether1 vrid=49
/ip/address/add address=192.168.1.1/32 interface=vrrp1
Testing
First of all, check if both routers have correct flags at VRRP interfaces. On router R1 it should look like this.
/interface/vrrp/print detail
 0   RM name="vrrp1" mtu=1500 mac-address=00:00:5E:00:01:31 arp=enabled interface=ether1 vrid=49
        priority=254 interval=1 preemption-mode=yes authentication=none password="" on-backup=""
        on-master="" version=3 v3-protocol=ipv4
and on router R2:
/interface/vrrp/print detail
 0    B name="vrrp1" mtu=1500 mac-address=00:00:5E:00:01:31 arp=enabled interface=ether1 vrid=49
        priority=100 interval=1 preemption-mode=yes authentication=none password=""
        on-backup="" on-master=" version=3 v3-protocol=ipv4
As you can see VRRP interface MAC addresses are identical on both routers. Now to check if VRRP is working correctly, try to ping the virtual address from a client and check ARP entries:
[admin@client] > /ping 192.168.1.1
192.168.1.254 64 byte ping: ttl=64 time=10 ms
192.168.1.254 64 byte ping: ttl=64 time=8 ms
2 packets transmitted, 2 packets received, 0% packet loss
round-trip min/avg/max = 8/9.0/10 ms
[admin@client] /ip/arp> print
Flags: X - disabled, I - invalid, H - DHCP, D - dynamic
 #   ADDRESS         MAC-ADDRESS       INTERFACE
 ...
 1 D 192.168.1.1   00:00:5E:00:01:31 bridge1
Now unplug the ether1 cable on router R1. R2 will become VRRP master, and the ARP table on a client will not change, but traffic will start to flow over the R2 router.
In case VRRP is used with Reverse Path Filtering, it is recommended that rp-filter is set to loose, otherwise, the VRRP interface might not be reachable.
Load sharing
In the basic configuration example, R2 is completely idle during the Backup state. This behavior may be considered a waste of valuable resources. In such circumstances, the R2 router can be set as the gateway for some clients.
The obvious advantage of this configuration is the establishment of a load-sharing scheme. But by doing so, the R2 router is not protected by the current VRRP setup.
To make this setup work we need two virtual routers.
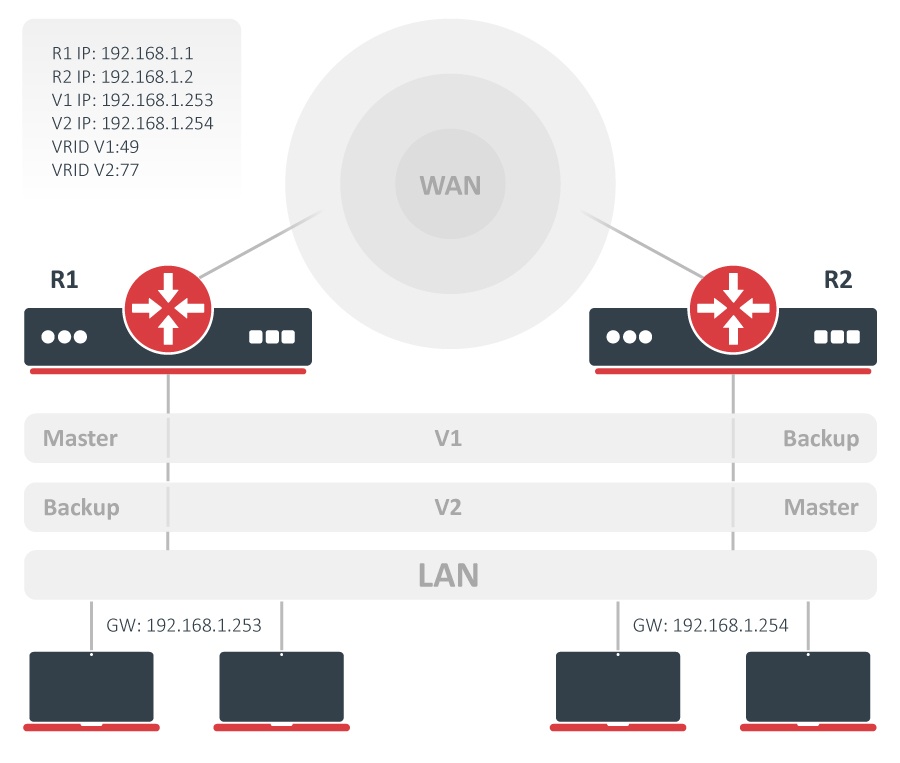
Configuration for the V1 virtual router will be identical to a configuration in the basic example - R1 is the Master and R2 is the Backup router. In V2 the Master is R2 and the Backup is R1.
With this configuration, we establish load-sharing between R1 and R2; moreover, we create a protection setup by having two routers acting as backups for each other.
Configuration
R1 configuration:
/ip/address/add address=192.168.1.1/24 interface=ether1
/interface/vrrp/add interface=ether1 vrid=49 priority=254
/interface/vrrp/add interface=ether1 vrid=77
/ip/address/add address=192.168.1.253/32 interface=vrrp1
/ip/address/add address=192.168.1.254/32 interface=vrrp2
R2 configuration:
/ip/address/add address=192.168.1.2/24 interface=ether1
/interface/vrrp/add interface=ether1 vrid=49
/interface/vrrp/add interface=ether1 vrid=77 priority=254
/ip/address/add address=192.168.1.253/32 interface=vrrp1
/ip/address/add address=192.168.1.254/32 interface=vrrp2
VRRP without Preemption
Each time the router with a higher priority becomes available it becomes the Master router. Sometimes this is not the desired behavior and can be turned off by setting preemption-mode=no in VRRP configuration.
Configuration
We will be using the same setup as in the basic example. The only difference is that during configuration, set preemption-mode=no. It can be done easily by modifying the existing configuration:
/interface/vrrp/set [find] preemption-mode=no
Testing
Try turning off the R1 router, R2 will become the Master router because it has the highest priority among available routers.
Now turn the R1 router on and you will see that the R2 router continues to be the Master even if R1 has the higher priority.