LCD Touchscreen
Summary
RouterBOARD 2011U and CCR series devices are equipped with a resistive touchscreen for quick access to device statistics and simple configuration options. The touchscreen requires pressure against the surface to register a touch; therefore, light swipes and quick or short taps might not be registered (unlike capacitive touchscreens commonly found on phones). If you encounter difficulty operating the screen with your finger, you can also try a stylus or the opposite end of a pen.
Configuration
Sub-menu: /lcd
This sub-menu provides configuration options for the LCD touchscreen.
| Property | Description |
|---|---|
| backlight-timeout (time interval: 5m..2h | never; Default: 30m) | Specifies the duration of inactivity before the LCD touchscreen backlight turnssoff. Set to "never" to keep the backlight always on. |
| color-scheme (dark | light; Default: depends on RouterBoard model) | Sets the color scheme for the LCD display, choosing between a dark or light background. |
| default-screen (informative-slideshow|interface|log|main-menu|stat-slidehow|stats|stats-all; Default: main-menu) | Defines the default screen displayed on the LCD after the router boots up. |
| enabled (yes | no; Default: yes) | Enables or disables the LCD touchscreen. When disabled, the touchscreen stops functioning, statistics gathering resets, and the LCD program closes. |
| read-only-mode (yes | no; Default: yes) | Enables or disables Read-Only mode. When enabled, menus that allow configuration changes are hidden from the LCD interface. |
| time-interval (min | hour | daily | weekly; Default: min) | Sets the time interval for displayed interface statistics in the Stats screen. |
| touch-screen (enabled | disabled, Default: enabled) | Enables or disables touch screen input functionality. |
Available Functions
The LCD touchscreen supports the following functions:
- backlight - Turns the LCD backlight on or off. The LCD program continues running.
- recalibrate - Starts the LCD touchscreen calibration process.
- show - Specifies which screen is displayed on the LCD.
- take-screenshot - Creates a screenshot of the currently displayed LCD screen.
LCD Touchscreen Calibration
The LCD touchscreen requires calibration before it can be used for the first time. Calibration data is stored on the router after a successful calibration. If no calibration data exists, the calibration process starts automatically.
During calibration or recalibration, you must touch four points displayed on the screen. Three of these points are used to calculate the calibration variables, while the fourth point verifies whether the calibration was successful. If calibration fails, the calibration variables are not saved. After touching the fourth point, a message displays the calibration result.
Take LCD Screenshot
The take-screenshot function captures the current LCD screen as a BMP image and saves it to the File List using the specified file name. Screenshots without a file name are not saved. If a file with the specified name already exists, it will be overwritten.
Example:
[admin@MikroTik] /lcd/take-screenshot file-name=screen-1
Screenshot taken
[admin@MikroTik] >
LCD Interface
Sub-menu: /lcd/interface
The Interfaces submenu configures how individual interface statistics are displayed in the Stat Slideshow. Up to 10 additional (non-physical) interfaces can be added to the LCD for monitoring purposes.
| Property | Description |
|---|---|
| disabled (*yes | no*; Default: no) |
| max-speed (*integer | auto*; Default:) |
| timeout (time interval: 1s..1m; Default: 10s) | Specifies how long each interface slide displays during the slideshow |
- display - Displays the interface in the Stats screen.
All Interface Graph Screen
Sub-menu: /lcd/interface/pages
A Page is a screen that can contain up to 12 interface bar graphs. The Sub-menu allows configuring which interfaces are shown in a page. Up to 5 pages can be added to the All Interface Graph Screen and up to 12 interfaces per page. To add an interface to a page, it first must be added under /lcd/interfaces sub-menu.
| Property | Description |
|---|---|
| interfaces (interface names; Default:) | Interfaces that are shown on the screen. Must have at least 1 interface. |
LCD Informative Screens
Sub-menu: /lcd/screen
The Screens menu allows you to configure the display timing for each slide in the Informative Slideshow.
| Property | Description |
|---|---|
| disabled (*yes | no*; Default: no) |
| timeout (time interval: 1s..1m; Default: 10s) | Duration that each informative slide is displayed |
LCD PIN Code
Sub-menu: /lcd/pin

The PIN code protects sensitive menus on the LCD screen. The PIN is requested when Read-Only mode is disabled and you attempt to add an IP address, reset, or reboot the router. The default PIN is 1234.
| Property | Description |
|---|---|
| pin-number (number; Default: 1234) | PIN protection code |
| hide-pin-number (*yes | no*; Default: no) |
LCD screens/modes
Since v6.0, LCD has a menu structure. Menu screens consist of buttons that are used to navigate the menus. A scrollbar is shown on the right side of the screen if it does not fit on the actual display. The screen can be dragged up or down to access more options if they are available. At the top of each menu screen is a "Back" button that jumps to the previous screen.
Startup
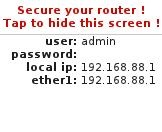
If the router has default configuration - user named "admin" with no password, then a warning on LCD will appear. This screen shows IPs assigned to the interfaces which could be used to connect to the router. Otherwise, the Main menu screen is displayed after booting up.
Interfaces
The Interfaces menu displays all the Ethernet and Wireless interfaces. Bandwidth usage is shown similar to the All interface graph screen. From the Interfaces screen, you can choose a specific interface to look at. The following options are available:
- Info (only for physical interfaces) - menu which shows information about the interface.
- Registration Table (only for wireless) - menu which shows all the registered clients for the wireless interface and their respective signal strengths.
- Addresses - menu which lists all the addresses assigned to the interface.
- Stats - menu which allows you to jump to the selected interface in the "Stats" screen. You can directly choose to show Bandwidth or Packets.
 Info Info |  Registration Table Registration Table |  Addresses Addresses |  Stats selection Stats selection |
Stats
The Stats screen shows single interface graphs for RX and TX. Values are updated from right to left (newest to oldest). The Info that is shown: RX/TX rate and packets.

The interface name is shown at the top right; it is trimmed if it's too long (last characters are cut off). The top right corner shows the time interval for the values. The following time values are available:
- Min (Minute) - shows values for the last minute. Unit = second. Vertical line separates the first 30 seconds. Total values: 30 + 24.
- Hour - shows values for the last hours. Unit = 5 minutes. Vertical lines separate 1 hour. Total values: 12 + 12 + 3.
- Daily - shows values for the last days. Unit = hour. Vertical lines separate 1 day. Total values: 12 + 12 + 3.
- Weekly - shows values for the last weeks. Unit = day. Vertical lines separate 1 week. Total values: 7 + 7 + 4.
Motions
- Tap - tapping the finger against the touch screen without moving it too much.
- If a tap lands in the top right corner of the screen (square box 1/4 of the screen height), info time interval is changed: Min -> Hour -> Daily -> Weekly -> Min...
- Otherwise a tap cycles through graph info: rate -> packets -> rate...
- Swipe/Drag - while holding the finger down, move in any direction. The changes should be highlighted during the drag.
- Up - Go to Main menu.
- Down - Select All Interface graph screen.
- Left - Next interface.
- Right - Previous interface.
All Interface Graph Screen
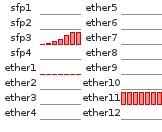
The All interface graph screen shows the RX/TX bandwidth usage of all interfaces. The max values are calculated like this - for Ethernet interfaces it's the negotiated rate or set speed. For wireless interfaces it's calculated from used band, channel-width and chain count using the theoretical values. The goal of this screen is to see how values are related to each other for a single interface.
Motions
- Swipe/drag:
- Up - Back (to Stats screen).
- Left - Next page.
- Right - Previous page.
Stat Slideshow
The Stat Slideshow screen is similar to the "Stats" screen, but the interfaces are switched after they timeout. Settings for the slideshow are stored in the RouterOS submenu /lcd/interface
Informative Slideshow
The Submenu /lcd/screen Informative Slideshow screen cycles through screens with various system information:
- Aggregate traffic.
- Aggregate packets.
- Resources.
- System.
- Health.
- Date & time.
 System System |  Resources Resources |  Health Health |
Log
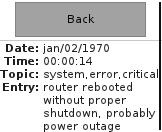
The Log screen shows the 5 last log entries where log action=echo.
Reboot and Reset Configuration
These screens are only available when Read-Only mode is disabled. To access any of the screens, the Pin number must be entered. If the Pin authentication is successful, the user must confirm the desired action by pressing the "Yes" button, or cancel by pressing "No".