ROSE-storage
This section covers ROSE-storage and related disk features. Use it to configure storage, filesystems, client access, and redundancy options on RouterOS.
Btrfs
Summary
While regular drives are supported, for reliability purposes, we highly recommend using drives that have Power Loss Protection (PLP).
The ROSE (RouterOS Enterprise) package adds data center functionality to RouterOS - for supporting disk monitoring, improved formatting with BTRFS and XFS file systems, RAIDs, rsync, iSCSI, NVMe over TCP, NFS. This functionality is currently supported on arm, arm64, x86 and tile platforms.
Storage Type
Crypted
Drive or device used together with type=crypted to make "dm_crypt" encrypted storage. dm-crypt is a transparent disk encryption subsystem designed to provide encryption of block devices.
Properties
| Property | Description |
|---|---|
| slot (string; Default: ) | Name of the file system |
| encryption-key (string; Default: ) | key used to decrypt |
| crypted-backend*(string;* Default: ) | Drive or partition to encrypt |
Example: Simple crypted file system
To create an encrypted file-system:
add crypted-backend=usb1 encryption-key=<secret_key> slot=crypted-usb1 type=crypted
After it's created, format the file system and it's ready to go.
/disk/format crypted-usb1 file-system=ext4
Example: Crypted RAID1 array with integrity check
Create a RAID1 array and create a encrypted-file system on top of it:
/disk
add raid-device-count=2 raid-type=1 slot=raid1 type=raid
set nvme3 raid-master=raid1 raid-role=0
set nvme4 raid-master=raid1 raid-role=1
add crypted-backend=raid1 encryption-key=<secret_key> slot=crypted-raid1 type=crypted  crypt-mode=encryption-and-integrity
Format the encrypted file-system to Btrfs:
/disk
 format crypted-raid1 file-system=btrfs
iSCSI
iSCSI allows accessing storage over an IP-based network. On the initiator the iSCSI device will appear as a block device. RouterOS supports both target and initiator modes.
Properties
| Property | Description |
|---|---|
| iscsi-address | IP address of the iSCSI target. (Host device IP) |
| iscsi-export | Disables/enables iSCSI on the host device |
| iscsi-iqn | Unique identifier used to name the iSCSI target. |
| iscsi-port | Network port used by the iSCSI target to listen for incoming connections from initiators. The default port for iSCSI traffic is 3260. |
| iscsi-server-iqn | Unique identifier used by the iSCSI server. By default the format for the IQN is iqn.2000-02.com.mikrotik:slot (starting 7.21beta2) |
| iscsi-server-port | Network port used by the iSCSI server. (starting 7.21beta2) |
Configuration example
Host
/disk
set pcie1-nvme1 iscsi-export=yes
Client
/disk
add type=iscsi iscsi-address=192.168.1.1 iscsi-iqn=iqn.2000-02.com.mikrotik:pcie1-nvme1
NFS
NFS allows sharing local directories over a network. RouterOS currently supports NFS v4-only mode.
NFS uses port TCP/2049. If the port is not available in disk print detail you will see the state stuck at nfs-state="mounting"
Properties
| Property | Description |
|---|---|
| nfs-address | IP address of the NFS target. (host device IP) |
| nfs-share | Specify the folder to mount (client parameter) |
| nfs-sharing | Disable/enable NFS on the host device |
Configuration example
Host
/disk
set pcie1-nvme1 nfs-sharing=yes
Client
/disk
add type=nfs nfs-address=192.168.1.1
Linux client
mkdir /mnt/files
mount -t nfs 192.168.1.1:/ /mnt/files
NVME over TCP
nvme-tcp allows accessing storage over the network as an NVMe block device on the initiator side. On the target side this device can be hdd/ssd/nvme or even a raid array.
Properties
| Property | Description |
|---|---|
| nvme-tcp-address | IP address of the NVME over TCP target. (host device IP) |
| nvme-tcp-export | Disable/enable NVME over TCP on the host device |
| nvme-tcp-host-name | This property specifies the hostname of the NVMe over TCP initiator. It can be used for identification and authentication purposes |
| nvme-tcp-name | This property specifies the name of the NVMe over TCP target or the connection name for reference purposes (needs to be the same as host slot name) |
| nvme-tcp-password s**ensitive | This property is used to specify the password for authenticating the NVMe over TCP connection, ensuring secure access. |
| nvme-tcp-port | This property specifies the network port used by the NVMe over TCP target to listen for incoming connections from initiators. The default port for NVMe over TCP traffic is 4420. |
| nvme-tcp-server-allow-host-name | This property specifies whether the NVMe over TCP server allows connections from specific hostnames, providing a mechanism for host-based access control. |
| nvme-tcp-server-password sensitive | This property specifies the password for the NVMe over TCP server, used for authenticating initiators connecting to the target. |
| nvme-tcp-server-port | This property specifies the network port used by the NVMe over TCP server to accept connections from initiators. |
Example: Mount a disk
In this example, one RouterOS device is used as a storage server ( Host ) and another RouterOS device requires a storage device to be mounted over the network ( Client ).
-
Use the following commands on Host :
/disk/set disk1 nvme-tcp-export=yes nvme-tcp-port=4420 -
Use the following commands on Client :
/disk/add type=nvme-tcp nvme-tcp-address=192.168.1.1 nvme-tcp-name=disk1 -
Your Client will now see a disk that is actually mounted over network using NVMe-Over-TCP.
Linux Client
Use these commands to set up NVM-Over-TCP on a Linux Client .
-
Load kernel module.
modprobe nvme_tcp -
Discover existing NVMe-Over-TCP mounts.
nvme discover -t tcp -a 192.168.1.1 -s 4420#OUTPUT:Discovery Log Number of Records 1, Generation counter 2=====Discovery Log Entry 0======trtype: tcpadrfam: ipv4subtype: nvme subsystemtreq: not specified, sq flow control disable supportedportid: 4420trsvcid: 4420subnqn: disk1traddr: 10.155.166.7sectype: none -
Connect to the NVMe-Over-TCP mount.
nvme connect -t tcp -a 192.168.1.1 -s 4420 -n disk1 -
Block devices now should be available.
ls /dev/nvme*#OUTPUT:/dev/nvme0 /dev/nvme0n1 /dev/nvme-fabrics -
You can now use the mounted block device as any other block device on your Linux Client.
In case you want to disconnect the mounted block device:
nvme disconnect -d /dev/nvme0
Example: Mount a file as a block device
In this example, one RouterOS device is used as a storage server ( Host ) and another RouterOS device requires a storage device to be mounted over the network ( Client ).
Such a setup is useful when you don't want to delegate the whole disk to a Client , but rather give a fraction of the disk size to the Client . Mounting a file rather than a disk is going to have lower performance than mounting a disk (or partition) using NVMe-Over-TCP.
-
Use the following commands on Host to create a file that is going to be used as a block device:
/disk/add type=file file-path=disk1/BIGFILE.img file-size=10G slot=blockdevice1/disk/set blockdevice1 nvme-tcp-export=yes -
Use the following commands on Client to mount the file as a block device:
/disk/nvme-discover 192.168.1.1/disk/add nvme-tcp-address=192.168.1.1 nvme-tcp-name=blockdevice1 type=nvme-tcp/disk/format blockdevice1 file-system=ext4 -
Your Client will now see a new disk called
blockdevice1even though on the Server the storage device is actually a file.
In case you want to mount the block device on a Linux Client, then check the LinuxClient section.
Example: Mount a RAID array
In this example, one RouterOS device is used as a storage server ( Host ) and another RouterOS device requires a storage device to be mounted over the network ( Client ), but also provides data redundancy.
-
Set up a RAID on the Host, for example:
/disk/add raid-device-count=8 raid-type=6 slot=RAID6_array type=raid/disk/set disk1 raid-master=RAID6_array raid-role=0/disk/set disk2 raid-master=RAID6_array raid-role=1/disk/set disk3 raid-master=RAID6_array raid-role=2/disk/set disk4 raid-master=RAID6_array raid-role=3/disk/set disk5 raid-master=RAID6_array raid-role=4/disk/set disk6 raid-master=RAID6_array raid-role=5/disk/set disk7 raid-master=RAID6_array raid-role=6/disk/set disk8 raid-master=RAID6_array raid-role=7/disk/set RAID6_array nvme-tcp-export=yes -
Use the following commands on the Client:
-
Your Client will now see a single disk, but it is actually a highly redundant RAID array.
In case you want to mount the block device on a Linux Client, then check the LinuxClient section.
Do not mount multiple disks from different RouterOS devices on a Linux Client and put them into a software RAID configuration (for example, mdadm). While this type of configuration does provide some redundancy, you can expect abnormal latency issues or even timeouts. It is recommended to create a RAID array on your RouterOS and export the RAID array as a block device to your Linux Client.
Ramdisk
RAMdisk - allows using part of RAM as an attached device (block device). If compared to tmpfs - this allows using RAM as part of a raid, or any other configuration where a device instead of a folder is required.
RAMdisk will be cleared on reboot or power loss
Properties
| Property | Description |
|---|---|
| ramdisk-size | Size of the block device you want to create |
Configuration example
/disk/add type=ramdisk ramdisk-size=500M
To start using the created ramdisk, you must first format it.
/disk/format ramdisk1
SMB
SMB is a popular file-sharing protocol. The ROS package currently supports SMB2.1, SMB3.0, SMB3.1.1 dialects (SMB1 is not supported due to security vulnerabilities).
Properties
| Property | Description |
|---|---|
| smb-address | IP address of the SMB server |
| smb-password*sensitive* | SMB password |
| smb-share | Name of the share you want to connect to |
| smb-user | SMB user |
Configuration example
Client
add smb-address=10.155.145.11 smb-share=share1 smb-user= smb-password=password type=smb
Server-side configuration can be found - SMB
Tmpfs
TMPFS - allows using part of RAM as a filesystem (can't be used as a block device)
Tmpfs will be cleared on reboot or power loss
Properties
| Property | Description |
|---|---|
| tmpfs-max-size | Size of the block device you want to create |
Configuration example
add type=tmpfs tmpfs-max-size=10G
RAID
RAID (Redundant Array of Independent Disks) technology allows storing data on multiple drives - improving data transfer performance, data protection or both by combining them into logical units.
In the case of a RAID disk failure, a rebuild begins automatically once the failed drive is replaced.
RouterOS supports software RAID levels 0,1,4,5,6,linear and nested RAID.
Properties
| Property | Description |
|---|---|
| raid-type | RAID type used (levels 0,1,4,5,6,linear and nested RAID.) |
| raid-chunk-size | The size of the chunks or stripes used in the RAID array. |
| raid-device-count | The number of devices (disks) included in the RAID array. |
| raid-master | Created RAID master block device that the disks are added to. |
| raid-max-component-size | The maximum size of an individual component or disk in the RAID array. |
| raid-member-failed | Sets the drive in a failed state in the RAID array. Used if there is a need to change a non-failed drive |
| raid-role | Defines the role of each device within the RAID array. |
| raid-scrub | Verifies and repairs data integrity across the RAID array. |
Configuration example (RAID6):
This is an example on how to configure RAID. It will be the same procedure for most RAID types
Create the RAID block device (in this example, RAID 6)
add raid-device-count=20 raid-type=6 slot=raid1 type=raid
Add drives to this raid
set nvme1 raid-master=raid1 raid-role=0
set nvme2 raid-master=raid1 raid-role=1
set nvme3 raid-master=raid1 raid-role=2
set nvme4 raid-master=raid1 raid-role=3
set nvme5 raid-master=raid1 raid-role=4
set nvme6 raid-master=raid1 raid-role=5
set nvme7 raid-master=raid1 raid-role=6
set nvme8 raid-master=raid1 raid-role=7
set nvme9 raid-master=raid1 raid-role=8
set nvme10 raid-master=raid1 raid-role=9
set nvme11 raid-master=raid1 raid-role=10
set nvme12 raid-master=raid1 raid-role=11
set nvme13 raid-master=raid1 raid-role=12
set nvme14 raid-master=raid1 raid-role=13
set nvme15 raid-master=raid1 raid-role=14
set nvme16 raid-master=raid1 raid-role=15
set nvme17 raid-master=raid1 raid-role=16
set nvme18 raid-master=raid1 raid-role=17
set nvme19 raid-master=raid1 raid-role=18
set nvme20 raid-master=raid1 raid-role=19
Format the RAID block device
/disk> format raid1 file-system=ext4
And the result should look similar to this
21 BM        type=raid slot="raid1" slot-default="" parent=none uuid="f457bc79-7408-489b-8850-85923e900452" fs=ext4 model="RAID6 2-parity-disks"
             size=17 283 541 893 120 free=17 283 538 190 336 raid-type=6 raid-device-count=20 raid-max-component-size=none raid-chunk-size=1M raid-master=none
             raid-state="clean" nvme-tcp-export=no iscsi-export=no nfs-sharing=no smb-sharing=no media-sharing=no media-interface=none
Avoid using multiple partitions on a single physical disk in multiple RAID arrays. Using the same physical disk in multiple RAID arrays can result in low performance.
Example: RAID check
It is extremely important to monitor your RAID array for failures. There are multiple ways to do it, but the simplest way is to create a script that sends an e-mail whenever a RAID member has failed. You can use the following script as a working example:
/system/scheduler
add interval=30s name=MRaidHealthCheckCall on-event=MraidHealthCheck policy=ftp,read,write,,test,sniff start-time=startup
/system/script
add dont-require-permissions=no name=MraidHealthCheck owner=admin policy=ftp,read,write,,test,sniff source=":global CheckRAID;\
\n:local sysadmin; \
\n\
\n:set \$sysadmin \"<servername@domain.tld>\";\
\n\
\n:local temp [/disk/print count-only where raid-member-failed];\
\n:if ( \$temp > 0 ) do={\
\n :if ( \$CheckRAID < 1 ) do={\
\n /log/info message=\"ERROR: RAID has failed!\";\
\n /tool/e-mail/send to= \$sysadmin subject=([/system/identity/get name].\" RAID failed\") body=(\"Go check it! Value: \".\$temp);\
\n :set \$CheckRAID 7;\
\n :delay 5s;\
\n }\
\n } \
\n :if ( \$CheckRAID > 0 ) do={\
\n :set \$CheckRAID ( \$CheckRAID -1 );\
\n }\
\n"
You will also need to configure your RouterOS device's e-mail server settings:
/tool/e-mail
set from=<raidcheck@domain.tld> port=587 server=smtp.domain.com tls=starttls
Make sure you configure your e-mail server's settings under /tool/e-mail and change the e-mail address in the script above with the values that match your e-mail server's settings.
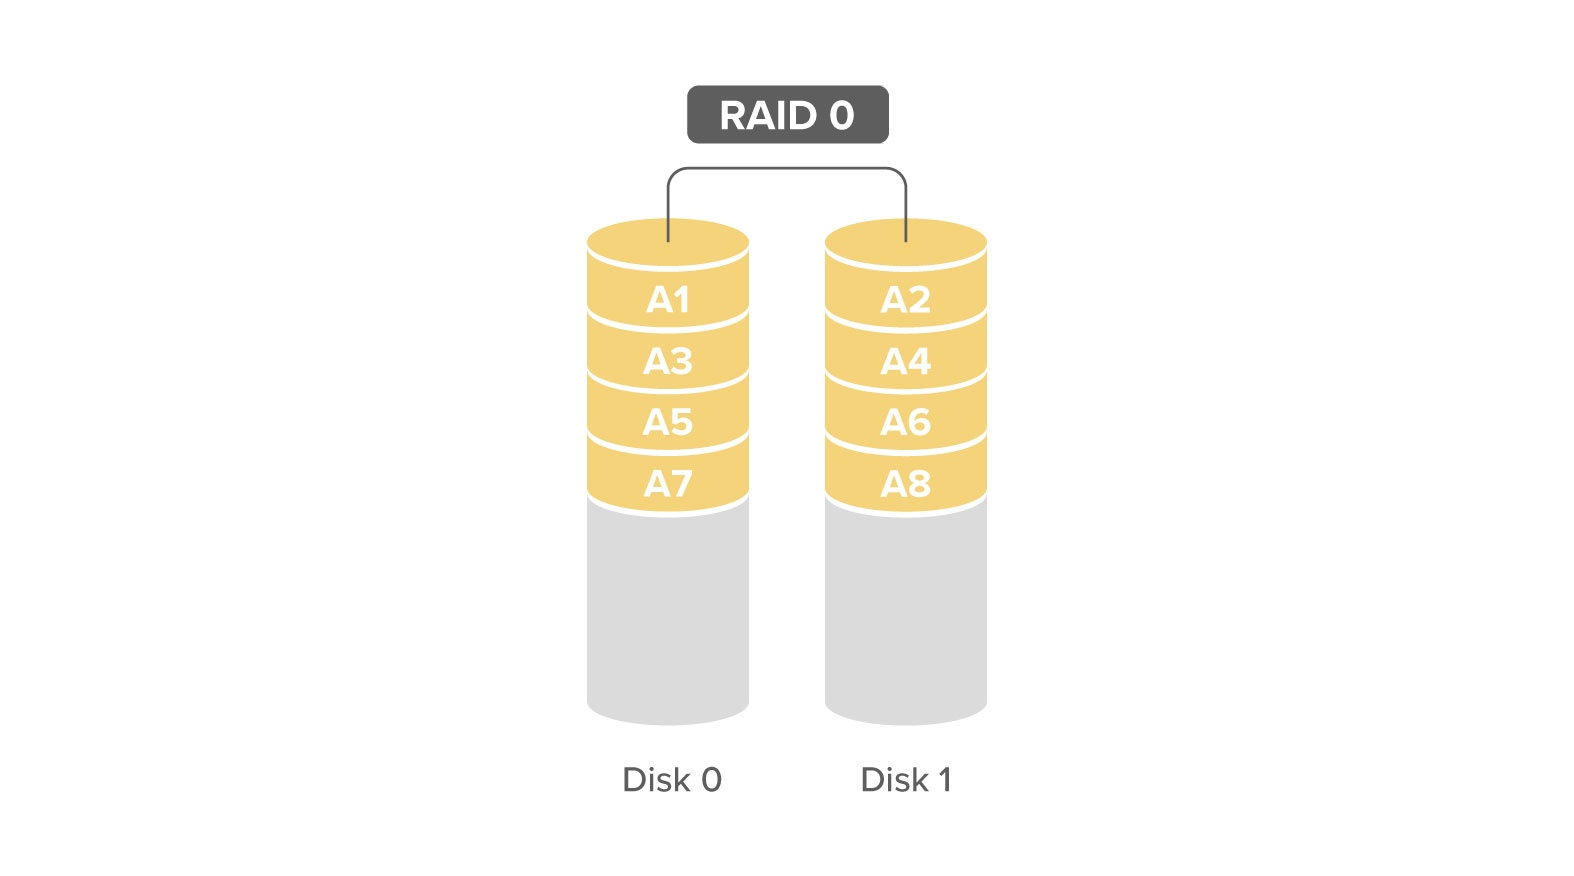
RAID 0
All data is written evenly over all disks in this RAID, this configuration does not provide any fault tolerance but provides best performance.
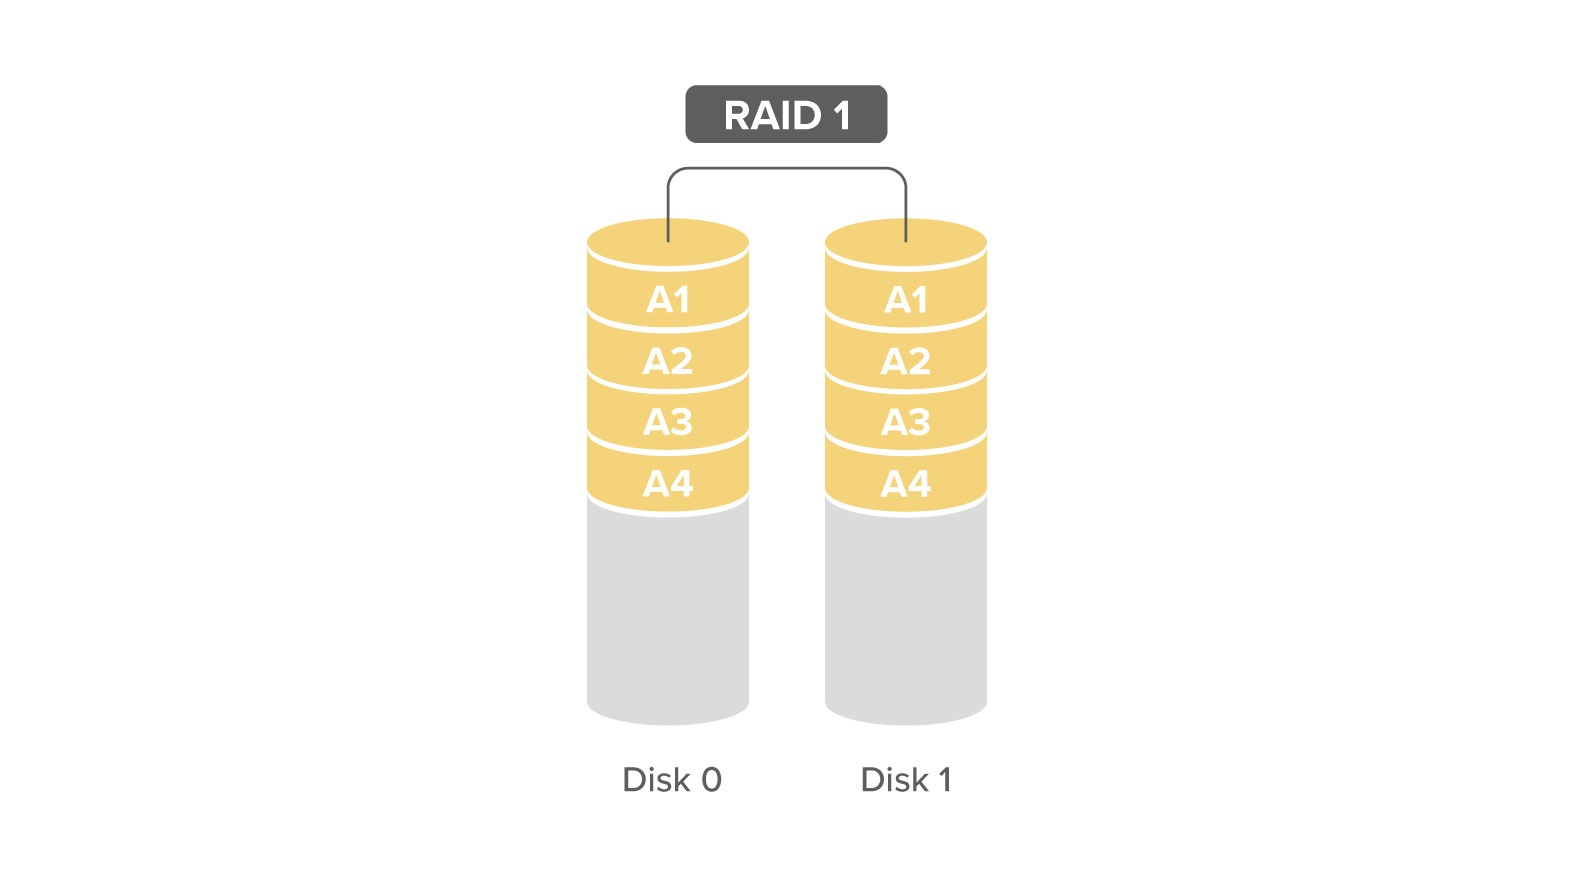
RAID 1
The same data is written to all drives (data is mirrored), this configuration provides best fault tolerance, but performance-wise write speeds will be equal to the slowest disk used in the array.
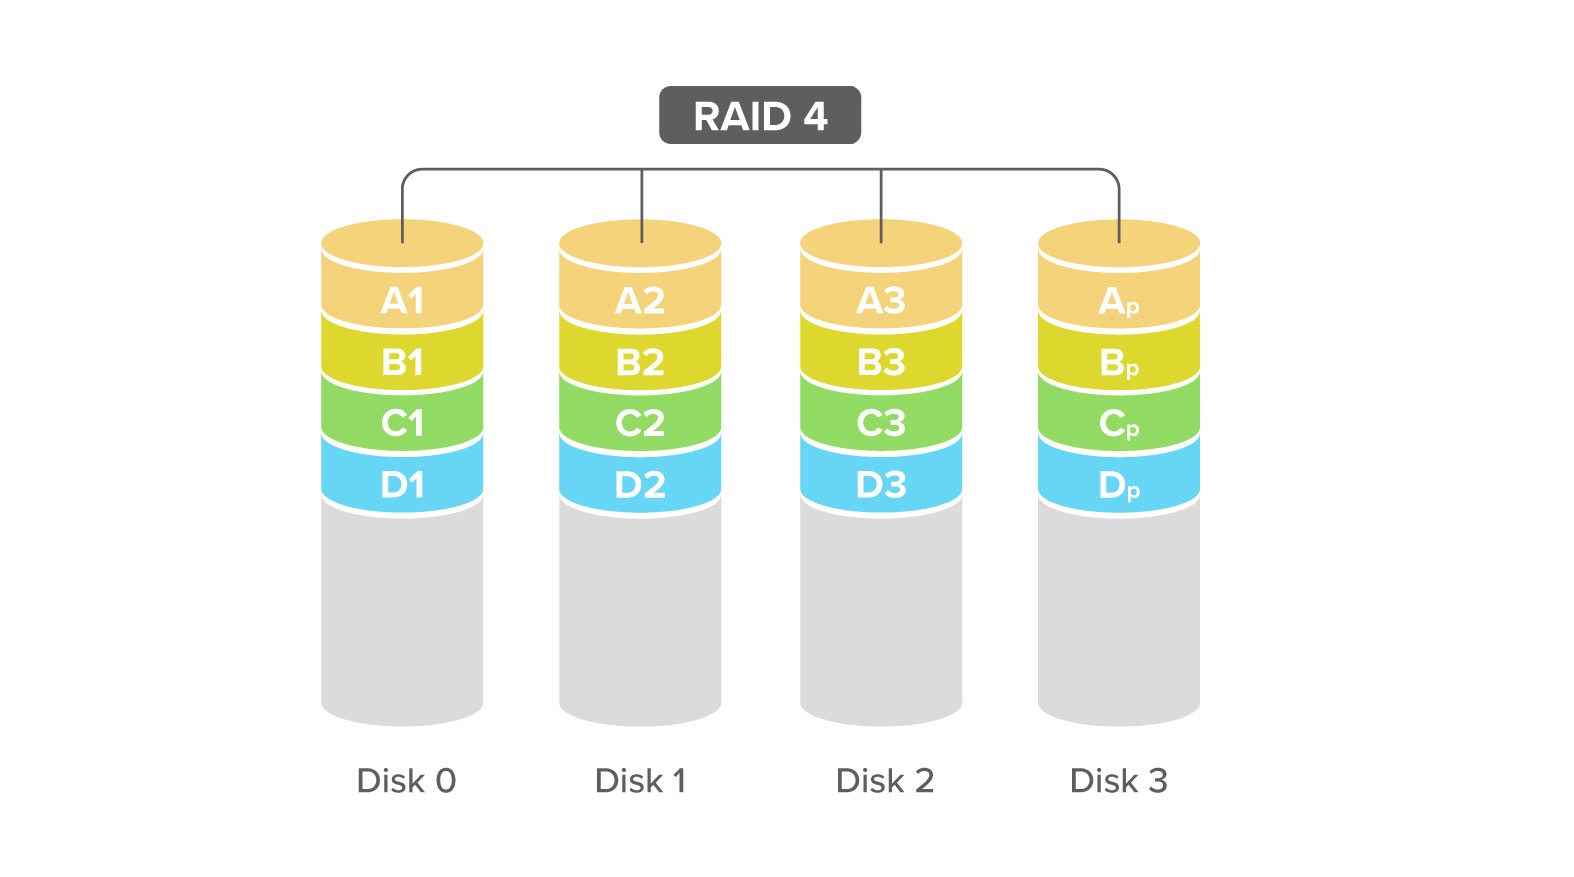
RAID 4
Block-level data is striped to a dedicated disk where parity bits are stored. Performance will be limited to the parity writing speed.
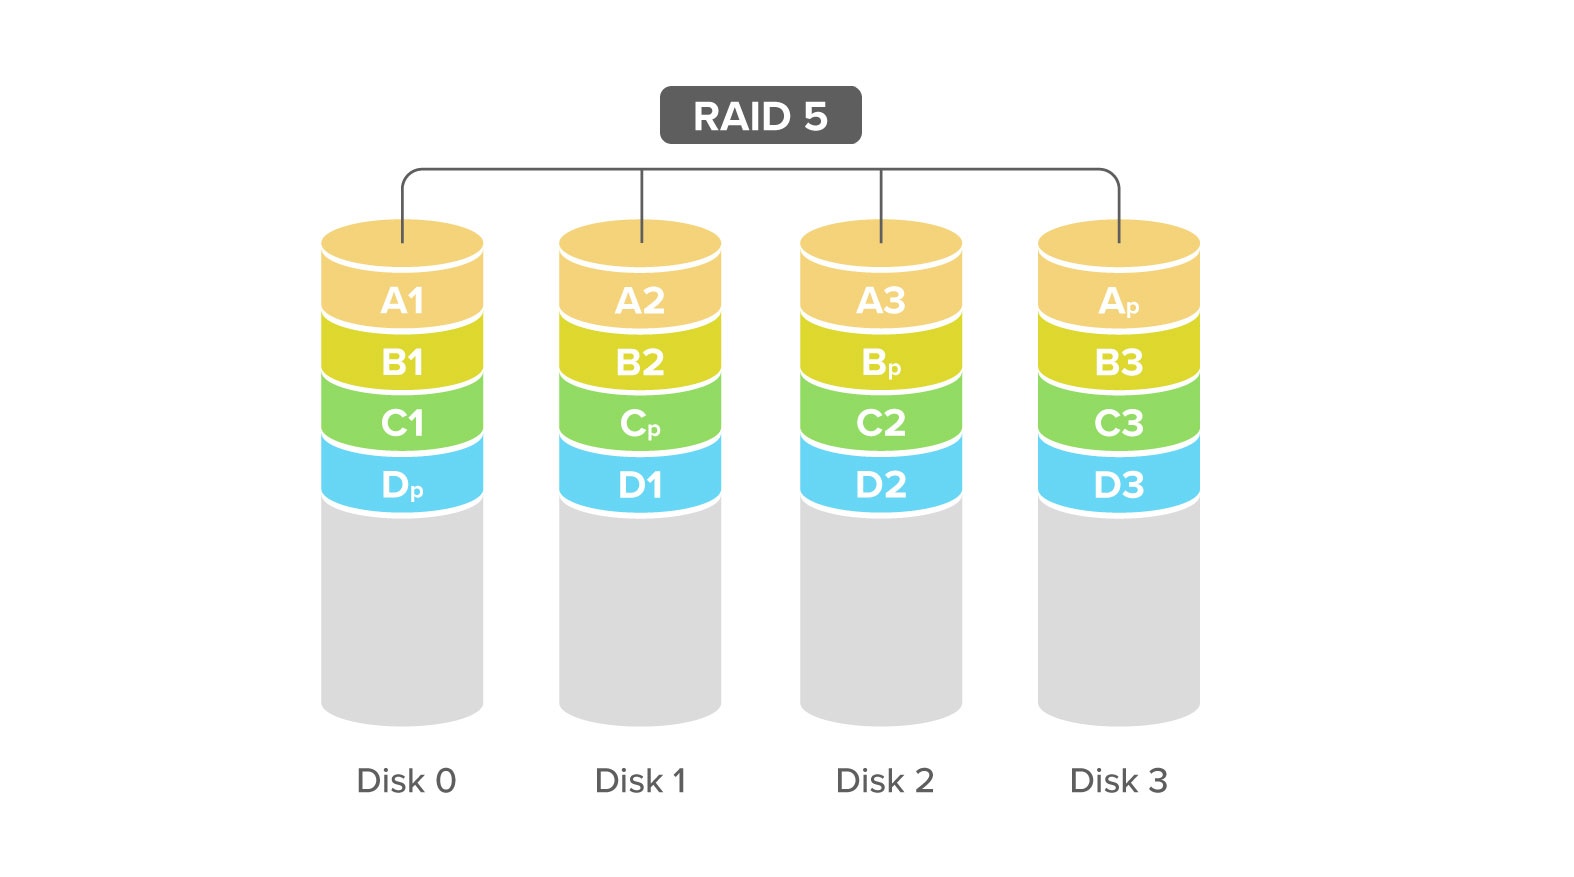
RAID 5
Block-level data is striped evenly over the available disks. It can be recovered from 1 disk failure.
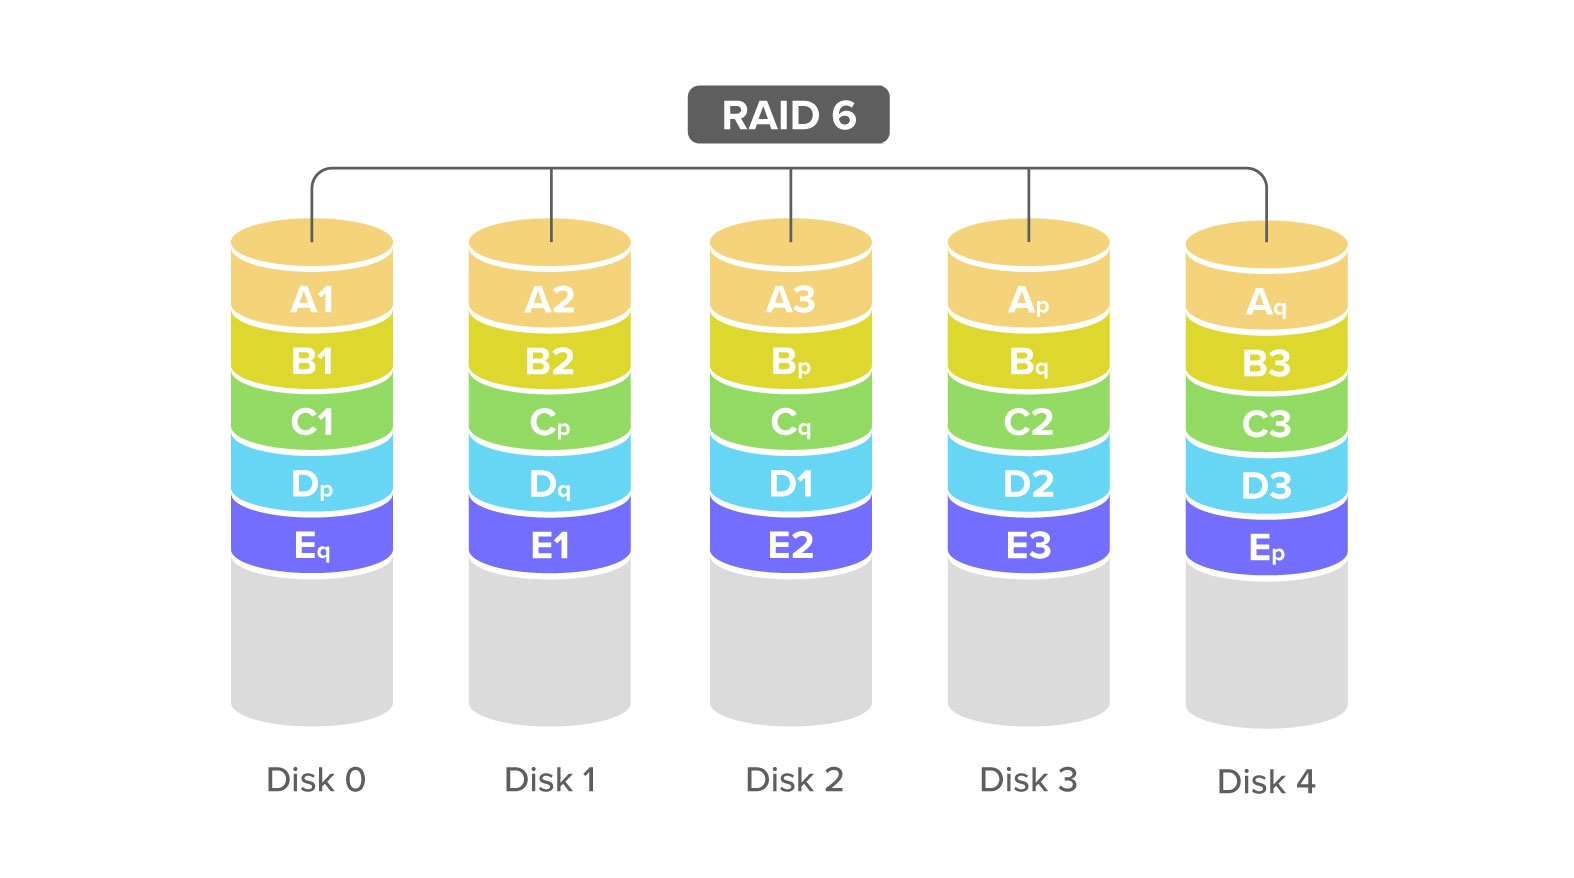
RAID 6
Block-level data is striped evenly over the available disks. It can be recovered from 2 disk failures.
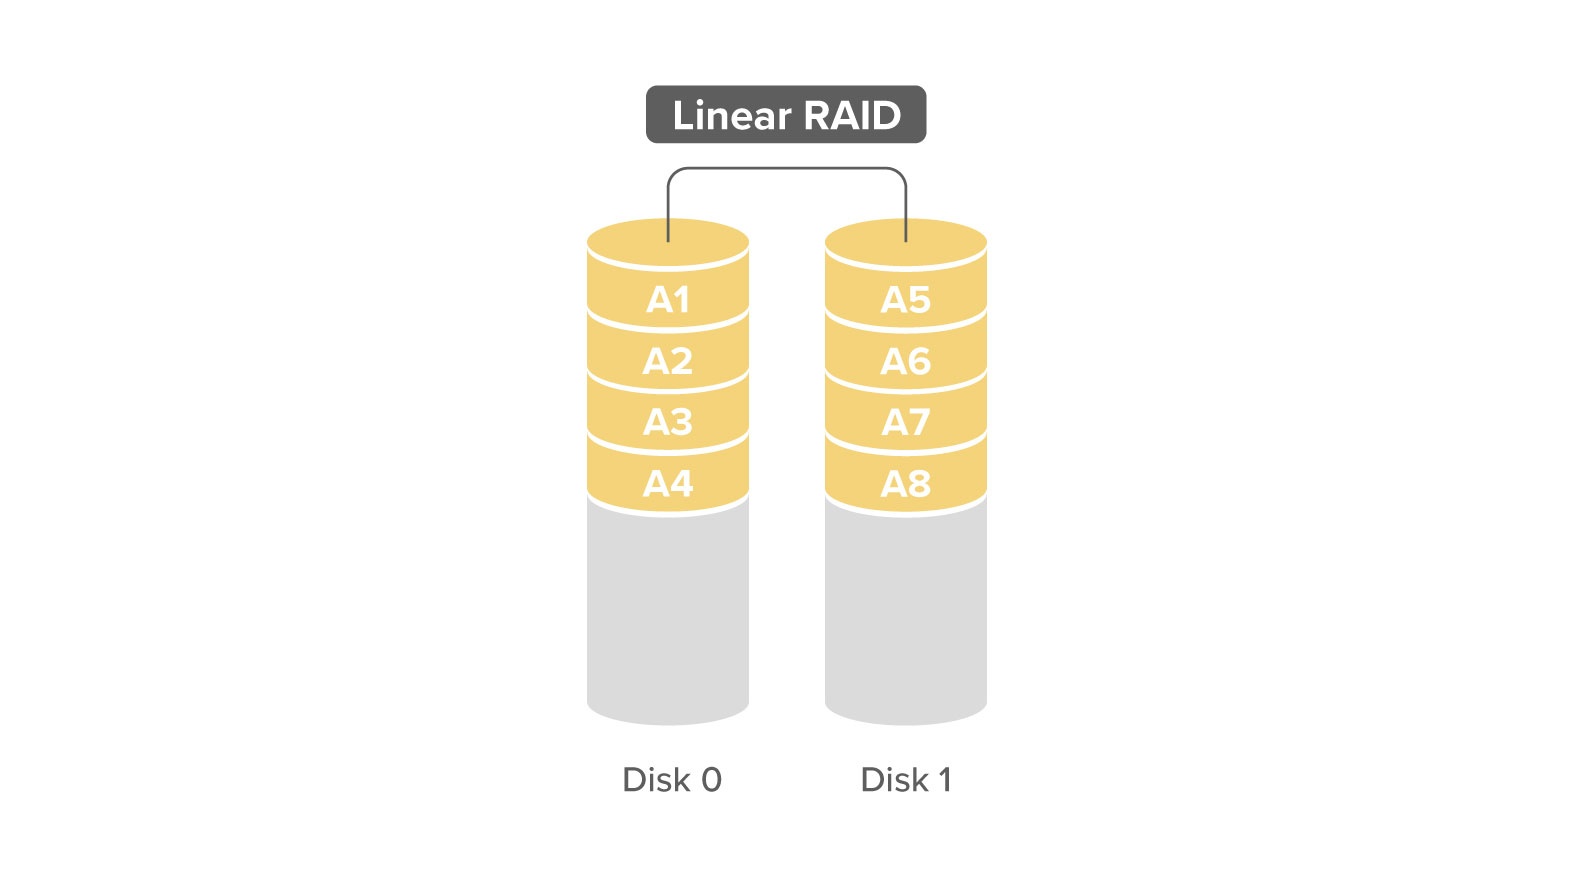
RAID Linear
Data is appended over multiple disks combining them into a single large disk. Provides no redundancy and is limited to the single disk read/write speed.
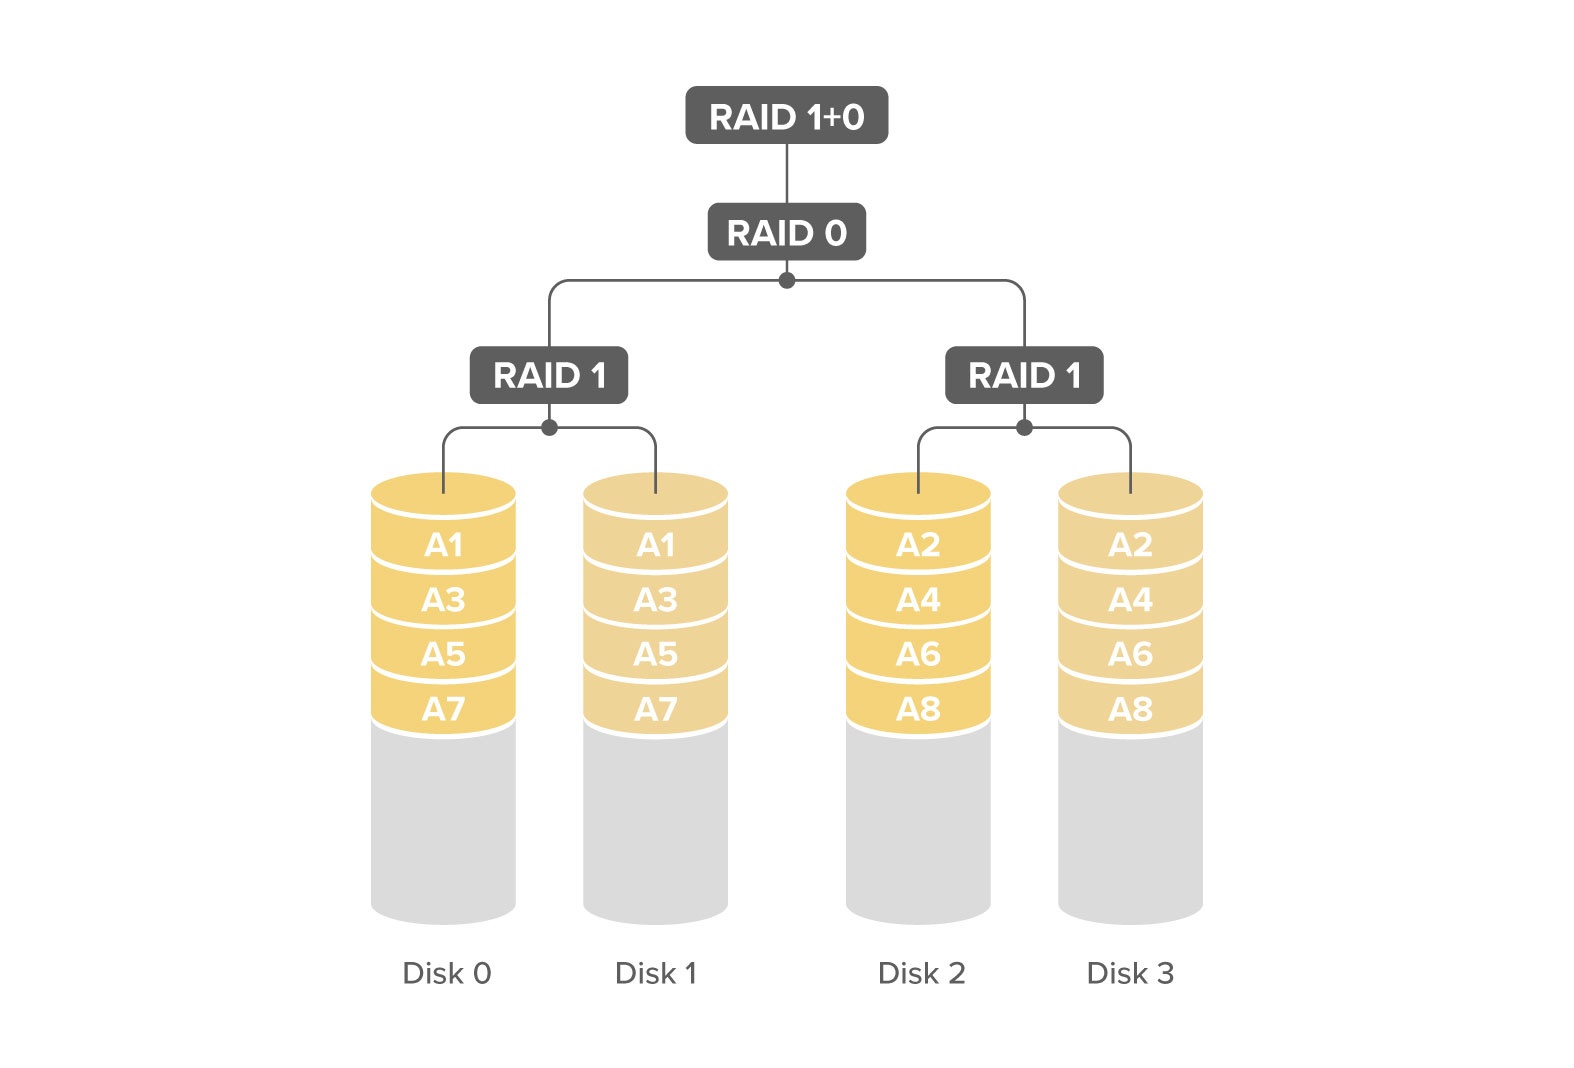
Nested RAID
Combination of multiple RAID configurations into another RAID. For example RAID 10 (RAID 1+0) combines disk mirroring (RAID 1) and disk striping (RAID 0)
Configuration example
In this example I'm using 10 SSD drives and configuring in RAID (RAID 1+0)
Create a RAID 0 block
add raid-device-count=3 raid-type=0 slot=raid10 type=raid
Create five RAID 1 blocks, each containing 2 devices and add them to set the master-raid to the previously created RAID 0 block (name=raid10)
add raid-device-count=2 raid-master=raid10 raid-role=0 raid-type=1 slot=raid0 type=raid
add raid-device-count=2 raid-master=raid10 raid-role=1 raid-type=1 slot=raid1 type=raid
add raid-device-count=2 raid-master=raid10 raid-role=2 raid-type=1 slot=raid2 type=raid
add raid-device-count=2 raid-master=raid10 raid-role=3 raid-type=1 slot=raid3 type=raid
add raid-device-count=2 raid-master=raid10 raid-role=4 raid-type=1 slot=raid4 type=raid
Add drives to each RAID block
set nvme1 raid-master=raid0 raid-role=0
set nvme3 raid-master=raid1 raid-role=0
set nvme5 raid-master=raid2 raid-role=0
set nvme7 raid-master=raid3 raid-role=0
set nvme9 raid-master=raid4 raid-role=0

set nvme2 raid-master=raid0 raid-role=1
set nvme4 raid-master=raid1 raid-role=1
set nvme6 raid-master=raid2 raid-role=1
set nvme8 raid-master=raid3 raid-role=1
set nvme10 raid-master=raid4 raid-role=1
After this format, the raid10 block
format raid10 file-system=ext4
After formatting you should see the free space and use the block
23 BM        type=raid slot="raid10" slot-default="" parent=none uuid="ec3344f4-1662-49ab-b899-db1aaa217b0f" fs=ext4 model="RAID0 striped" size=9 601 967 652 864
             free=9 597 901 369 344 raid-type=0 raid-device-count=5 raid-max-component-size=none raid-master=none raid-state="clean" nvme-tcp-export=no
             iscsi-export=no nfs-sharing=no smb-sharing=no media-sharing=no media-interface=none
Based on this configuration you can modify the RAID 10 configuration to fit as many storage devices as you require.
Similarly it is possible to create other nested RAID configurations, keeping the same principle as showcased in the example.
Setting a hot spare disk
It's possible to assign a hot spare disk for your RAID array. In case of a disk failure - the rebuild immediately begins on the assigned spare disk.
Add the RAID array with the desired number of arrays:
/disk/add raid-device-count=4 raid-type=5 type=raid slot=raid5
Afterwards, add the disks as well as the spare to the RAID. In this case we will add NVMe5 as the spare.
/disk/set raid-master=raid5 raid-role=0 nvme1
/disk/set raid-master=raid5 raid-role=1 nvme2
/disk/set raid-master=raid5 raid-role=2 nvme3
/disk/set raid-master=raid5 raid-role=3 nvme4

/disk/set raid-master=raid5 raid-role=spare nvme5
Moving your RAID array to a different device
It is possible to move your RAID array from one device to another.
In this example we are using a RAID 5 array on an RDS2216 consisting of 4 members.
First, on the "new" device, create a RAID and assign the member slots.
# New device
/disk/add raid-device-count=4 raid-type=5 type=raid slot=raid5
Then, add the currently empty slots to the newly created RAID
# New device
/disk/set raid-master=raid5 raid-role=0 nvme1
/disk/set raid-master=raid5 raid-role=1 nvme2
/disk/set raid-master=raid5 raid-role=2 nvme3
/disk/set raid-master=raid5 raid-role=3 nvme4
After the RAID has been created and the slots have been assigned to the RAID - on the "old" device, eject the disks you want to switch to the "new" device
# Old device
/disk/eject nvme1
/disk/eject nvme2
/disk/eject nvme3
/disk/eject nvme4
Finally, you can remove the disks from the "old" device and insert them in the assigned slots in the "new" one. RouterOS will automatically detect a RAID superblock and mount the array without any additional input.
RSYNC
rsync (Remote Sync) is a powerful file synchronization and file transfer program used in Unix-based systems. It allows for efficient transfer and synchronization of files and directories between different systems or within the same system.
If you make changes in a file, only changes to files are transferred, reducing data transfer volume. RouterOS RSYNC implementation uses ipsec for data transfer (if password is set). When configured, you will see dynamic ipsec entries.
Rsync settings can be found in the file/sync menu
Port TCP/8291 is used for the control connection (if not open in the status (file sync print) you will be stuck at making control connection to 192.168.88.2)
Port UDP/500 and protocol 50 (ipsec-esp) are used to create a secure connection and start the transfer (if not open in the status (file sync print) you will be stuck at initializing transfer)
IPSec dynamic entry example
#     PEER                     TUNNEL  SRC-ADDRESS       DST-ADDRESS       PROTOCOL  ACTION   LEVEL    PH2-COUNT
;;; file-sync-10.155.145.11
1  D  file-sync-10.155.145.11  no      10.155.145.17/32  10.155.145.11/32  tcp       encrypt  require          1

/ip/ipsec/peer> print
 0  D  name="file-sync-10.155.145.11" address=10.155.145.11/32 local-address=10.155.145.17 profile=default exchange-mode=main send-initial-contact=yes
/ip/ipsec/identity> print
 0 D  ;;; file-sync-10.155.145.11
      peer=file-sync-10.155.145.11 auth-method=pre-shared-key secret="secret" generate-policy=no
Properties
| Property | Description |
|---|---|
| local-path | File/folder path. Used for mode Upload to set the path of the file/folder to upload to the device |
| mode | Sets if you want to download/upload the file (direction of the sync) |
| password | Target device password |
| remote-address | Target device IP |
| remote-path | File/folder path. Used with mode download to set the path on the target device to be downloaded |
| user | Target device password |
Configuration example
Basic configuration is really easy. On the host device you need to add the file you want to sync to another device, the ip, user/password and the mode.
/file/sync
add local-path=/ipv6route.txt.rsc mode=upload remote-address=192.168.88.2 remote-path=RAID/
If configured correctly, you will see on the host device:
0 192.168.88.2 upload /ipv6route.txt.rsc RAID/ in sync
And on the client device:
#   REMOTE-ADDRESS   MODE      LOCAL-PATH  REMOTE-PATH         STATUS
0 D 192.168.88.1 download  RAID/       /ipv6route.txt.rsc  in sync
Self-Encryption Drives
For using SED - drives have to be Opal-compliant. Please consult drive manufacturers' documentation to find out if a particular drive supports this feature before buying drives.
RouterOS adds o (supported inactive) or O (supported active) flags for supported drives:
/disk/print
Flags: B - BLOCK-DEVICE; M, F - FORMATTING; o - TCG-OPAL-SELF-ENCRYPTION-SUPPORTED
Columns: SLOT, MODEL, SERIAL, INTERFACE, SIZE, FREE, FS, RAID-MASTER
#     SLOT   MODEL                  SERIAL           INTERFACE                   SIZE             FREE  FS    RAID
0 BMo sata1  Samsung SSD 860 2.5in  S3Z9NX0N414510L  SATA 6.0 Gbps  1 000 204 886 016  983 351 111 680  ext4  none
1 BMo sata2  Samsung SSD 860        S5GENG0N307602J  SATA 6.0 Gbps  1 000 204 886 016  983 351 128 064  ext4  none
2 BMO sata3  Samsung SSD 860        S5GENG0N307604H  SATA 6.0 Gbps  1 000 204 886 016  983 351 128 064  ext4  none
3 BMO sata4  Samsung SSD 860 2.5in  S4CSNX0N838150B  SATA 6.0 Gbps  1 000 204 886 016  983 351 128 064  ext4  none
To set TCG-OPAL-SELF-ENCRYPTION:
/disk
/disk/set sata1 self-encryption-password=securepassword
to unset:
/disk
/disk/unset sata1 self-encryption-password
or
/disk
/disk/set sata1 !self-encryption-password
S.M.A.R.T info
Starting with RouterOS 7.23, S.M.A.R.T. (Self-Monitoring, Analysis and Reporting Technology) support has been added.
S.M.A.R.T. is a monitoring system built into modern storage drives, which allows you to monitor the drive's health, performance, and error rates.
For any attached storage device that supports S.M.A.R.T., you can retrieve diagnostic attributes directly from the CLI using the/disk smart-info command.
Some USB disk enclosures may not support retrieving S.M.A.R.T information.
Example Output
[admin@R2DUTRDS22162XG4S4XS2XQ20DISKS] > disk/smart-info nvme1
Columns: OUTPUT
OUTPUT
smartctl 7.1 2019-12-30 r5022 [aarch64-linux-5.6.3] (local build)
Copyright (C) 2002-19, Bruce Allen, Christian Franke, www.smartmontools.org
=== START OF INFORMATION SECTION ===
Model Number: U.2 SSD 4TG2-P
Serial Number: <S/N>
Firmware Version: E21T4C
PCI Vendor/Subsystem ID: 0x1bc0
IEEE OUI Identifier: 0x24693e
Controller ID: 0
Number of Namespaces: 1
Namespace 1 Size/Capacity: 960,197,124,096 [960 GB]
Namespace 1 Formatted LBA Size: 512
Namespace 1 IEEE EUI-64: <EUI-64>
Firmware Updates (0x02): 1 Slot
Optional Admin Commands (0x0017): Security Format Frmw_DL Self_Test
Optional NVM Commands (0x0054): DS_Mngmt Sav/Sel_Feat Timestmp
Maximum Data Transfer Size: 512 Pages
Warning Comp. Temp. Threshold: 100 Celsius
Critical Comp. Temp. Threshold: 110 Celsius
Supported Power States
St Op Max Active Idle RL RT WL WT Ent_Lat Ex_Lat
0 + 20.00W - - 0 0 0 0 5 5
Supported LBA Sizes (NSID 0x1)
Id Fmt Data Metadt Rel_Perf
0 + 512 0 0
=== START OF SMART DATA SECTION ===
SMART overall- self-assessment test result: PASSED
SMART/Health Information (NVMe Log 0x02)
Critical Warning: 0x00
Temperature: 33 Celsius
Available Spare: 100%
Available Spare Threshold: 10%
Percentage Used: 0%
Data Units Read: 5,774,165 [2.95 TB]
Data Units Written: 10,770,860 [5.51 TB]
Host Read Commands: 75,868,764
Host Write Commands: 61,379,337
Controller Busy Time: 22
Power Cycles: 579
Power On Hours: 4,203
Unsafe Shutdowns: 105
Media and Data Integrity Errors: 0
Error Information Log Entries: 0
Warning Comp. Temperature Time: 0
Critical Comp. Temperature Time: 0
Temperature Sensor 1: 45 Celsius
Temperature Sensor 2: 33 Celsius
Temperature Sensor 3: 33 Celsius
Temperature Sensor 4: 34 Celsius
Temperature Sensor 5: 34 Celsius
Temperature Sensor 6: 35 Celsius
Temperature Sensor 7: 32 Celsius
Temperature Sensor 8: 31 Celsius
Error Information (NVMe Log 0x01, max 64 entries)
No Errors Logged