Netinstall
Netinstall is a utility for installing and reinstalling RouterOS on MikroTik devices.
If you suspect your device is not functioning properly, use Netinstall to reinstall the operating system.
The tool is available for Windows, with a graphical interface, and for Linux, as a command-line tool.
Netinstall reformats the system drive, which erases all configuration data and user files.
Netinstall does not remove the RouterOS license key, nor does it reset RouterBOOT settings. For example, the CPU frequency remains unchanged during reinstallation.
Device Installation Workflow Using Netinstall
Follow these steps to install or reinstall a device using Netinstall:
-
Prepare the Netinstall host
Start Netinstall on a computer connected to the same L2 network segment as the device being reinstalled. For best results, use a dedicated network interface card (NIC) and a simple switch or hub to avoid IP, DHCP, or BOOTP conflicts with other devices on the network. -
Boot the device into etherboot mode
Two boot options are available: the regular bootloader and the backup bootloader.-
Regular bootloader:
Press Ctrl+E in the serial console to enter etherboot mode, or press the Reset button 1–2 seconds after powering on the device. -
Backup bootloader:
Power off the device, hold the Reset button, power on the device, wait for the LED sequence (blinking → steady → off), then release the button.
-
-
Install the device
Use Netinstall to install the device with the selected packages, parameters, and configuration scripts. -
Apply configuration
After installation, the device applies the configuration parameters specified in Netinstall on the next boot.
Device configuration scripts:
Configure script - installs on the device a custom default configuration script which replaces the RouterOS supplied default configuration script. The script can access factory set passwords with read-only variables $defconfPassword and $defconfWifiPassword starting from RouterOS 7.10beta8.
Mode script - puts a one‑time custom script on the device to run on the device’s first boot after installation. This script can be used to configure device‑mode and protected‑routerboot and other settings during device initial configuration.
Configure and Mode scripts have a maximum execution timeout of 120 seconds.
Configure script will be kept during RouterOS updates and used after further configuration resets until device is reinstalled with new script or removed if no script provided.
Mode script feature requires RouterOS and Netinstall version 7.22 or newer.
Configure and Mode scripts are regular/import files, accept valid MikroTik RouterOS CLI commands.
For more reference see:
Netinstall for Windows
Netinstall is a Windows utility used to install or reinstall RouterOS on MikroTik devices over the network.
The tool requires the target device to be booted in Netinstall mode in order to be detected and accessed.
Available Actions and Parameters
| Control/Action | Description |
|---|---|
| Netbooting | Enables, disables, and configures IP addressing for Netinstall's built-in BOOTP and TFTP server. This is required for netbooting a MikroTik device using the Netinstall client. |
| Shutdown | Shuts down the selected MikroTik device that is booted in Netinstall mode. |
| Reboot | Reboots the selected MikroTik device that is booted in Netinstall mode. |
| Install | Performs a RouterOS installation on the selected MikroTik device using the specified options. |
| Cancel | Cancels the current in-progress installation. |
| Routers/Drives | Displays devices available for installation. A device appears in this list only after it has been started in Netinstall mode. |
| Packages | Allows selection of the directory containing RouterOS package files and creation of package sets for use in subsequent installations. |
Netinstall Parameters
| Parameter | Description |
|---|---|
| Auto Reboot | Defines the action performed after device installation completes successfully. |
| Software ID | Displays the current device Software ID. |
| Key | Allows specification and installation of a new license key during installation. By default, Netinstall retains the detected license key from the device. |
| Keep Old Configuration | Instructs Netinstall to read and restore the device core configuration (/export; /users) after installation. This option does not retain user files, containers, or similar data. |
| Keep Branding | Instructs Netinstall to retain the device branding package if present on the device. Factory-installed branding packages cannot be discarded and are always preserved. |
| Apply Default Config | If enabled, the device will apply the default configuration script after installation and reboot. See /system/default-configuration/script/print. |
| Configure Script | Allows installation of a custom default configuration script on the device during installation. This replaces the RouterOS-supplied default configuration script. See /system/default-configuration/custom-script/print. The script is retained during RouterOS updates and used after subsequent configuration resets until the device is reinstalled with a new script or the script is removed. |
| Mode Script | Specifies a one-time custom script that runs on the device's first boot after installation. Use this script to configure device-mode, protected-routerboot, and other settings during device deployment. The mode script executes before any custom or default configuration scripts. Upon completion, the script is automatically removed from the device. If the script modifies the device-mode, the device reboots immediately after execution. This feature requires RouterOS and Netinstall version 7.22 or newer. |
| IP Address / Gateway / Baudrate | Netinstall auto-creates a Configure script with the specified parameters for initial device configuration using IPv4 connectivity or serial console. This parameter is available only when installing to an empty configuration, meaning no other configuration options are specified. |
Netinstall for Linux
The Linux version of Netinstall, netinstall-cli, is a command-line tool that provides nearly the same functionality as the Windows version.
This tool requires root privileges. You must run it as root or use sudo to execute it.
netinstall-cli Command Line Options
The netinstall-cli command syntax is:
netinstall-cli [-r] [-e] [-b] [-m [-o]] [-f] [-c] [-v] [-k <keyfile>] [-s <userscript>] [-sm <modescript>] [--mac <mac address>] {-i <interface> | -a <client-ip>} [PACKAGES]
General Options
| Parameter | Description |
|---|---|
| -r | Reinstall the device and apply the default configuration script. |
| -e | Reinstall the device without applying the default configuration script, leaving the device with an empty configuration. |
| -b | Discard the currently installed branding package from the device. If not specified, the branding package is preserved. |
| -f | Ignore storage size constraints. By default, netinstall-cli checks the router's storage capacity. If the total size of selected packages exceeds available storage, an error is displayed: "Ignoring XX:XX:XX:XX:XX:XX, not enough space (override with -f)" |
| -c | Allow multiple Netinstall instances to run simultaneously on the same computer. |
| -v | Enable verbose mode for detailed output. |
Multiple Device Reinstallation Options
| Parameter | Description |
|---|---|
| -m | Enable multiple device reinstallation. The same device will be reinstalled as many times as BOOTP requests are received. |
| -o | Restrict installation to once per Netinstall run. The tool tracks MAC addresses of successfully installed devices and ignores subsequent BOOTP requests from the same MAC address during the current session. |
Combination behavior:
- No
-mand no-o: Only one successful installation proceeds, then Netinstall closes. -monly: Enables multiple reinstallation; the same device reinstalls repeatedly.-oonly: Same as no flags; one installation per run, then close.- Both
-mand-o: Enables multiple reinstallation, but each device installs only once per session.
Script and Configuration Options
| Parameter | Description |
|---|---|
| -k <keyfile> | Provide a license key file in .KEY format to the device (optional). |
| -s <userscript> | Specify a custom configuration script to install on the device. This replaces the RouterOS default configuration script. The script is stored at /system/default-configuration/custom-script/print and persists through RouterOS updates, remaining active after configuration resets until the device is reinstalled with a new script or the script is removed. |
| -sm <modescript> | Specify a one-time custom script to execute on the device's first boot after installation. Use this to configure device-mode, protected-routerboot, and other deployment settings. The mode script runs before any custom or default configuration scripts and is automatically removed after execution. If the script modifies the device-mode, the device reboots immediately. Requires RouterOS and Netinstall version 7.22 or newer. |
Network Options
| Parameter | Description |
|---|---|
| --mac <mac address> | Specify a MAC address to allow for installation. When provided, all other BOOTP requests are ignored. |
| -i <interface> | Specify a network interface for the installation (optional). |
| -a <client-ip> | Specify a specific IP address that the Netinstall server assigns to the device. This is mandatory unless using the -i parameter, which allows auto-assignment. |
Package Selection
| Parameter | Description |
|---|---|
| PACKAGES | Specify a list of RouterOS packages in .NPK format to install on the device. This parameter is mandatory. The system package must be listed first. |
Configuration Preservation Behavior:
When neither -r nor -e is specified, netinstall-cli reinstalls RouterOS while preserving the current configuration. It downloads the existing configuration database from the router, reformats the disk during reinstallation, then uploads the configuration back to the device. This matches the "Keep old configuration" option in the Netinstall GUI.
Note: This process applies only to the configuration itself. Files and databases such as User Manager database, Dude database, and other data stored separately are not preserved.
Quick Start Guide for Windows
This guide explains how to install RouterOS on your MikroTik device using the Netinstall utility on a Windows computer.
Prerequisites
- Download the Netinstall utility (Stable or Testing version) from the downloads page.
- Download the RouterOS Main package from the downloads page.
tip
Select a RouterOS version marked as Stable. Choose the appropriate architecture (ARM, MIPS, SMIPS, TILE, etc.). If you are unsure, download the RouterOS package for all architectures — Netinstall will automatically select the correct one for your device.
Step 1: Prepare Your Computer Network
-
Disable all network interfaces on your computer (WiFi, Ethernet, LTE, or any other connection) except for the Ethernet interface you will use for installation. Netinstall functions only with one active interface.
dangerDeactivating all other network interfaces is strongly recommended to ensure Netinstall selects the correct network interface.
-
Configure a static IP address for your Ethernet interface:
- Open Start and select Settings.
- Go to Network & Internet and select Change adapter options.
- Right-click on your Ethernet interface and select Properties.
- Select Internet Protocol Version 4 (TCP/IPv4) and click Properties.
- Check Use the following IP address and configure: IP address
192.168.88.1, Subnet mask255.255.255.0.
tipNetinstall can also run on a local network without a static IP address. However, setting a static IP address is highly recommended if you are not familiar with Netinstall.
Step 2: Extract and Launch Netinstall
-
Extract the Netinstall
.zipfile to a convenient location. -
Ensure your Ethernet interface is connected and launch
Netinstall.exe.dangerNetinstall requires administrator rights. Accept the permissions prompt for Netinstall to work properly.
Tip: If you followed this guide precisely, your computer should not have an Internet connection. Windows 10 may display a warning about verifying apps—click Run to proceed.
-
Allow access for Netinstall in the Public network when prompted.
-
Configure the Net booting settings:
- Set the Client IP address (must be unique and not used by any other device in your network, including your computer).
- Use an IP address from the same subnet as your computer's static IP but different from the computer's address.
Step 3: Connect Your Device
-
Connect your device to your computer using an Ethernet cable directly (without any other devices in between).
-
Plug the Ethernet cable into your device's Ether1 port or the port marked with BOOT.
dangerSome computers (especially USB Ethernet adapters) may create extra link flaps, causing Netinstall to fail to detect a device in Etherboot mode. If this occurs, use a switch between your device and computer, or use a RouterOS-powered router in bridge mode. If using a router in bridge mode, disable any DHCP client on the bridge interface and disable the Detect Internet feature.
Netinstall uses BOOTP packets, which use the same port numbers as DHCP packets. If using a switch, ensure the bridge ports is not blocked by other network devices. If you have DHCP snooping enabled, enable "trusted" on the bridge port facing the Netinstall PC.
-
Power up your device and put it into Etherboot mode.
tipMultiple methods exist to put your device into Etherboot mode. Refer to the Etherboot manual before proceeding—methods vary between different MikroTik devices.
Step 4: Install RouterOS
-
Wait for the device to appear in Netinstall.
-
Select the device and click Browse. Navigate to your RouterOS packages location and press OK.
-
Select your desired RouterOS packages and press Install.
-
Wait for installation to complete and press Reboot. Devices without serial console must be rebooted manually.
warningIf you downloaded RouterOS packages for multiple architectures, Netinstall will only display the appropriate architecture packages for your device after selecting it. Unsupported packages will not appear in the window.
If the installation does not start (progress bar not moving or no status shown), try closing and reopening Netinstall, or put the device into Etherboot mode again. If the issue persists, try using Netinstall on a different computer.
Step 5: Post-Installation
After using Netinstall, the device resets to defaults (unless you specified not to apply the default configuration). Some devices are not accessible through the Ether1 port with the default configuration for security reasons. See Default configuration for details.
The "Keep old configuration" process downloads the configuration database from the router, reinstalls the router (including disk formatting), and uploads the configuration back. This process applies only to the configuration itself and does not affect files, including databases like User Manager database, Dude database, and others.
The "Keep branding" option allows you to retain the device's already installed branding package without reinstalling it using Netinstall.
When using the Configure script option, it is recommended to introduce a delay before configuration execution.
Step 6: Complete Setup
Your device is now ready. Configure your device as needed and reconnect it to your network.
Quick start guide for Linux
Download the NetInstall tool from the MikroTik download page, then extract and run it:
wget https://download.mikrotik.com/routeros/[VERSION]/netinstall-[VERSION].tar.gz
Extract it:
tar -xzf netinstall-[VERSION].tar.gz
Running the Netinstall Tool
Execute the Netinstall tool with the following command:
sudo ./netinstall-cli [-parameters] [address/interface] routeros-arm64-[package VERSION].npk
The tool requires privileged access and must be run as root. using sudo.
Before running Netinstall, configure a static IP address on your computer's network interface:
admin@ubuntu:~$ sudo ifconfig <interface> 192.168.88.2/24
Netinstall Version 6 Example
The following example demonstrates running Netinstall version 6, which resets the configuration upon reinstallation:
admin@ubuntu:~$ sudo ./netinstall -r -a 192.168.88.3 routeros-mipsbe-6.48.1.npk
Using server IP: 192.168.88.2
Starting PXE server
Waiting for RouterBOARD...
PXE client: 01:23:45:67:89:10
Sending image: mips
Discovered RouterBOARD...
Formatting...
Sending package routeros-mipsbe-6.48.1.npk ...
Ready for reboot...
Sent reboot command
Netinstall Version 7 Example
The following example demonstrates running Netinstall version 7, which applies an empty configuration and removes branding during the reinstallation process:
admin@ubuntu:~$ sudo ./netinstall-cli -e -b -i enx1234567ee890 -a 192.168.88.3 routeros-7.14.2-arm.npk wireless-7.14.2-arm.npk
Version: 7.15beta9(2024-03-27 20:41:15)
Will apply empty config
Will remove branding
Using Interface: enx1234567ee890
Wait for Link-UP on 'enx1234567ee890'. OK
Using Client IP: 192.168.88.3
Using Server IP: 192.168.88.10
Starting PXE server
Waiting for RouterBOARD...
client: 74:4D:28:8E:86:74
Detected client architecture: arm
Sending and starting Netinstall boot image ...
Installed branding package detected
Discovered RouterBOARD... 74:4D:28:8E:86:74
Formatting...
Sending package routeros-7.14.2-arm.npk ...
Sending package wireless-7.14.2-arm.npk ...
Sending empty config ...
Ready for reboot...
Sent reboot command
Etherboot Mode
Etherboot mode is a special boot state on MikroTik devices that allows you to reinstall RouterOS using Netinstall. Two booter options are available: the regular booter and the backup booter. Both options should be verified before use.
Regular Booter: To enter etherboot mode using the serial console, press and hold Control+E. Alternatively, press the Reset button after powering on the device and waiting 1–2 seconds.
Backup Booter: Power off the device. Press and hold the Reset button, then power on the device. Wait until the "USR" LED begins blinking, then becomes steady (solid "On"), and finally turns "Off" — release the Reset button at this point. The device will boot into BOOTP mode, ready for RouterOS reinstallation via Netinstall.
Reset Button
The Reset button is available on all MikroTik devices and is used to enter Etherboot mode. To access Etherboot mode using the Reset button:
- Power off the device.
- Press and hold the Reset button.
- Power on the device while continuing to hold the Reset button.
- Keep holding the button until the device appears in your Netinstall window.
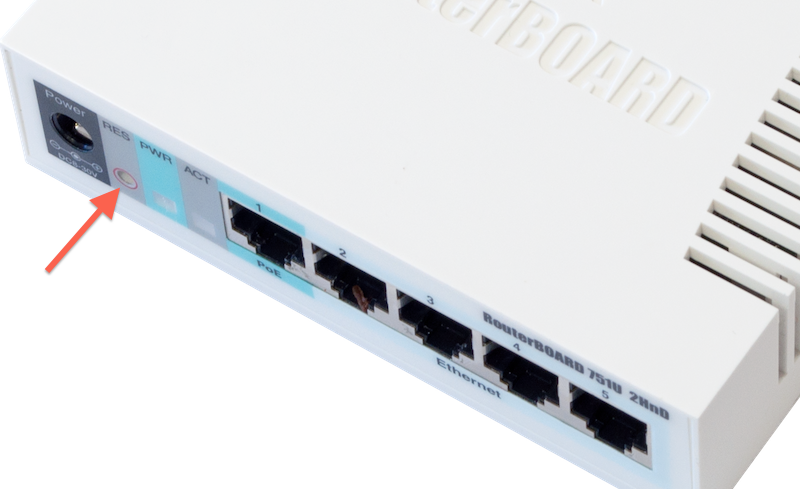
If a Protected bootloader has been configured, the Reset button behavior changes. Ensure you remember the settings used to set up the Protected bootloader; otherwise, you will not be able to use Etherboot mode or reset your device.
If your device can boot and you can log in, you can enable Etherboot mode. Connect to your device and run the following command:
/system/routerboard/settings/set boot-device=try--once-then-nand
After setting this option, reboot the device or perform a power cycle. On the next boot, the device will attempt to enter Etherboot mode first. Note that after this initial boot, the device will not attempt Etherboot mode again and will boot directly from NAND or the device's storage.
Serial Console
Some devices include a serial console that can be used to enter Etherboot mode. To use the serial console, you must first configure your computer's serial port settings.
Required serial parameters for most MikroTik devices (except RouterBOARD 230 series):
- Baud rate: 115200 bit/s
- Data bits: 8
- Stop bit: 1
- Parity: None
- Flow control: None
Required serial parameters for RouterBOARD 230 series devices:
- Baud rate: 9600 bit/s
- Data bits: 8
- Stop bit: 1
- Parity: None
- Flow control: Hardware (RTS/CTS)
Ensure you are using a proper null modem cable. For pinout information, refer to the Serial Console documentation.
Entering Etherboot mode:
- Power on the device.
- While the device is booting, press and hold Ctrl+E on your keyboard until the device displays that it is attempting the bootp protocol.
Example output:
RouterBOOT booter 7.14.2
CRS328-4C-20S-4S+
CPU frequency: 800 MHz
Memory size: 512 MiB
Storage size: 16 MiB
Press Ctrl+E to enter etherboot mode
Press any key within 2 seconds to enter setup
trying bootp protocol.... OK
Got IP : 192.168.88.3
resolved mac 84:69:93:9E:E6:49
transfer started ............................... transfer ok, time=2.00s
When the message "trying bootp protocol" appears, the device is in Etherboot mode and should automatically appear in your Netinstall window.