Quick Set
Summary
Quick Set brings the main settings for a home router together on one page. In WinBox, connect to the router and select Quick Set in the left menu. Quick Set is also available in the router's web interface at its IP address, usually 192.168.88.1 in the default configuration.
Quickset is available for all devices that have some sort of default configuration from the factory. Devices that do not have a configuration must be configured by hand. The most popular and recommended mode is the HomeAP (or HomeAP dual, depending on the device). This Quickset mode provides the simplest terminology and the most common options for the home user.
Use Quick Set for the initial setup of a router with its default configuration. If you have already changed the configuration in other WinBox menus or WebFig, continue in those menus instead: Quick Set can overwrite settings that were configured manually.
Find the main settings in WinBox
The numbered callouts show the main areas of Home AP Dual:
- Mode - Choose the preset for the router's role. Home AP Dual provides separate network names for the 2.4 GHz and 5 GHz radios.
- Wireless - Set the network names and Wi-Fi password.
- Internet - Choose how the router receives its internet address.
- Local Network - Review the LAN address, DHCP server, and NAT settings.
- System - Open the update or router password dialog.
- OK / Apply - Save the configuration after you review it. OK also closes the window; Cancel closes it without applying unsaved changes.
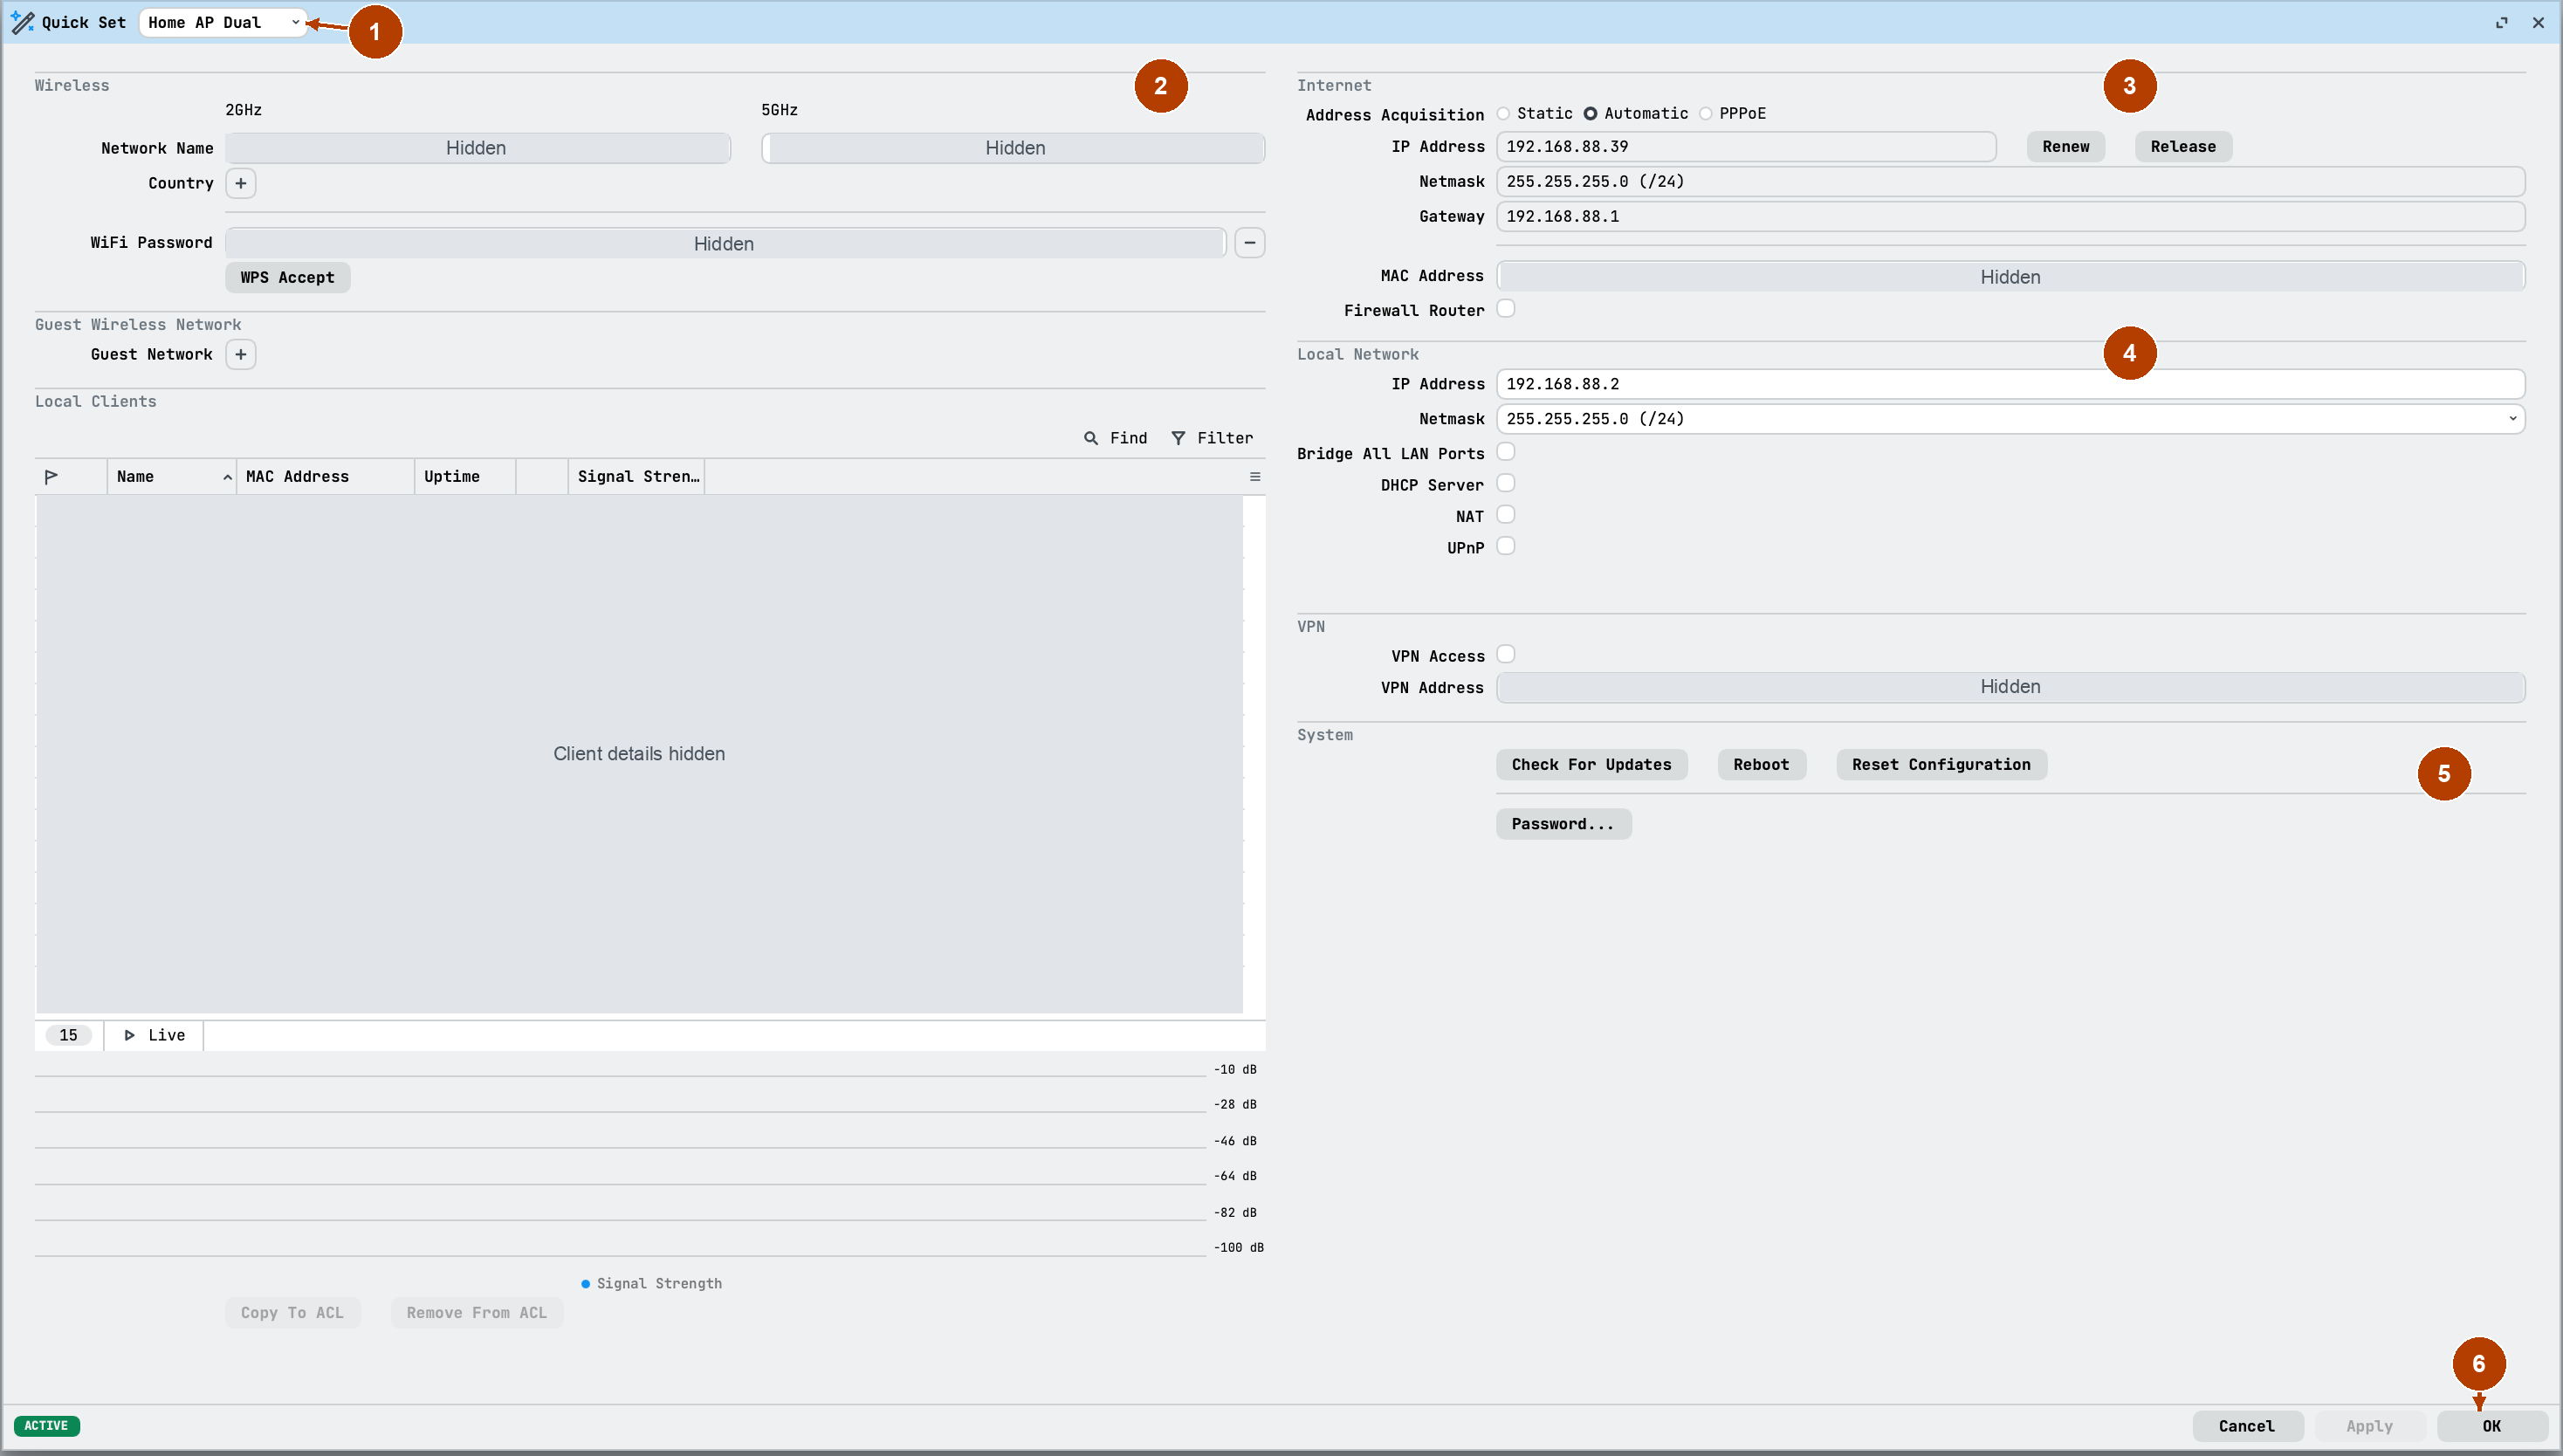
The screenshots show an existing router configuration, not factory defaults. Network names, passwords, device identifiers, and client details are hidden. The firewall, DHCP server, and NAT are off in this example; for a home router that connects your LAN to the internet, follow the settings described in the Internet and Local Network sections. Available modes and fields depend on the router model and installed wireless packages.
Modes
Depending on the router model, different Quickset modes are available from the Quickset dropdown menu:
- CAP: Controlled Access Point, an AP device that is managed by a centralized CAPsMAN server. Only use if you have already set up a CAPsMAN server.
- CPE: Client device, which connects to an Access Point (AP) device. Provides an option to scan for AP devices in your area.
- HomeAP: The default Access Point config page for most home users. Provides fewer options and simplified terminology.
- HomeAP dual: Dual-band devices (2GHz/5GHz). The default Access Point config page for most home users. Provides fewer options and simplified terminology.
- Home Mesh: Made for making bigger WiFi networks. Enables the CAPsMAN server in the router, and places the local WiFi interfaces under CAPsMAN control. Boot other MikroTik WiFi APs with the reset button pressed, and they join this HomeMesh network (see their Quick guide for details).
- PTP Bridge AP: When you need to transparently interconnect two remote locations together in the same network, set one device to this mode, and the other device to the next (PTP Bridge CPE) mode.
- PTP Bridge CPE: When you need to transparently interconnect two remote locations together in the same network, set one device to this mode, and the other device to the previous (PTP Bridge AP) mode.
- WISP AP: Similar to the HomeAP mode, but provides more advanced options and uses industry-standard terminology, like SSID and WPA.
HomeAP
This is the mode you should use to quickly configure a home access point.
Wireless
Start with the two controls marked in the screenshot:
- Enter the name your devices should see in Network Name. For example, use
Homefor both radios, orHomeandHome-5GHzto distinguish them. - Enter your Wi-Fi password in WiFi Password. This is the password phones and computers use to join the network; it is separate from the router's administrator password in System.

Changing the network name or password disconnects Wi-Fi clients when you apply the configuration. For initial setup, connect your computer to a LAN port with an Ethernet cable so you can finish the configuration without losing the Wi-Fi connection.
Set up your wireless network in this section:
- Network Name: How does your smartphone see your network? Set any name you like here. In HomeAP dual, you can set the 2GHz (legacy) and 5GHz (modern) networks to the same, or different names (see FAQ). Use any name you like, in any format.
- Frequency: Normally you can leave "Auto", in this way, the router scans the environment, and selects the least occupied frequency channel (it does this once). Use a custom selection if you need to experiment.
- Band: Normally leave this to defaults (2GHz b/g/n and 5GHz A/N/AC).
- Use Access List (ACL): Enable this if you want to restrict who can connect to your AP, based on the user's MAC (hardware) address. To use this option, first allow these clients to connect, and then use the button "Copy to ACL". This copies the selected client to the access list. After you have built an Access list (ACL), you can enable this option to forbid anyone else to attempt connections to your device. Normally you can leave this alone, as the Wireless password already provides the needed restrictions.
- WiFi Password: The most important option here. Sets a secure password that also encrypts your wireless communications, which is needed to connect to the wireless network.
- WPS accept: Use this button to grant access to a specific device that supports the WPS connection mode. Useful for printers and other peripherals where typing a password is difficult. First start WPS mode in your client device, then select the WPS button once here to allow that device. The button works for a few seconds and operates on a per-client basis.
- Guest network: Useful for house guests who don't need to know your main WiFi password. Set a separate password for them in this option. Guest users cannot access other devices in your LAN and other guest devices. This mode enables Bridge filters to prevent this.
- Wireless clients: This table shows the connected client devices (their MAC address, if they are in your Access List, their last used IP address, how long they are connected, their signal level in dBm and in a bar graph).
Internet
Use the callouts to distinguish the internet connection from your local network:
- Address Acquisition - Select Automatic if the provider supplies an address through DHCP, Static if it supplies fixed address details, or PPPoE if it supplies a PPPoE username and password. Enter the details your provider gives you; do not copy the addresses from the screenshot.
- Firewall Router - Enable this for a router that connects your home network to the internet.
- Local Network > IP Address - This is the router's address on your LAN, separate from the address in the Internet section.
- DHCP Server / NAT - For a typical home router, enable the DHCP server to give LAN clients their addresses and NAT to let them share the internet connection.
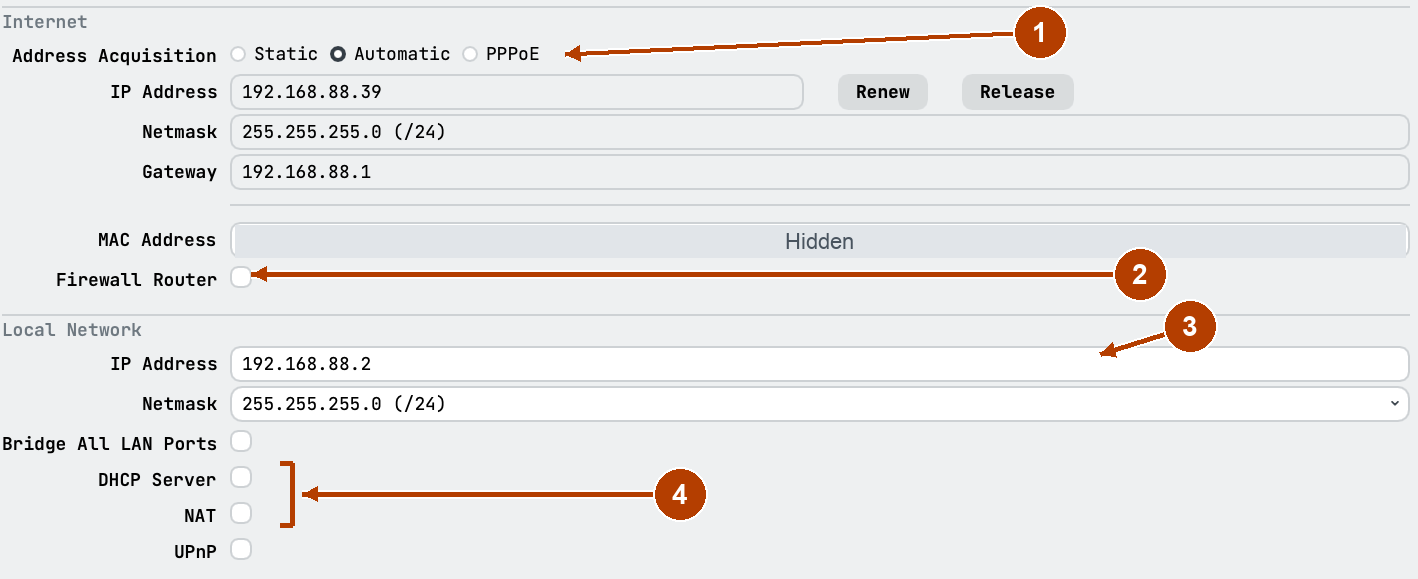
The screenshot has Automatic selected, so the internet IP address, netmask, and gateway are supplied by the upstream DHCP server. The unchecked options belong to this existing configuration, not a suggested setup for a home router.
- Port: Select which port is connected to the ISP (internet) modem. Usually Eth1.
- Address Acquisition: Select how the ISP is giving you the IP address. Ask your service provider about this and the other options (IP address, Netmask, Gateway).
- MAC address: Normally should not be changed, unless your ISP has locked you to a specific MAC address, and you have changed the router to a new one.
- Firewall router: This enables a secure firewall for your router and your network. Always make sure this box is selected, so that no access is possible to your devices from the internet port.
- MAC server / MAC Winbox: Allows connection with the Winbox utility from the LAN port side in MAC address mode. Useful for debugging and recovery, when IP mode is not available. Advanced use only.
- Discovery: Allows the device to be identified by model name from other RouterOS devices.
Local Network
- IP address: Mostly can stay at the default 192.168.88.1 unless your router is behind another router. To avoid an IP conflict, change to 192.168.89.1 or similar.
- Netmask: In most situations you can leave 255.255.255.0.
- Bridge all LAN ports: Allows your devices to communicate with each other, even if, say, your TV is connected by using an Ethernet LAN cable, but your PC is connected by using WiFi.
- DHCP server: Normally, you want automatic IP address configuration in your home network, so leave the DHCP settings ON and on their defaults.
- NAT: Turn this off ONLY if your ISP has provided a public IP address for both the router and the local network. If not, leave NAT on.
- UPnP: This option enables automatic port forwarding ("opening ports to the local network" as some call it) for supported programs and devices, like your NAS disks and peer-to-peer utilities. Use with care, as this option can sometimes expose internal devices to the internet without your knowledge. Enable only if specifically needed.
VPN
If you want to access your local network (and your router) from the internet, use a secure VPN tunnel. This option gives you a domain name to connect to, and enables PPTP and L2TP/IPsec (the second one is recommended). The username is 'vpn' and you can specify your own password. All you need to do is enable it here, and then provide the address, username and password on your laptop or phone, and when connected to the VPN, you have a securely encrypted connection to your home network. It is also useful when travelling - you can browse the internet through a secure line, as if connecting from your home. This also helps to avoid geographical restrictions that are set up in some countries.
System
- Check For Updates: Open the RouterOS update dialog to check for a newer release and choose when to install it.
- Password...: Set the router's administrator password. This protects access to the router configuration and is separate from WiFi Password.
After you review the wireless, internet, and LAN settings, select OK to save them and close Quick Set, or Apply to save them and keep the window open. A change to the LAN IP address can disconnect an IP-based WinBox session; reconnect to the router at its new address. After a Wi-Fi change, reconnect wireless devices with the new network name and password.
Leave Reset Configuration alone during ordinary setup: it resets the router configuration rather than saving your edits.
FAQ
Q: How is Quickset different from the Webfig tab, where a bunch of new menus appear?
A: QuickSet is for new users who only need their device up and running in no time. It provides the most commonly used options in one place. If you need more options, do not use any QuickSet settings at all; select "Webfig" to open the advanced configuration interface. The full functionality is unlocked.
Q: Can I use Quickset and Webfig together?
A: If you are going to use Quickset, use only Quickset and vice versa. While settings that are not conflicting can be configured this way, it is not recommended to mix up these menus. What is the difference between Router and Bridge mode? Bridge mode adds all interfaces to the bridge, allowing forwarding of Layer2 packets (acts as a hub/switch). In Router mode, packets are forwarded in Layer3 by using IP addresses and IP routes (acts as a router).
Q: In HomeAP mode, should the 2GHz and 5GHz network names be the same, or different?
A: If you prefer that all your client devices, like TVs, phones, game consoles, automatically select the best preferred network, set the names identical. If you want to force a client device to use the faster 5GHz 802.11ac connection, set the names unique.
Q: Can I create an AP without security settings - no password or connect to such AP while using QuickSet?
A: QuickSet uses WPA2 pre-shared key by default. This means that the minimal password length is 8 symbols and the device can only connect to a WPA2 secured AP or serve as an AP itself. For configurations with no security settings, you need to configure them manually by using WinBox, Webfig, or console.