Console
CLI reference:/console/system/console
Overview
The console is used for accessing the MikroTik Router's configuration and management features using text terminals, either remotely using a serial port, telnet, SSH, or console screen within WinBox, or directly using a monitor and keyboard. The console is also used for writing scripts. This manual describes the general console operation principles. Consult the Scripting Manual on some advanced console commands and on how to write scripts.
Login Options
Console login options enable or disable various console features like color, terminal detection, and many others.
Additional login parameters can be appended to the login name after the '+' sign.
    login_name ::= user_name [ '+' parameters ]
    parameters ::= parameter [ parameters ]
    parameter ::= [ number ] 'a'..'z'
    number ::= '0'..'9' [ number ]
If the parameter is not present, then the default value is used. If the number is not present, then the implicit value of the parameter is used.
Example: admin+ct80w - disables console colors, disables auto detection, and then sets terminal width to 80.
| Param | Default | Implicit | Description |
|---|---|---|---|
| "w" | auto | auto | Set terminal width |
| "h" | auto | auto | Set terminal height |
| "c" | on | off | Disable/enable console colors |
| "t" | off | on | Disable auto-detection of terminal capabilities |
| "e" | on | off | Enables "dumb" terminal mode |
Banner and Messages
The login process displays the MikroTik banner and short help after validating the user name and password.
  MMM      MMM       KKK                          TTTTTTTTTTT      KKK
  MMMM    MMMM       KKK                          TTTTTTTTTTT      KKK
  MMM MMMM MMM  III  KKK  KKK  RRRRRR     OOOOOO      TTT     III  KKK  KKK
  MMM  MM  MMM  III  KKKKK     RRR  RRR  OOO  OOO     TTT     III  KKKKK
  MMM      MMM  III  KKK KKK   RRRRRR    OOO  OOO     TTT     III  KKK KKK
  MMM      MMM  III  KKK  KKK  RRR  RRR   OOOOOO      TTT     III  KKK  KKK

  MikroTik RouterOS 7.23.2 (c) 1999-2026       https://www.mikrotik.com/


Press F1 for help
After the banner, other important information can be printed, like /system/note set by another admin, the last few critical log messages, demo version upgrade reminder, and default configuration description.
For example, the demo license prompt and the last critical messages are printed:
UPGRADE NOW FOR FULL SUPPORT
----------------------------
FULL SUPPORT benefits:
- receive technical support
- one year feature support
- one year online upgrades
(avoid re-installation and re-configuring your router)
To , register your license "software ID"
on our account server www.mikrotik.com
Current installation "software ID": ABCD-456
Please press "Enter" to continue!
2007-12-10 10:40:06 system,error,critical login failure for root from 10.0.0.1 via telnet
2007-12-10 10:40:07 system,error,critical login failure for root from 10.0.0.1 via telnet
2007-12-10 10:40:09 system,error,critical login failure for test from 10.0.0.1 via telnet
Command Prompt
At the end of the successful login sequence, the login process prints a banner that shows the command prompt, and hands over control to the user.
The default command prompt consists of user name, system identity, and current command path.
For example, change the current path from the root to the interface, then go back to the root:
[admin@MikroTik] > [enter]
[admin@MikroTik] /interface> / [enter]
[admin@MikroTik] >
Use ↑ to recall previous commands from command history (commands that added sensitive data, like passwords, will not be available in the history). If a multiline command is recalled, press F8 to expand it. Use Tab to autocomplete commands and see available options — pressing Tab twice shows all possible completions. Press Enter to execute the command, Control+C to interrupt the currently running command and return to the prompt, and F1 to display built-in help.
The easiest way to log out of the console is to press Control+D at the command prompt while the command line is empty (you can cancel the current command and get an empty line with Control-C, so Control-C followed by Control+D will log you out in most cases).
It is possible to write commands that consist of multiple lines. When the entered line is not a complete command and more input is expected, the console shows a continuation prompt that lists all open parentheses, braces, brackets, and quotes, and also a trailing backslash if the previous line ended with backslash-white-space.
    [admin@MikroTik] > {
    {... :put (\
    {(\... 1+2)}
    3
When you are editing such multiple line entries, the prompt shows the number of current lines and total line count instead of the usual username and system name.
line 2 of 3> :put (\
Sometimes commands ask for additional input from the user. For example, the command /password asks for old and new passwords. In such cases, the prompt shows the name of the requested value, followed by a colon and a space.
    [admin@MikroTik] > /password
    old password: ******
    new password: **********
    retype new password: **********
Hierarchy
The console allows the configuration of the router's settings using text commands. Since there are a lot of available commands, they are split into groups organized into hierarchical menu levels. The name of a menu level reflects the configuration information accessible in the relevant section.
For example, you can issue the /ip/route/print command:
[admin@MikroTik] > /ip/route/print
Flags: X - disabled, A - active, D - dynamic,
C - connect, S - static, r - rip, b - bgp, o - ospf, m - mme,
B - blackhole, U - unreachable, P - prohibit
 # DST-ADDRESS PREF-SRC G GATEWAY DIS INTE...
0 A S 0.0.0.0/0 r 10.0.3.1 1 bridge1
1 ADC 1.0.1.0/24 1.0.1.1 0 bridge1
2 ADC 1.0.2.0/24 1.0.2.1 0 ether3
3 ADC 10.0.3.0/24 10.0.3.144 0 bridge1
4 ADC 10.10.10.0/24 10.10.10.1 0 wlan1
[admin@MikroTik] >
Instead of typing /ip/route path before each command, the path can be typed only once to move into this particular branch of the menu hierarchy. Thus, the example above could also be executed like this:
[admin@MikroTik] > /ip/route
[admin@MikroTik] /ip/route> print
Flags: X - disabled, A - active, D - dynamic,
C - connect, S - static, r - rip, b - bgp, o - ospf, m - mme,
 B - blackhole, U - unreachable, P - prohibit #
DST-ADDRESS PREF-SRC G GATEWAY DIS INTE...
0 A S 0.0.0.0/0 r 10.0.3.1 1 bridge1
1 ADC 1.0.1.0/24 1.0.1.1 0 bridge1
2 ADC 1.0.2.0/24 1.0.2.1 0 ether3
3 ADC 10.0.3.0/24 10.0.3.144 0 bridge1
4 ADC 10.10.10.0/24 10.10.10.1 0 wlan1
[admin@MikroTik] /ip/route>
Each word in the path can be separated by a space or by /.
Notice that the prompt changes to reflect where you are located in the menu hierarchy at the moment. To move to the top level again, type /
[admin@MikroTik] > /ip/route
[admin@MikroTik] /ip/route> /
[admin@MikroTik] >
To move up one command level, type ..
[admin@MikroTik] /ip/route> ..
[admin@MikroTik] /ip>
You can also use / and .. to execute commands from other menu levels without changing the current level:
[admin@MikroTik] /ip/route> /ping 10.0.0.1
10.0.0.1 ping timeout
2 packets transmitted, 0 packets received, 100% packet loss
[admin@MikroTik] /ip/firewall/nat> ../service-port/print
Flags: X - disabled, I - invalid
# NAME PORTS
0 ftp 21
1 tftp 69
2 irc 6667
3 h323
4 sip
5 pptp
[admin@MikroTik] /ip/firewall/nat>
Item Names and Numbers
Many of the command levels operate with arrays of items: interfaces, routes, users, etc. Such arrays are displayed in similar-looking lists. All items in the list have an item number followed by flags and parameter values.
To change the properties of an item, you have to use the set command and specify the name or number of the item.
Item Names
Some lists have items with specific names assigned to each of them. Examples are /interface or /user levels. There you can use item names instead of item numbers.
You do not have to use the print command before accessing items by their names, which, as opposed to numbers, are not assigned by the console internally, but are properties of the items. Thus, they would not change on their own. However, there are all kinds of obscure situations possible when several users are changing the router's configuration at the same time. Generally, item names are more "stable" than the numbers, and also more informative, so you should prefer them to numbers when writing console scripts.
Item Numbers
Item numbers are assigned by the print command and are not constant - two successive print commands may order items differently. But the results of the last print commands are memorized and, thus, once assigned, item numbers can be used even after add, remove, and move operations. Item numbers are assigned on a per-session basis; they will remain the same until you quit the console or until the next print command is executed. Also, numbers are assigned separately for every item list, so for example, the /ip/address/print will not change the numbering of the /interface list.
It is possible to use item numbers without running the print command. Numbers will be assigned just as if the print command was executed.
You can specify multiple items as targets for some commands. Almost everywhere, where you can write the number of an item, you can also write a list of numbers.
[admin@MikroTik] > /interface/print
Flags: X - disabled, D - dynamic, R - running
# NAME TYPE MTU
0 R ether1 ether 1500
1 R ether2 ether 1500
2 R ether3 ether 1500
3 R ether4 ether 1500
[admin@MikroTik] > /interface/set 0,1,2 mtu=1460
[admin@MikroTik] > /interface/print
 Flags: X - disabled, D - dynamic, R - running
# NAME TYPE MTU
0 R ether1 ether 1460
1 R ether2 ether 1460
2 R ether3 ether 1460
3 R ether4 ether 1500
[admin@MikroTik] >
Do not use item numbers in scripts. It is not a reliable way to edit items in the scheduler, scripts, etc. Instead, use the find command. More info in the scripting documentation. Also look at scripting examples.
General Commands
Some commands are common to nearly all menu levels, namely: add, edit, find, move, print, remove, set, reset, export, get, enable, disable, and comment. These commands have similar behavior throughout different menu levels. For detailed descriptions and parameters, see the Scripting Commands reference.
You can combine commands. Here are two variants of the same command that will place a new firewall filter entry, by looking up the comment:
/ip/firewall/filter/add chain=forward place-before=[find where comment=CommentX]
/ip/firewall/filter/add chain=forward place-before="CommentX"
Edit Modes
The console line editor works either in multiline mode or in single-line mode.
In multiline mode, the line editor displays the complete input line, even if it is longer than a single terminal line. It also uses a full-screen editor for editing large text values, such as scripts.
In single-line mode, only one terminal line is used for line editing, and long lines are shown truncated around the cursor. A full-screen editor is not used in this mode.
The choice of modes depends on detected terminal capabilities.
Input Modes
It is possible to switch between several input modes:
- Normal mode - indicated by a normal command prompt.
- Safe mode - indicated by the word SAFE after the command prompt.
- Hot-lock mode - indicated by an additional yellow >. Autocompletes commands.
Safe Mode
It is sometimes possible to change the router configuration in a way that will make the router inaccessible (except from the local console). Usually, this is done by accident, but there is no way to undo the last change when the connection to the router is already cut. Safe mode can be used to minimize such risk.
The "Safe Mode" button in the WinBox GUI allows you to enter Safe Mode, while in the CLI, you can access it by either using the keyboard shortcut F4 or pressing Control+X. To exit without saving the changes made in CLI, hit Control+D.
[admin@MikroTik] /ip/route>[CTRL]+[X]
[Safe Mode taken]
[admin@MikroTik] /ip/route<SAFE>
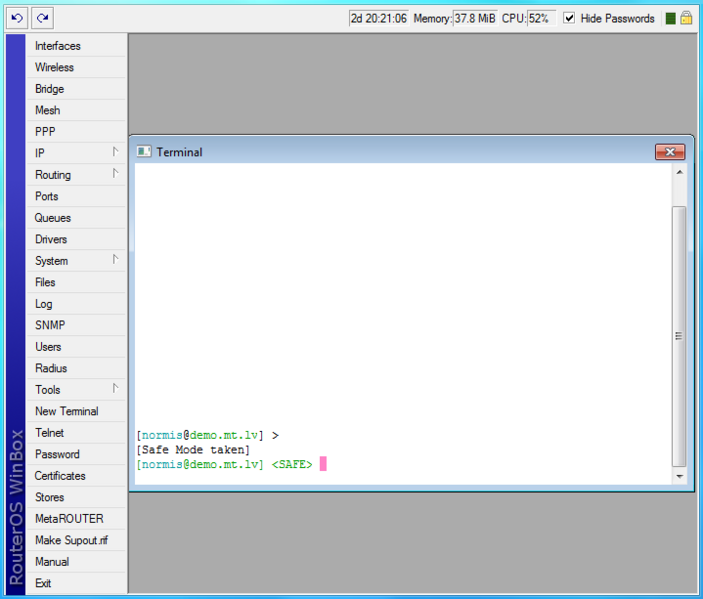
Message Safe Mode taken is displayed and the prompt changes to reflect that session is now in safe mode. All configuration changes that are made (also from other login sessions), while the router is in safe mode, are automatically undone if the safe mode session terminates abnormally. You can see all such changes that will be automatically undone, tagged with an F flag in the system history:
[admin@MikroTik] /ip/route>
[Safe Mode taken]
[admin@MikroTik] /ip/route<SAFE>/add
[admin@MikroTik] /ip/route<SAFE> /system/history/print
Flags: U, F - FLOATING-UNDO
Columns: ACTION, BY, POLICY
ACTION BY POLICY
F 0.0.0.0/0 added admin write
Now, if the telnet connection (or WinBox terminal) is cut, then after a while (TCP timeout is 9 minutes) all changes that were made while in safe mode will be undone. Exiting the session by Control+D also undoes all safe mode changes, while /quit does not.
If another user tries to enter safe mode, they are given the following message:
[admin@MikroTik] >
Hijacking Safe Mode from someone - unroll/release/don't take it [u/r/d]:
- [u] - undoes all safe mode changes, and puts the current session in safe mode.
- [r] - keeps all current safe mode changes, and puts the current session in safe mode. The previous owner of safe mode is notified about this:
[admin@MikroTik] /ip/firewall/rule/input
[Safe mode released by another ]
- [d] - leaves everything as-is.
If too many changes are made while in safe mode, and there's no room in history to hold them all (currently history keeps up to the 100 most recent actions), then the session is automatically put out of safe mode, and no changes are automatically undone. Thus, it is best to change the configuration in small steps, while in safe mode. Pressing Control+X twice is an easy way to empty the safe mode action list.
As "Safe Mode" operates within the user's session and stores configuration changes, it will be ignored for commands requiring a reboot, such as resetting configuration or restoring from a backup.
HotLock Mode
When HotLock mode is enabled, commands will be auto-completed.
To enter/exit HotLock mode press F7.
[admin@MikroTik] /ip/address> [F7]
[admin@MikroTik] /ip/address>>
Double >> is an indication that HotLock mode is enabled. For example, if you type "/in et", it will be auto-completed to:
[admin@MikroTik] /ip/address>> /interface/ethernet/
Lock Mode
The :lock command locks the screen.
[admin@MikroTik] > :lock
...
  MMM      MMM       KKK                          TTTTTTTTTTT      KKK
  MMMM    MMMM       KKK                          TTTTTTTTTTT      KKK
  MMM MMMM MMM  III  KKK  KKK  RRRRRR     OOOOOO      TTT     III  KKK  KKK
  MMM  MM  MMM  III  KKKKK     RRR  RRR  OOO  OOO     TTT     III  KKKKK
  MMM      MMM  III  KKK KKK   RRRRRR    OOO  OOO     TTT     III  KKK KKK
  MMM      MMM  III  KKK  KKK  RRR  RRR   OOOOOO      TTT     III  KKK  KKK

  MikroTik RouterOS 7.16rc1 (c) 1999-2024       https://www.mikrotik.com/


Session is locked       (Ctrl-D to Quit)

 password for admin:
Quick Typing
Two features in the console help entering commands much quicker and easier - the Tab key completions, and abbreviations of command names. Completions work similarly to the bash shell in UNIX. If you press the Tab key after a part of a word, the console tries to find the command within the current context that begins with this word. If there is only one match, it is automatically appended, followed by a space:
/inte Tab becomes /interface/
If there is more than one match, but they all have a common beginning, which is longer than that of what you have typed, then the word is completed to this common part, and no space is appended:
/interface/set e Tab becomes /interface/set ether
If you've typed just the common part, pressing Tab once has no effect. However, pressing it for the second time shows all possible completions in compact form:
[admin@MikroTik] > /interface/set e[Tab]_
[admin@MikroTik] > /interface/set ether[Tab]_
[admin@MikroTik] > /interface/set ether[Tab]_
ether1 ether5
[admin@MikroTik] > set ether_
The Tab key can be used in almost any context where the console might have a clue about possible values - command names, argument names, arguments that have only several possible values (like names of items in some lists or names of protocols in firewall and NAT rules). You cannot complete numbers, IP addresses, and similar values.
Another way to press fewer keys while typing is to abbreviate command and argument names. You can type only the beginning of the command name, and, if it is not ambiguous, the console will accept it as a full name. So typing:
[admin@MikroTik] > pin 10.1 c 3 si 100
equals:
[admin@MikroTik] > ping 10.0.0.1 count 3 size 100
It is possible to complete not only the beginning, but also any distinctive substring of a name: if there is no exact match, the console starts looking for words that have the string being completed as the first letters of a multiple-word name, or that simply contain letters of this string in the same order. If a single such word is found, it is completed at the cursor position. For example:
[admin@MikroTik] > /interface/x[TAB][TAB]_
dot1x vxlan
[admin@MikroTik] > /interface/mt[TAB]_
[admin@MikroTik] > /interface/monitor-traffic _
Console Search
Console search allows performing keyword search through the list of RouterOS menus and the history. The search prompt is accessible with the Control+R shortcut.
Internal Chat System
RouterOS console has a built-in internal chat system. This allows remotely located admins to talk to each other directly in RouterOS CLI. To start the conversation, prefix the intended message with the # symbol. Anyone who is logged in at the time of sending the message will see it.
[admin@MikroTik] > # ready to break internet?
[admin@MikroTik] >
fake_admin: i was born ready
[admin@MikroTik] >
[fake_admin@MikroTik] >
admin: ready to break internet?
[fake_admin@MikroTik] > # i was born ready
[fake_admin@MikroTik] >
Settings
In the /console/settings menu, it is possible to enable an option for replacing reserved characters with underscores for file names.
| Property | Description |
|---|---|
| sanitize-names (yes | no Default: no) | Replace reserved characters (\ / : * ? |) with underscores |
Built-in Help
The console has built-in help. Press F1 for general console usage help. The general rule is that help shows what you can type in a position where F1 was pressed (similarly to pressing Tab key twice, but in verbose form and with explanations).
List of Keys
| Key | Description |
|---|---|
| F1 | Show context-sensitive help |
| F3 or Control+R | Search command history |
| F4 or Control+X | Toggle safe mode |
| F5 or Control+L | Reset terminal and repaint screen |
| F7 | Toggle hot-lock mode |
| F8 | Print entire multiline input |
| Tab | Perform line completion. When pressed a second time, show possible completions. |
| Control+C | Interrupt current action |
| Control+D | Terminate session (on empty prompt) |
| Control+K | Delete to the end of the line |
| Control+U | Delete to the beginning of the line |
| Control+T | Switch to a background task |
| Control+\ | Split line at cursor. Insert newline at the cursor position. |
| Control+B or ← | Move cursor backward one character |
| Control+F or → | Move cursor forward one character |
| Control+P or ↑ | Go to the previous line. If this is the first line of input, recall previous input from history. |
| Control+N or ↓ | Go to the next line. If this is the last line of input, recall the next input from history. |
| Control+A or Home | Move the cursor to the beginning of the line. If the cursor is already at the beginning, go to the beginning of the first line of the current input. |
| Control+E or End | Move the cursor to the end of the line. If the cursor is already at the end, move it to the end of the last line of the current input. |
| Delete | Remove character at the cursor |
| Control+H or Backspace | Remove character before cursor and move the cursor back one position |
| # | Send a message to the internal chat system |
| / | Move up to base level |
| .. | Move up one level |
| /command | Use command at the base level |
Up, Down and split keys leave the cursor at the end of the line.